Bound Side Angle Pose as a preparation for Astavakrasana

Bound Side Angle

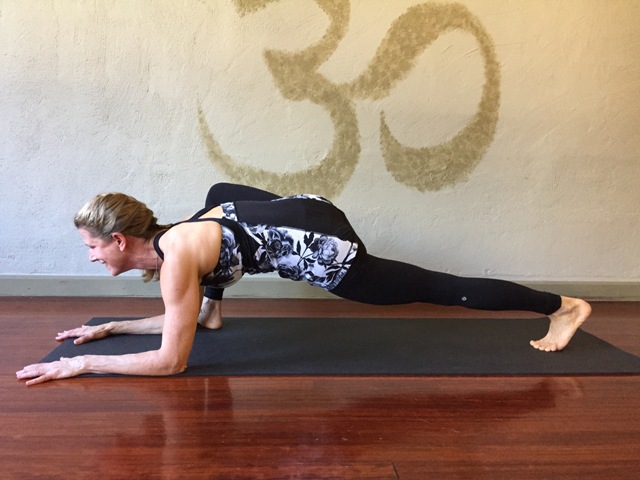
Last week I talked about how Lizard Lunge was a prep for Astavakrasana.  And it is.  I am using this pose as a benchmark pose; meaning that it can tell you where you are and what you have to work on to get to the desired final pose.  In Astavakrasana, you need the flexibility of getting one knee up and over your shoulder.  You can see how close you are to doing that in Lizard Lunge.  Can you get your elbows to the floor?  If you can, then your knee is higher than your shoulder.  If you can’t, don’t worry and don’t try to force it.  Be patient and keep working on your Lizard.

Lizard-Lunge-R-web-large.jpg

Bound Side Angle is also one of those poses where you need your shoulder to be lower than your knee in order to be able to bind.   But that is not the first thing you have to look at.  The primary action is your ability to bend your front leg to 90 degrees. Before we look at Bound Side Angle Pose, let’s back up and look at the pieces that make up Bound Side Angle Pose.  Those pieces are:  Warrior II, Triangle, Side Angle and the hands in prayer behind the back (Pascima Namaskar).

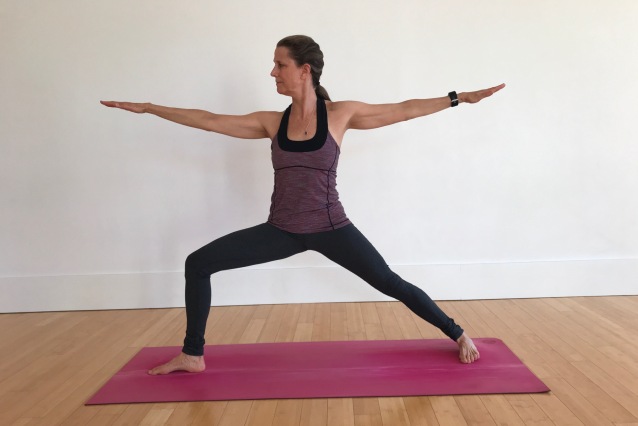
Let’s start in Warrior II.  Can you bend your front knee so that the thigh is parallel to the floor?  Take an honest look at yourself in a mirror.  Is your front thigh parallel to the floor with your shin perpendicular?  If you can’t bend that deep (and keep your knee over your ankle), don’t try to force it.  Try putting a block, or two, under your front foot and see if that helps you.  You may have to play with that for a while, but eventually you can try it without the block.

Virabhadrasana-2-4-x-6.jpg

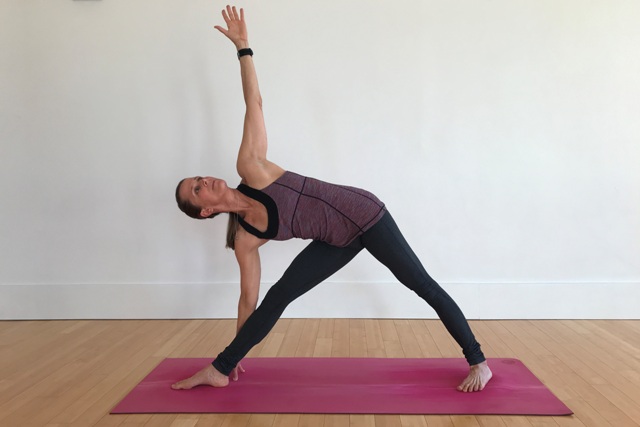
The second standing pose is Triangle.  Eventually we are looking to be able to get the spine horizontal and the bottom hand on the floor.  Again, be patient.  Your bottom hand may need to rest on your leg or a block.  Watch your progress with the help of a mirror.  Look at your spine.  Keep it straight as you stretch towards the floor; don’t let it dome up in the middle.  Also, look to see that your torso is directly above the front leg, not in front of it.

Trikonasana-web-large-640-x-427.jpg

Now it’s time to put Warrior II and Triangle together in Side Angle Pose.  Can you bend your front knee so that the thigh is horizontal and get your lower hand to the floor with the upper edge of your body from your back foot to your top hand in one straight line?  If you can, you are in full Side Angle Pose and you are ready to bind.  If you can’t, keep working on Warrior II and Triangle poses.

Side-ANgle-Hand-to-floor-4-x-6.jpg

There is some separate arm work to do to prepare the shoulders for binding and that is getting your hands behind your back in prayer.  Let's start by looking at your ability to clasp your hands behind your back in Yoga Mudra.

Uttanasana-with-Yoga-Mudra-web-large.jpg

This arm position stretches the front of the shoulders and is the same arm position you need for Bridge Pose and Shoulder Stand.

bridge-full-pose-shoulders-down-4-x-6.jpg

In Yoga Mudra we work the hands behind the back with the arms straight and then we can bend one elbow at a time and work the arms in Cow Face Posture (Gomukhasana).

Gomukhasana-arms-web-large.jpg

If you cannot clasp your hands behind your back in Cow Face Posture, use a belt.

Gomukhasana-with-belt-web-large.jpg

Once you can clasp your hands in Gomukhasana then begin working both hands behind your back in Reverse Prayer. If you can do that, you have all the necessary shoulder flexibility to bind in Bound Side Angle Pose.

pascima-namaskar-web-large.jpg

To come into Bound Side Angle Pose first come into Side Angle Pose but place your bottom hand on the floor inside your front leg.  Raise your top arm straight up in the air, and if you need a belt to bind, then the belt should be in this top hand.  Bend your top arm back behind your waist as you dip your front shoulder below your front thigh.  Slide your bottom forearm under your front thigh and grab hold of your other hand or the belt.  Then bring your front buttock under you as you lean your upper body back against your bent leg.  This brings your body back into Side Angle position.  with your hands now clasped behind your back.

Bound-SIde-Angle-pose-back-4-x-6-web-large.jpg

Getting your hands around your front thigh in Bound Side Angle Pose is a very similar action to getting your leg up over your shoulder for Astavakrasana.   You can always use a belt for Side Angle Pose until the day you can finally clasp and then you know that Astavakrasana is more attainable.  Keep working.  I'll see you in class!
The Science of Yoga:  The Risks and the Rewards – by William Broad

Opening quote:

There is no subject which is so wrapped up in mystery and on which one can write whatever one likes without any risk of being proved wrong.”
-- I.K. Taimini, Indian scholar and chemist on the obscurity of yoga. 

Prologue

Yoga has become so mainstream these days.  It seems like everyone is doing it: from babies in the womb during their mother’s pre-natal yoga classes all the way up through senior citizens living in assisted living facilities and everyone in between.   It has become so popular here in the west that it has even included in the annual Easter Egg Roll at the Whitehouse since 2009.

In his book, William Broad, a lifelong yoga practitioner, sorts out the myth and the hyperbole from the traditions and what we really know about the history and practice of yoga.  People have made many claims about what yoga can do for our health and well-being over the years.  Science supports some of these claims, but many aspects of yoga’s famous healing powers come from story and legend rather than scientific fact.  This is partly due to the fact that a lot of research done on yoga was often a hobby or a sideline. There is not a lot of money for research in something that cannot be turned into an expensive pill or medical device.

As Mr. Broad dove into the scientific research that had been done on yoga, he ran into my teacher Mel Robin.  As a scientist for Bell Labs for 30 years, Mel also turned his keen scientific eye towards yoga.  He has written three books on the science behind the practice of yoga.  Mel is listed in the Who’s Who of yoga at the beginning of this book and Mr. Broad quotes his research throughout the book.

One of the reviews on the book’s jacket warns us: “The Science of Yoga is a wonderful read that any yoga practitioner thirsting for authenticity should study carefully before suiting up”  --David Gordon White, author of Kiss of the Yogini

One important fact that Mr. Broad points out is that yoga has no governing body.  There’s no hierarchy of officials or organizations meant to ensure purity and adherence to agreed upon sets of facts poses, rules and procedures, outcomes and benefits.  There is also no government oversight, no Safety Commission or Administration to ensure that yoga lives up to its promises.  This can be very confusing for the beginner and even for seasoned yogis.  You never really know if what you've read or been taught is something that is truly coming from the history of yoga, or if it is just what someone made up to suit their purposes.  This happens a lot and is not necessarily a bad thing.  Personally, I like studying within the Iyengar lineage.  They have a long history of tradition, practice and they also have a research institute to study the effects of yoga.

All yoga is basically Hatha Yoga which is a practice that centers on postures and breathing meant to strengthen the body and mind.  Separate from the practice of physical postures is the ethical and philosophical side of yoga and the religious aspect of Hinduism.

Yoga differs from most other forms of exercise in that it goes slow rather than fast emphasizing static postures and fluid motions.  Its low-impact nature puts less strain on the body than traditional sports making it appealing for a wide variety of ages.  The greatest emphasis is on regulating the breath and creating an awareness of the body position in space.  Advanced yoga encourages concentration on subtle energy flows.  Overall, compared to sports and other forms of Western exercise, yoga seems safer and the focus is not just on the physical; the practice also draws the attention inward.

The book is organized into the following chapters which follows the development of scientific interest over the decades:
Health
Fitness
Moods
Risk of Injury
Healing
Sex
Inspiration

So, read along with me as Mr. Broad sheds light on the risks and rewards of yoga.

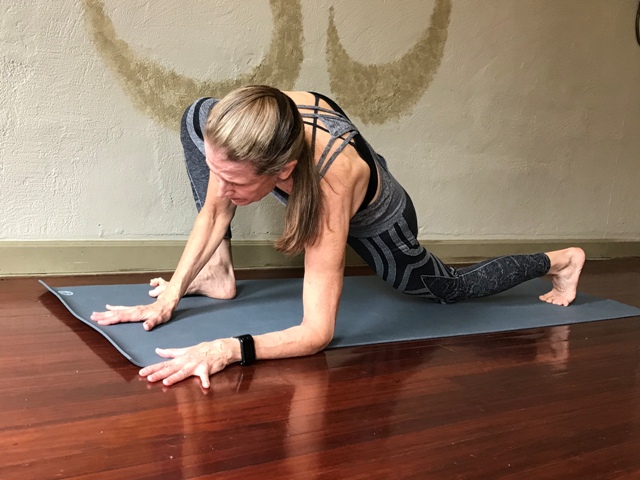
Lizard Lunge as a preparation for Astavakrasana

Continuing with postures in the sequence for Astavakrasana, let’s look at Lizard Lunge.

In order to be able to do Astavakrasana you have to be able to get your knee onto the back of your arm when you are in a seated position.  In Lizard Lunge, you can see whether or not your shoulder is below your knee.

Lizard-Lunge-R-web-large.jpg

In this pose, the back leg is straight and the front leg bent with the shin perpendicular to the floor.  If you can easily get both forearms evenly on the ground, then chances are that you have the flexibility to do Astavakrasana.

In the beginning you start with your hands on the floor,

Lizard-Lunge-hands-to-floor-web-large.jpg

eventually lowering your elbows to blocks and finally to the floor.  It is harder to lower the inside elbow to the floor.

Lizard-uneven-elbows-web-large.jpg

It is important to lower them both evenly.  You may have to back up until you are able to achieve this.  This may take a while.  If you are interested in doing Astavakrasana, you might want to practice Lizard Lunge every day until you can easily get your elbows to the floor.  This practice could unlock other poses for you as well such as Warrior I, Pigeon and Split.

In some of these photos, you can see that my back knee is on the floor.  In the beginning, you might need to bend your back leg.  Eventually, you may be able to keep the knee lifted and the back leg straight.

Lizard-Lunge-R-web-large.jpg

It is also important to maintain the length on the front body.  Your torso will round if you are reaching too hard to get the elbows to the floor.  Keep pressing down into the hands or forearms and lengthen your collar bones forward.  Draw your shoulder blades towards each other and down your back towards your waist rather than away from each other and down towards the floor.   As you would in Caturanga, don’t drop your head.  Keep your neck in line with the spine and the back of your head level with your upper back.

You may be tempted to let the front ankle roll out.  Some call this “Broken Pigeon”.

Broken-pigeon-web-large-2.jpg

This often happens in the desire to get the elbows to the floor.  This could be a good variation when you are working towards poses with the legs externally rotated such as Pigeon or Seated Cobbler’s Pose.  But for now we are working on our ability to fold forward with one knee bent into our chest as in Marichyasana I.

Marichyasana-I-web-large.jpg

For this pose, I prefer keeping the weight pressing down onto the inner edge of the foot and keeping the ankle straight.  If you need some play, it is better to let the knee and foot rotate out a few degrees, but I would only do this if I could not get my hands to the floor, not to get my elbows to the floor.  Be patient.  Don’t force the stretch.

Lizard-with-the-knee-and-toes-turned-out-web-large.jpg

The next step would be to come into Eka Hasta Bhujasana, or One Arm Leg Pressure Pose.

Eka Hasta Bhujasana, which means One Arm Leg Press Pose. You can see that I have to hook one of my legs over my shoulder.

And from there into Astavakrasana

Astavakrasana-SC-web-large.jpg

Continuing with postures in the sequence for Astavakrasana, let’s look at Lizard Lunge.In order to be able to do Astavakrasana you have to be able to get your knee onto the back of your arm when you are in a seated position.  In Lizard Lunge, you can see whether or not your shoulder is below your knee. In this pose, the back leg is straight and the front leg bent with the shin perpendicular to the floor.  If you can easily get both forearms evenly on the ground, then chances are that you have the flexibility to do Astavakrasana.In the beginning you start with your hands on the floor, eventually lowering your elbows to blocks and finally to the floor.  It is harder to lower the inside elbow to the floor.  It is important to lower them both evenly.  You may have to back up until you are able to achieve this.  This may take a while.  If you are interested in doing Astavakrasana, you might want to practice Lizard Lunge every day until you can easily get your elbows to the floor.  This practice could unlock other poses for you as well such as Warrior I, Pigeon and Split. In some of these photos, you can see that my back knee is on the floor.  In the beginning, you might need to bend your back leg.  Eventually, you may be able to keep the knee lifted and the back leg straight. It is also important to maintain the length on the front body.  Your torso will round if you are reaching too hard to get the elbows to the floor.  Keep pressing down into the hands or forearms and lengthen your collar bones forward.  Draw your shoulder blades towards each other and down your back towards your waist rather than away from each other and down towards the floor.   As you would in Caturanga, don’t drop your head.  Keep your neck in line with the spine and the back of your head level with your upper back.You may be tempted to let the front ankle roll out.  Some call this “Broken Pigeon”.This often happens in the desire to get the elbows to the floor.  This could be a good variation when you are working towards poses with the legs externally rotated such as Pigeon or Seated Cobbler’s Pose.  But for now we are working on our ability to fold forward with one knee bent into our chest as in Marichyasana I.For this pose, I prefer keeping the weight pressing down onto the inner edge of the foot and keeping the ankle straight.  If you need some play, it is better to let the knee and foot rotate out a few degrees, but I would only do this if I could not get my hands to the floor, not to get my elbows to the floor.  Be patient.  Don’t force the stretch.The next step would be to come into Eka Hasta Bhujasana, or One Arm Leg Pressure Pose. And from there into Astavakrasana

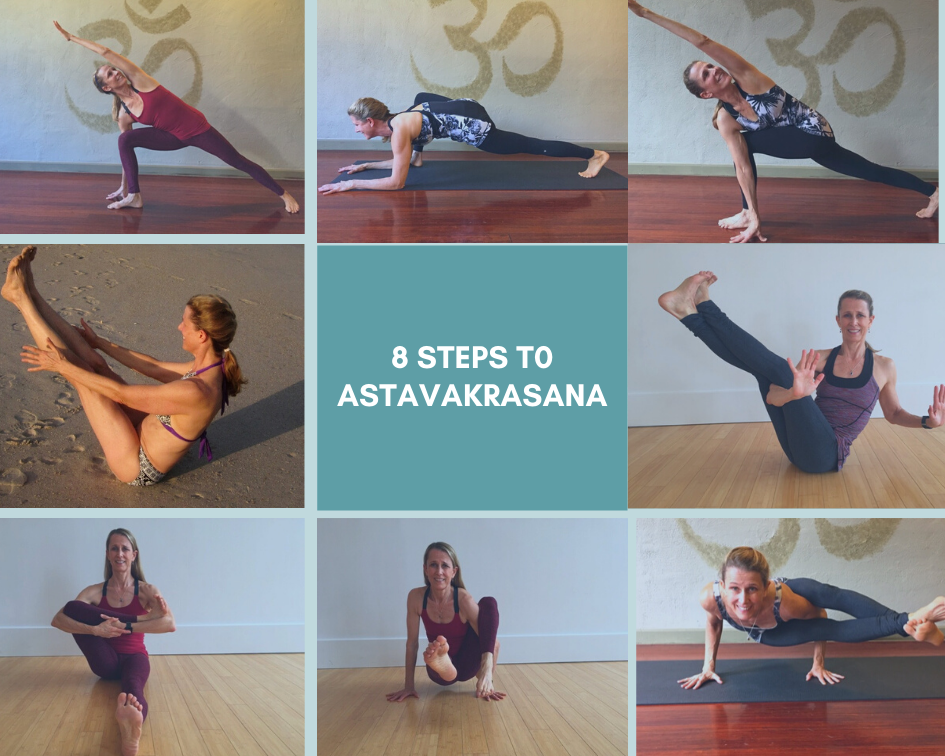
A Sequence to Prepare for Astavakrasana

Preparing for Astavakrasana

Here is a sequence you can work on to prepare for Astavakrasana:Start by doing a few of your favorite Sun Salutes to warm up.  Then try these poses in the following order:

  1. Side Angle Pose. Work to get your bottom hand to the floor.

  2. Lizard Lunge. Work to get your forearms to the floor with your shoulders lower than your knee. Notice the back of my head is not lower than my upper back!

  3. Revolved Side Angle Pose. Work on getting your armpit outside of the opposite knee with your hand on the floor. This may take some time to achieve.

  4. Boat Pose to build core strength for the arm balance.

  5. "Revolved Boat" or Seated Astavakrasana. This gives you something to work on if you cannot do the arm balance. Understanding how your arm fits through your crossed legs and how you straighten your legs against your arm will help for the final pose.

  6. Seated Baby Cradle to loosen the hip.

  7. One Arm Leg Pressure pose. Work to get your knee up as high towards your shoulder as you can. With your knee clamped down against your arm, you press into your hands, draw your navel to your spine and lift yourself off of the floor. Once you are lifted, you cross your straight leg ankle over your bent leg ankle to squeeze your legs onto your arm. Then bend your elbows and tip forward like you are doing Caturanga and while pressing your top leg onto the back of your tricep as you squeeze your legs together and Voila, You are in the final posture! Or not. This may take some time.

  8. Astavakrasana

8-Steps-t0-Astavakrasana.png

Be patient with yourself as you work on these poses.  Understand the stage of each pose that you are in and work on your practice over time.  Progress can be imperceptible from one day to the next, but over time, the results can be pretty impressive.  Don't give up!

Prep for Astavakrasana

Preparing for Astavakrasana with Side Angle Pose

Why you should never do Side Angle Pose with your elbow on your knee.

I am not a fan of doing Side Angle Pose with your elbow on your knee. I prefer putting your hand on the floor or on a block. There are always exceptions and I understand that for some people that may be the best variation.

See how the lower shoulder is collapsed as I rest my weight into that elbow instead of lifting up off it?

See how the lower shoulder is collapsed as I rest my weight into that elbow instead of lifting up off it?

However, the primary reason I don’t recommend the bent elbow version of this pose is because when students put their elbow on their knee in Side Angle, there is a tendency to collapse into that bottom shoulder.

They can be made aware of that and they can learn to press their elbow into their knee and open the chest and collar bone on that lower side, but that action is often not taught. It is much more natural to press down into the bottom hand when it is on the floor or on a block. But still, that action of opening the bottom chest needs to be demonstrated and taught.

SIde-angle-elbow-to-knee-lower-shoulder-not-collapsing-4-x-6.jpg

If you are doing a gentle yoga class and you are just moving through some basic poses, then there might not be a reason to go any deeper into Side Angle Pose than elbow to knee. But if you are doing a more progressive form of yoga where poses build on each other, then it is important to see and use Side Angle Pose as a gateway to more complex asanas.

Let’s take Astavakrasana, for example. In order to be able to approach this arm balance, you will need to develop the flexibility to get your shoulder under your bent knee.  The entry into Astavakrasana comes from a pose called Eka Hasta Bhujasana which looks like this:

Eka Hasta Bhujasana, which means One Arm Leg Press Pose. You can see that I have to hook one of my legs over my shoulder.

Eka Hasta Bhujasana, which means One Arm Leg Press Pose. You can see that I have to hook one of my legs over my shoulder.

This work begins in Side Angle pose where we work to get the bottom hand to the floor outside of the bent knee.

Notice the relationship of the knee and the shoulder. This is considered the full pose with the bottom hand on the floor.

Notice the relationship of the knee and the shoulder. This is considered the full pose with the bottom hand on the floor.

When you take your hand to the floor, make sure that you do not allow your front thigh to drop below horizontal. Keep from doing this by pressing down on the outer edge of the back foot and lifting the inner back thigh away from the floor.

When you take your hand to the floor, make sure that you do not allow your front thigh to drop below horizontal. Keep from doing this by pressing down on the outer edge of the back foot and lifting the inner back thigh away from the floor.

In the beginning, your hand may be on the tall side of a block, which is about the same height you would be in if you had your elbow on your knee.

Compare the height of the shoulder to the knee in this version of the pose with the picture of me with my elbow on my knee below. They appear to be practically at the same height. If the elbow rests on the knee, there is too big of a change to go fr…

Compare the height of the shoulder to the knee in this version of the pose with the picture of me with my elbow on my knee below. They appear to be practically at the same height. If the elbow rests on the knee, there is too big of a change to go from there to hand on the floor. But with your hand on the tall block, it is a gradual process of stretching to get the hand to the middle level of the block, to the lower level of the block and to finally getting the hand to the floor.

SIde-angle-elbow-to-knee-lower-shoulder-not-collapsing-4-x-6.jpg

Performing this pose by placing the elbow on the knee prevents you from exploring your capacity to go deeper over time. This is a modification of Side Angle Pose. It is not the full pose.

But over time, you lower the block to its medium height and then to its lowest height until you can finally you put the hand on the floor.

The shoulder is getting lower as the flexibility in the hip increases.

The shoulder is getting lower as the flexibility in the hip increases.

If you look at the relationship of the shoulder and the knee full Side Angle Pose, you can see that they get very close together when you can get your hand to the floor.

The shoulder is getting even close to the knee.

The shoulder is getting even close to the knee.

No matter what stage you find yourself in Side Angle Pose remember to maintain the geometry of a straight line form back foot to top hand, front thigh parallel to the floor and front shin perpendicular to the floor.

No matter what stage you find yourself in Side Angle Pose remember to maintain the geometry of a straight line form back foot to top hand, front thigh parallel to the floor and front shin perpendicular to the floor.

If you are looking to improve your flexibility and range of motion then you can see why you would want to work towards the full version of Side Angle Pose. It is this flexibility that is necessary to do poses like Astavakrasana.

Astavakrasana, or Eight Crooked Places Pose.

Astavakrasana, or Eight Crooked Places Pose.

Other postures that build on the flexibility of Side Angle Pose include: binding in Side Angle Pose, Bird of Paradise, Lizard Lunge, Revolved Side Angle Pose, Crow, Tortoise, Seated Wide Leg Forward Fold, Revolved Seated Tree and probably others that aren’t coming to mind right now.

Coming Down from Sirsasana II into Wide Legged Forward Fold.

Coming Down from Sirsasana II into Wide Legged Forward Fold.

First make sure you’ve warmed up by doing a few Sun Salutes.  Then do these standing poses: Triangle, Side Angle and Pyramid.  Then come into Wide Legged ForwardFold and lower your head to the floor.

Wide Legged Forward Fold to Tripod Headstand (Prasarita Padottanasana to Sirsasana II)

The transition from one pose to another requires the ability to do the two postures individually.  It is also important to understand how the actions of one pose are developed and then get carried on to the next.  There is a progression in learning yoga poses. 

Wide Legged Forward Fold is typically learned beforeinversions because it gets the head lower than the heart preparing the body forinverting.  The placement of the head andhands in Prasarita Padottanasana sets the foundation for Headstand II.  A couple of important points in this standingpose are the straightness of the legs due to the engagement of the quadricepsand the ability to hinge at the hips and elongate the trunk to get the top ofthe head towards the floor. 

The Straightness of the Legs.

This is often a point of confusion for students who havebeen taught to soften their knees in standing poses.  This may be a good cue for gentle yogaclasses where the aim is to breathe and move and where the poses are notbuilding upon each other but are done for their own sake.  But, if you are interested in a progressivepractice that teaches you to do more complex poses, then the basics need to belearned.  In straight leg poses the legsare meant to be straight, which is not locked out and hyper-extended – that isa different problem!  In order tostraighten the legs, the quadriceps muscles need to be engaged which in turndraws the knee caps up into the thigh. You can tell if your quads are engaged if, when you grab your knee capwith your fingers, you cannot wiggle it from side to side.

If you look at my legs in Prasarita Padottanasana,

Wide-Legged-Forward-Fold-4-x-6.jpg

Wide-Legged Forward Fold

in the Wide Legged transition between the Forward Fold and Headstand,

Sirsasana-II-wide-legs-web-large-4-x-6.jpg

and then in Sirsasana II itself,

Sirsasana-II.jpg

there is never a point where my legs are bent, or my knees are “soft”.  This engagement of the legs does two things: it allows me to bend and hinge only at the hip joint and not at the knees and low back, and it keeps my awareness focused on balancing my body parts by knowing where they are and what they are doing in space.  And it allows me to balance!

Try this:  Find abroomstick or a yardstick, dowel or even a baseball bat and place it on yourpalm or the finger tip of one hand and, without gripping it with your fingers,see if you can balance it.  Chances arethat you will be able to, at least for a little while.  Now, imagine that the thing you are balancinghad a joint in the middle that was soft and wiggly.  Would you still be able to balance thestick?  The answer is no, because the toppart would fall in the direction of the bend and you would have no control overit.  Engaging your muscles is exertingcontrol over your body. 

Check out this handstand video clip.  Notice how straight her arms and legs arefrom the forward fold into the handstand. There is only a slight bend in the leg she uses to hop up: https://www.pinterest.com/pin/119908408816084757/

So the first skill we will work on this month is tostraighten and strengthen the legs.  Wewill work on this in Triangle, Pyramid Pose, Warrior III, Half Moon Pose andStanding Hand to Big Toe Pose.

Next week we will work on Tripod Headstand.  Then, before you learn to lift from Wide Legged Forward Fold into Tripod Headstand, you will learn to come down from Tripod Headstand into Wide Legged Forward Fold. First we will do this one leg at a time, without falling out and then with both legs at the same time.  After that, you will be ready to learn to lift up from Prasarita Padottanasana into Sirsasana II. 

A Sequence for Back Bending Over a Chair

I learned how to do wheel by bending backwards over achair.  The first time I tried it, Ithought it was some sort of Medieval torture. But I soon discovered that working with the chair became more and morecomfortable and my Urdhva Dhanurasana, or Wheel, became better and better. 

Dwi-pada-viparita-dandasana-with-a-chair-backwards.jpg

My feet should be against a wall so that I learn to press through my legs. (I didn't use a wall in order to frame a nicer picture for you.)

Yoga axiom #1  Props are not remedial tools, they are teachers.

Yoga axiom #2 Support equals release.  This is true in yoga postures and in life.  By learning how to prop myself in good alignment, my body learned how to be in the shape of Urdhva Dhanurasana and I got closer and closer to being able to do the pose without the props. 

Yoga axiom #3  Practice doesn’t make you perfect, it only makes you a practitioner; perfect practice makes perfect.

If you habitually push yourself up into Wheel with your elbowswider than your wrists and your knees, ankles and hips externally rotating, notonly do you risk injuring yourself, but then you have to unlearn these badhabits.

Here is a sequence to help you practice back bending over achair to open your upper back and prepare your body for Urdhva Dhanurasana.

Warm Ups:  Cat/Cow Do a couple of these warm up stretches being mindful of how your breath moves, your back arches and flexes and how the hips and shoulders move.

Sun Salutes:  Do 3 Surya Namaskar A.  Pause for a few breaths in each Bhujangasana (Cobra) in order to feel the evenness of your back as it arches.  Can you keep the inner thighs lifting as you press down into the tops of the feet and keep the quadriceps engaged?  Can you pull backwards with your hands as you expand your collar bones and lift your chest?  From the roof of your mouth press the back of the head back and look up!

Standing Pose:  Virabhadrasana I with your back heel against the wall.  Hold for a few breaths as you contemplate your form.  Can you keep the back leg straight and the back quadriceps lifted as you bend the front knee deeply?  Keep drawing the front thigh backward as you wrap the outer hip of the back leg forward.  Is your waist long ? Maintain the awareness of pressing your back heel into the wall to lift your chest.  Can you draw the energy of the legs up into the arms, hands and even fingertips?

Virabhadrasana-1-4-x-6.jpg

I don't have a picture of me with my back heel against the wall, but notice how straight my back leg is.

Arm work:  Gomukhasana arms.  You can do this standing or seated.  Focus on turning the top bicep in and keeping the upper arm in close to your head. Use a belt if your hands don't connect.

Gomukhasana-with-belt-web-large.jpg

Thigh Stretch:  Do EkaPada Raja Kapotasana II (Screaming Pigeon) at the wall.  Make sure your standing thigh is verticalwith the foot moving towards the outer heel as it would in VIrasana (HeroPose).  Observe that the knee of yourback leg is in line with, or behind its own hip.  It should not be forward of the hip.  The front knee has a tendency to cave in towardsthe midline, just as it does in Virabhadrasana II (Warrior II).  Pay attention to that alignment.  If your quadriceps are tight, it can causethe front leg hip to “hike” up.  Thiswill shorten the waist on that side. Learn to observe the length on both sides of your waist.  They should be even with your hipslevel.  If you can maintain all of thisin your lower body, interlace your fingers, turn your hands inside out with thepalms facing foraward and raise your arms up alongside of your head in UrdhvaBaddhangulyasana, Upward interlaced fingers.

Grab your chair.  (Itshould not be on a mat, as it will need to slide when you start to straightenyour legs.)  Turn your chair to face thewall about 2 feet from the wall.  Eventually,when you stretch your legs out straight, your feet should be touching thewall.  (I didn’t do that in this picture,simply because I didn’t have a “nice wall” to put my feet up against for thephoto.)  Get two blocks and place them infront of your chair.  These are for youto sit on as you lie your head and shoulders backwards over onto the chairseat.  With your knees bent, lift yourhips and shimmy backwards through the chair until you can slide your arms out throughthe back of the chair.

The arms: 

  1. Stretch your arms overhead into the air behindyou (as if you are doing Warrior I arms). This might be all you can do. Youcan press a block between your hands to work your arms.

  2. Then, press your hands on the chair back, beginto arch your shoulders and upper back over the back of the chair. Your back should coil over the chair and notextend straight out. If it doesn’t coil,stay there and breathe for about 30 seconds and come out.

  3. Once your chest begins to coil over the chairback, see if you can stretch your arms overhead and rest the back of your handson the floor. (Your head should not beon the floor.) Stay for a few breaths and come out.

  4. If you can go further, bend your elbows andplace your hands on the floor as if you are about to press up into Urdhva Dhanurasana.Make sure that your wrists are wider than your elbows and not the other wayaround!

  5. If you can get your hands to the floor, begin towalk your fingers back towards the chair legs and grab them. Roll your upper biceps and elbows in, the wayyou do in Gomukhasana arms.

  6. Then slowly begin to extend your legs. Keep the legs parallel and the upper, innerthighs moving down towards the floor. Yourtoes and kneecaps should be facing the ceiling and you should be able to pressout through the inner edges of your feet into the wall. You may need to elevate your heels on blocksif you cannot keep them down on the floor with straight legs. (You may need ahelper for this.)

Now try Urdhva Dhanurasana and see how it feels.  It would be interesting to do this every dayfor at least a month.  Take a picture onthe first day and then after 30 days and see if there is any noticeableimprovement. 

This version of Wheel looks more like an upside down letter "U".

Urdhva Dhanurasana

Rest in Savasana with your calves supported on the chair seat to release your lower back. 

(If you are interested in playing with this sequence, I will be teaching it and using the chair in my classes at the Solebury Club and at Dig. I do not have access to chairs at Cornerstone. You may attend classes on a drop in basis.)