Bound Triangle - Part 2: Your shoulders are part of your back, not your neck

“Perfection in an asana is achieved when the effort to perform it becomes effortless and the infinite being within is reached.”Just when you thought your Triangle Pose was looking pretty good here comes Bound Triangle; which is Triangle on steroids.  As one of my philosophy teachers used to say:  “In an ever expanding universe, there is always more.”Four Stages to Bound Triangle

Shoulder-Harness.jpg
  1. Elongating the Torso

  2. Shoulders are part of you back, not part of your neck.

  3. Lengthening the Hamstrings

  4. Binding – When the Effort becomes Effortless

Remember that Tadasana is the blueprint for every posture.  So, in every pose, lengthen through your spine, lift the collar bones and draw your shoulder blades towards the spine and down towards your waist.  If you are used to standing with your shoulders rounded forward, this may feel a little like you are doing a Standing Bridge Pose.We can feel this by using a belt as a shoulder harness to stretch the shoulders back.  It looks like this:We will use some variations of Triangle, Side Angle and Half Moon with the top arm behind the back holding on to a belt that help to turn the chest up. The belt helps us to feel what it is like to get the shoulders in the same vertical plane with the chest facing sideways rather than the floor.

Ardha-Chandrasana-with-belt-rear-view-web-large.jpg

The Fruits of Practicing the Yamas and the Niyamas – Yoga Sutras II.29 to II.45

In the Yoga Sutras Patanjali gives us the Eight Limbs of Yoga. Most yoga students have heard of these. Sometimes they are referred to as the Ten Commandments of Yoga. Patanjali not only tells us what to practice in order to reach enlightenment, but why we should practice. Here I will discuss the first two limbs. They are the Yamas and the Niyamas.

The Yamas are moral and ethical restraints in your interactions with others. There are 5 of them.

Ahimsa – non violence. To one who is steeped in non-violence, in their presence all hostilities will cease.

Satya – truthfulness. To one who is steeped in truthfulness, their words will have the power to make things manifest.

Asteya – non-stealing. Non-covetousness leads to desirelessness and this in turn brings worldly and spiritual wealth without a hankering for them.

Brahmacharya – control of sensual pleasure. One who controls sensual pleasure, and does not let sensual pleasure control them, develops vigor and energy

Aparigraha – non-hoarding. One who lives free from attachment to possessions and lives without greed, finds that all their needs are met and they reach the path of knowledge and wisdom, which is real and permanent.

The Niyamas make up the second limb of yoga; they are observances for your self.

Saucha – cleanliness, purity. With purity of body, interest in sensual pleasures or contact with other’s bodies fades and the urge towards spiritual knowledge dawns. By maintaining cleanliness and orderliness, the wandering mind is transformed which brings cheerfulness, single-focused attention and control over the senses of perception, which leads towards realization of the soul.

Santosha – contentment. By practicing contentment a joyful awareness needed to realize the inner self arises.

Tapas – effort, burning zeal. By practicing tapas one develops control over the body and the senses.

Svadhyaya – self-study with the help of scriptures or sacred texts. Self study from the skin to the Self with the guidance of sacred scriptures leads toward the realization of God, or communion with te longed for deity.

Ishvara Pranidhana – Surrender to a higher power. This leads to Samadhi, or the realization of God in whatever form the practitioner deems God to be.

Bound Triangle

Perfection in an asana is achieved when the effort to perform it becomes effortless and the infinite being within is reached.” 

Y.S. 2.47Just when you thought your Triangle Pose was looking pretty good, here comes Bound Triangle; which is Triangle on steroids.

As one of my philosophy teachers used to say: “In an ever expanding universe, there is always more.

Four Stages to Bound Triangle

Shoulder-Harness.jpg

1. Elongating the Torso

2. Shoulders are part of you back, not part of your neck.

3. Lengthening the Hamstrings

4. Binding – When the Effort becomes Effortless

This week we will work on Elongating the Torso

It is important to have good hip and shoulder mobility so that we move at the big joints first. If our hips or shoulders are restricted, then our spines will be forced to compensate. Yoga is primarily about learning to extend the spine, creating space between the vertebrae.So much of our life is spent shortening our spine as we hunch over steering wheels, smart phones and computers. Life can also be difficult so we further round our shoulders in a posture of protection. We often live in fear: of being taken advantage of, of looking foolish, of not being prepared. It is no wonder that we often can’t sit up straight and throw our shoulders back.We will work on this in class with a shoulder harness on. I have been doing this for the last week or so. It is a good stretch and warm up for any pose, but it is a particularly good body blueprint for binds which often cause us to shorten our spines.Next week:Shoulders are part of your back, not your neck

Yoga Sutra 2.29 – The Eight Limbs of Yoga

Chapter 2 – Sadhana Pada: The Chapter on Practice.

Yoga Sutra 2.29 – The Eight Limbs

This is the most well known sutra in the whole text: By the practice of the limbs of yoga, the impurities dwindle away and there dawns the light of wisdom, leading to discriminative discernment.

Y.S. - 2.29 Yama niyama asana pranayama pratyhara dharana dhyana samadhayo astavangani

Yama - restraints, respect for others
niyama - observances, respect for yourself
asana - posture
pranayama - breath control, energy
pratyhara - withdrawal from the pull of the senses
dharana - concentration
dhyana - meditation
samadhayo – absorption, enlighten
mentasta - eight
angani - limbs

The eight limbs of yoga are a code for how to interact with others, observances for yourself,  your physical well-being, harnessing your energy, withdrawing from the pull of the senses, concentration, meditation and perfected consciousness.

Most of people in the west think of yoga as the third limb only, the physical postures. But each of the rungs is equally important. In the next sutras Patanjali not only explains each of the yamas and niyamas but tells you what the fruits of each practice are. The promises are quite extraordinary!

Pinca Mayurasana or Peacock Feather Pose

Pinca Mayurasana

Pinca Mayurasana is an intermediate arm balance. It is taught after Headstand and Handstand have been introduced. It is easier to learn to balance in than Handstand because you have more of a foundation to ground you.  It is similar to Headstand, except that it requires more strength and stretch in the shoulders as the head is lifted off of the ground.

Pinca requires the full range of motion in the shoulder girdle, where the arms are raised in the overhead position in line with the torso in 180 degrees of flexion.  It is often a good idea to begin with shoulder stretches when warming up for this posture.   If you are tight in your shoulders, you will feel that this Forearm Balancing Pose is more of a back bend, but it is not meant to be.  There are variations where you can back bend into a Scorpion version, but the basic pose is an upside-down Tadasana on your forearms.When you begin to learn any inversion, there is a tendency to become disoriented.  All inversions in yoga literally turn our worlds upside down.  Can we stay connected when this happens?  Can we breathe and pay attention to where we are and what we’re doing?  Practicing the right angle version of Pincha Mayurasana  in the beginning allows you to get a sense of the pose while being able to remain in your center.  It also helps you build strength. 

Yoga, as defined by Patanjali in his Yoga Sutras, should be practiced without interruption over a long period of time.  This is really important when you start going upside down and balancing on your arms instead of your feet.  Pincha Mayurasana demands this of us.  In return it will repay us with a wonderful sense of strength and confidence.  With the body in an inverted position, prana circulates stimulating the circulatory system, the glandular system and cleansing the mind.  Not only do inversions help us to face our fears, they help regulate the chemistry of the mind; balancing depression and anxiety.  With consistent practice over a long period of time the benefits of this pose are endless.

There is a Japanese word, sat, the meaning of which can be described as the moment right before a performer walks on stage when the heart is racing with the knowledge that anything could happen, the moment right before creation, the moment of crisis. This is very close to the Sanskrit word Satya meaning truth. It is this moment of crisis, this moment of truth that we have the opportunity to confront our fear and to feel the most alive. There is a moment of sat before you perform any pose that scares you.  There can be a moment of sat right before you lift your leg above your head for Pinca Mayurasana.

A Lesson in How to Shake it Off

One day a farmer's donkey fell down into a well. The animal cried piteously for hours as the farmer tried to figure out what to do. Finally, he decided the animal was old, and the well needed to be covered up anyway; it just wasn't worth it to retrieve the donkey.

He invited all his neighbors to come over and help him. They all grabbed a shovel and began to shovel dirt into the well. At first, the donkey realized what was happening and cried horribly. Then, to everyone's amazement he quieted down.

A few shovel loads later, the farmer finally looked down the well. He was astonished at what he saw. With each shovel of dirt that hit his back, the donkey was doing something amazing. He would shake it off and take a step up.

As the farmer's neighbors continued to shovel dirt on top of the animal, he would shake it off and take a step up. Pretty soon, everyone was amazed as the donkey stepped up over the edge of the well and happily trotted off!

MORAL :
Life is going to shovel dirt on you, all kinds of dirt. The trick to getting out of the well is to shake it off and take a step up. Each of our troubles is a steppingstone. We can get out of the deepest wells just by not stopping, never giving up! Shake it off and take a step up.

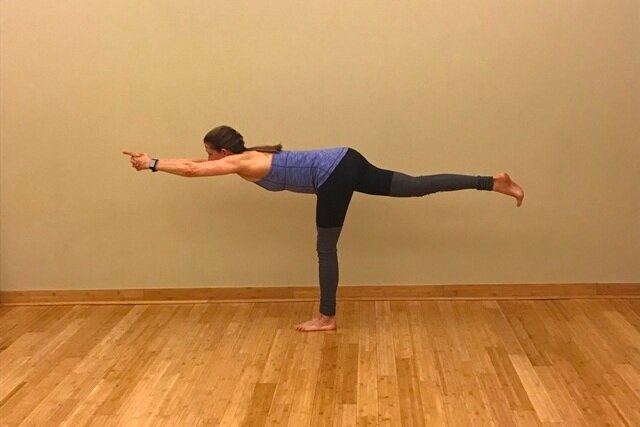
Vinyasa Pose of the Month – Virabhadrasana III (Warrior III)

Virabhadrasana-3-web-large.jpg

Virabhadra = the name of a fierce warrior, an incarnation of Shiva, described as having a thousand heads, a thousand eyes, and a thousand feet; wielding a thousand clubs; and wearing a tiger's skin.

Virabhadrasana III is said to be a continuation of Virabhadrasana I and it is a much more challenging position.

To come into Warrior II, fist come to Warrior I with the right foot forward and the left foot back.  The feet should be 4 to 4-1/2 feet apart front to back and hip width apart from left to right with the back foot almost facing forward.  Raise the arms overhead and look up. Press the palms together.   Keep the back leg straight as you bend the right knee towards 90 degrees.  Hold this for a few breaths before continuing.

On and exhalation, lean the trunk forward and lay the chest out over the bent right knee.   Take two breaths in this position

Again, on an exhalation, simultaneously lift the back leg from the floor as you straighten the right leg.  Keep the back leg inwardly rotating so that the hips are parallel to the floor.  Make the back leg straight and stiff.  Your goal is to lift the chest and the back leg parallel to the floor.  If this is too much, you can take the arms back like airplane wings, or even rest your fingertips on a block until you develop the strength and flexibility to do the full pose.

Come out of the pose the way you came into it.  (Don’t simply collapse!)  Step back into Warrior I and then straighten the front leg.  Turn the feet so they are parallel and then step or jump the feet together.

This pose encourages you to contract and tone the abdominal organs, as well as the leg and buttock muscles.   This pose conveys harmony, strength, balance, poise and power.  It improves one’s bearing and carriage.

Chapter 2. Sutras 10 & 11 – Meditation transcends ignorance

So far, the first sutra in chapter 2 has told us that all we need to do to transform ourselves and find enlightenment (Samadhi) is to practice with a burning intensity (tapas), to study the texts that have described this path in detail and to look inward to see how we are progressing on the path (svadhyaya) and to surrender to a higher power (ishvara pranidhana).

In the second sutra it tells us that why we should do these things and that is because these practices remove obstacles and lead to Samadhi.

The third sutra enumerates what these obstacles are: avidya or seeing things incorrectly, asmita or the ego, raga which is attachment to pleasure, dvesha which is avoidance of painful experiences and abhinivesha which is fear of death or clinging to life.

Sutras 4 - 9 define each of these obstacles in more detail.

Yoga Sutra 2.10 – Te pratiprasavaheyah suksmah
te – these
prati – in opposition, against
prasava – procreation, generation (prati prasava = involution)
heyah – to abandon, desert, relinquish, emit, renounce, abstain
suksmah – subtle minute, delicate
These subtle afflictions (ego, attachment, fear) are to be minimized and eradicated by a process of involution.

Yoga Sutra 2.11 – Dhyannaheya tadvrttayah
dhyana – meditation, reflection, attention, observation
heyah – to abandon, desert, relinquish, emit, renounce, abstain
tad – their
vrttayah – fluctuations, movements, operations
The fluctuations of consciousness created by gross and subtle afflictions are to be silenced through meditation.
Tapas removes the gross afflictions, svadhyaya removes the subtle afflictions and ishvara pranidhana removes the most subtle obstacles.

How to Meditate.
The first chapter of the Yoga Sutras gives seven suggestions on how to meditate:
Y.S.1.33 -  Be happy for the happiness of others, be compassionate when they are not happy, When they are vitruous, be encouraging and be indifferent when they are not.
Y.S.1.34 - Use an object of meditation such as a candle flame, a flower, a deity or a crystal to focus the mind.
Y.S.1.35 -  Practice Ujjayi breathing techniques.
Y.S.1.36 -  Focus on the light within your own heart, the seat of the soul.
Y.S.1.37 - Contemplate sages whom you admire, who were calm and tranquil and free from desires and attachments.
Y.S.1.38 - Learn the technique of lucid dreaming
Y.S.1.39 - Or, if any of these techniques don’t work, meditate on anything you choose.

I once had a yoga student who told me that a teacher told him that he was meditating wrong. This was several years before I had read these Yoga Sutras, but I strongly believed that what he was told couldn’t possibly be true. There are lineages that have developed particular techniques that have proven track records, but there is a great variety from one lineage to another. I believe, and these sutras seem to corroborate that, if one system of meditation does not work for you, try another until you find a practice that you can maintain.

Chapter 2 – Sadhana Pada: The Chapter on Practice. Y.S. 2.1 Effort, surrender and letting go. All in one sutra.

In the first chapter Patanjali gives us the theoretical aim of yoga, to control the vrittis (thought forms) of the mind. This chapter can be divided into several headings: the different kinds of thought forms, the practices to control them and the different kinds of superconscious experiences, culminating in the highest experience of Samadhi, or enlightenment. But, it is not that easy to get to Samadhi. The second chapter tells the student how to prepare him/herself by laying the proper foundation, then gradually building until that level is reached.

Y.S. 2.1 Tapah svadhyaya ishvara pranidhanani kriya yogah
Tapas – heat, accepting pain as purification
svadhyaya - self study and the study of spiritual books
ishvara - supreme being
pranidhanani - surrendering
kriya - action
yogah - yoga

Kriya yoga, the yoga of action, which is burning zeal in practice, self study and surrender to a higher power.

Tapas is often translated as effort and is often thought of as austerity. But it stands for something different here. Tapas means “to burn or create heat”. Anything that is burned will be purified. For example, the more you fire gold, the more pure it becomes. Each time it goes into the fire, more impurities are removed.

Tapas also refers to self-discipline. Swami Satchidananda describes it this way: Normally the mind is like a wild horse tied to a chariot; the intelligence is the charioteer, the mind is the reins and the horses are the senses. The Self, or the true you, is the passenger. If the horses are allowed to gallop without reins and charioteer, the journey will not be safe for the passenger. Although control of the senses and organs often seems to bring pain in the beginning, it eventually ends in happiness. If tapas is understood in this light, we will look forward to pain; we will even thank people who cause it, since they are giving us the opportunity to steady our minds and burn out impurities.
This brings me to my favorite quote from the movie Evan Almighty. In the movie, “God” says to a woman who is leaving her husband because he is not quite the man she married: “Let me ask you something. If someone prays for patience, do you think God gives them patience? Or does he give them the opportunity to be patient? If he prayed for courage, does God give him courage, or does he give him opportunities to be courageous? If someone prayed for the family to be closer, do you think God zaps them with warm fuzzy feelings, or does he give them opportunities to love each other?

This is tapas in action.

On our yoga mat, tapas means showing up to practice, whether you feel like it or not. It also means doing the poses you don’t like. To help you learn to like those difficult poses, you are allowed to modify them and use props to make those postures more accessible. It means letting go of the drama that surrounds any discomfort and breathing into it. However, it doesn’t mean physical pain. That would go against the first yama of ahimsa or non-violence.

Self-study involves being able to see one’s true, capital “S” self. This doesn’t mean focusing on one’s own feelings and problems. Both the yoga texts and modern psychology tell us that extreme self-centeredness is one sure way to depression. Anything that will elevate your mind and remind you of your own true nature, of your inner divine self should be studied; texts such as the Yoga Sutras, the Bhagavad Gita, the Bible, the Koran. This type of self-study will take you on a journey to your inner self to help you see if you are living a life in alignment with the spiritual path you are on.

On your yoga mat, this translates into watching your physical alignment. We often think we are doing something, but only when we truly open our eyes to look and see if we really are doing what we think we are doing does the insight come. We may wonder why we are not progressing on the path. Often it is because we are out of alignment in some way. This is tough because our ego gets in the way. We are often willing to sacrifice alignment to reach a goal. Or, maybe we misunderstand what is important. In yoga you might think you are stretching yourself, but really you are stretching toward your Self.

Surrender is often the hardest spiritual practice. This is the practice of letting go of outcomes and of letting go of your own agenda. The way yoga works, the way it truly works is to dedicate your practice to a higher goal, or to dedicate your practice to others. The Bhagavad Gita tells us that we only entitled to our actions, not the fruits of our actions. An analogy is often given of a flower blooming; it doesn’t try to bloom, it just blooms.

Letting go also means letting go of your stuff. We often have much more stuff than we need and letting go of it is hard. The inability to let go is another way of being stuck. In order to let go of stuff means letting go of memories, of the past, of possibilities that once were. Not letting go is another way of staying stuck. There is this saying about not being able to reach into the future if you cannot let go of the past.
On your yoga mat, this means to do your poses in your best possible alignment, with your heart and soul and to not worry if you achieve the final form of the posture. Most of us get hung up on the final form of the posture and don’t value the intermediate steps. I can see this when I ask people to slow down and not go into the final pose right away. If they can do the pose, most people find it hard to restrain themselves. When we stretch ourselves, the goal is not to stretch towards the pose, the goal is to stretch toward the Self.

Surrender is also the ability to relax. We practice this at the end of every class in Savasana. Many times when I adjust people in Savasana I feel their tension. As I lift their arm, I feel them helping me and their arm feels stiff. If they were relaxed and I was to let go, the arm should fall to the floor, but it often remains held rigidly in the air. This is because there is so much tension in our lives. We often feel as if we are on guard protecting ourselves. Savasana is where we can practice letting go.
Pose of the Month for April - Bakasana to Sirsasana II

This month we will focus on two poses and the transition between them.  You need to develop proficiency in each one separately before trying to move from one to the other.  Especially since the transition requires that you are able to balance in headstand without the support of the wall.

Sirsasana II

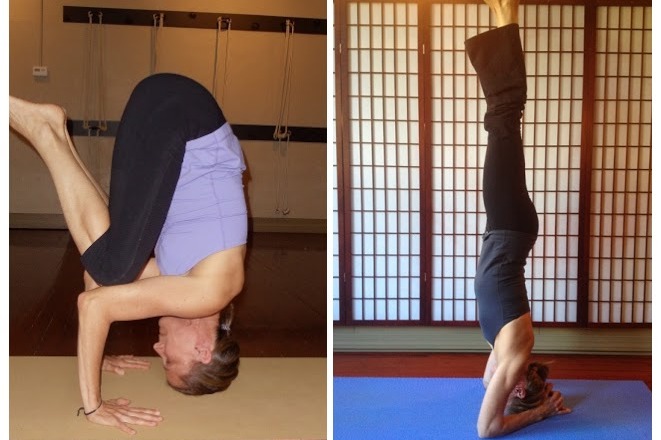
This is also called Tripod Headstand.  Because you are on your hands instead of your forearms, this takes more muscular strength in your arms.  Some people may prefer this headstand over Sirsasana I, or Forearm Headstand, due to tightness in their shoulders that prevents them from raising their arms overhead.  It is nice to be able to do both, they each use different muscles and have different purposes.  This helps to make you a well rounded practitioner.

Sirsasana II prep on left, Sirsasana I on right

Sirsasana II prep on left, Sirsasana I on right

While I would ordinarily ask students to double their mats for extra padding for Sirsasana I, I would not recommend it for this version.  First, we will not be holding Headstand for that long and second, the extra padding makes the foundation less stable which will make the transition from one pose to the other harder.

In order to come into any Headstand, you need to know which part of your head should be on the floor.  The perfect spot is on the top of the head, at the very crown.  This spot is also known as the bregma, which is a Greek word meaning the top of the head. You could balance a book on your head on this spot and it wouldn’t fall off.  Anatomically this is the spot where the frontal bone and parietal bones meet.

How to find which part of your head rests on the floor in Headstand.

How to find which part of your head rests on the floor in Headstand.

Here is a good rule of thumb for finding this spot.  Place the heel of your hand at the bridge of your nose and allow the fingers to curl over the top of your head.  The spot where your middle finger touches is mostly likely the bregma.  However you locate this spot, you need to make sure that your neck rises straight up from this spot when you are in headstand.  Remember that Headstand is just an upside down version of Tadasana.  You would not want your neck to be bent while it was carrying the weight of your body.

Coming into Tripod Headstand

Coming into Tripod Headstand

To come into Sirsasana II, kneel on your mat.  Sit back on your heels with your knees together.  Place your hands on the floor next to your knees. Make sure the palms are flat and the fingers spread wide and your inner wrists are against your outer knees. Keeping your hands where they are, bend forward and place the top of your head onto the floor.  Pause here and make sure you can see your finger tips without having to swivel your head.  If you cannot see your finger tips, your hands are too close to your head and your foundation will not be stable.  The placement of your hands and head should form the three corners of an equilateral triangle.  Check to see that your elbows are as wide as your shoulders and not wider or narrower and that your forearm and upper arms form a right angle.  Please do not attempt to go up into Headstand if these alignment marks are not in place; adjust yourself until they are.  Once you are certain of the alignment of your foundation, proceed with the next step.

Lift your hips up as if you are coming into Down Dog but keep your head and hands where they are.  Keep walking your feet in and your hips up until you cannot walk in any closer.  Bend one knee and place that knee on your elbow and when you are ready, do the same with the other knee.  Rest here for a few breaths.  When you are ready, keep lifting your hips and engaging your core until your knees begin to lift up off of your elbows.  Keep lifting until the back is straight and your buttocks are up in the air, but your knees are still bent.  When you are ready, slowly take one leg up at a time until you are in Headstand.  Take a few breaths here.

Bakasana

Bakasana

To come down, you can either take one straight leg down at a time, or you can try to come down the way you went up; by bending your knees and trying to land your knees on your elbows.  Pause here for a moment and when you are ready try to lift your head off the floor.  You will most likely land on your feet.  This is the beginning of how you come out of Headstand and transition into Crow.

Come into a squat and place your hands on the floor inside of your knees.  Rise up high onto the balls of your feet.  Bend your elbows and work one elbow under each shin, keeping your heels and your buttocks close together.  Begin to tip your weight forward as you move your elbows over your wrists.  If you move your head and shoulders far enough forward, you feet should become light.  It is a good idea to put a blanket, bolster or a block on the floor in front of you in case you tip over.  This can happen, especially in the beginning.  Once you get the hang of it you won’t fall again, it is like riding a bicycle in that aspect.

Typically when you come into Crow, you squeeze your inner thighs and the tips of your toes together and look up.  This squeezing action helps your legs hug onto your arms by engaging the adductor muscles in your inner thighs and the looking up helps you balance.   Once you are balancing, you would begin to push the floor away and try straightening your arms as you draw your belly in and up rounding your back like you do in “cat back”.   Make sure you are comfortable in Crow and can balance for a while before you try the transition into Headstand.

Transitions

It is easier to go from Tripod Headstand into Bakasana at first.  One way to do this from Headstand is to bring your knees down to your elbows and then try to raise your head off of the floor.  You will almost always fall back onto your feet.  The trick is to pause halfway in between.  One of the ways I do this is to flatten my back a little and allow my feet and knees to come apart slightly.  This lowers my center of gravity and makes it easier to get my head off the floor.  Once my head is off the floor, I need to look forward, draw my low belly in and squeeze my feet and knees back together.  If I look forward and press down into my hands I can hover here for a while, if not I just tip back onto my feet, again.  You have to keep trying to slow the motion down until you can stall it.

To go from Crow to Headstand is a little scarier because you are purposefully lowering your head to the floor.  You want to do that softly and in control.  In the beginning, when it might not be so graceful you might can put some padding there like a blanket, block or bolster.  But once you can make the transition smoothly, remove the extra padding under your head as it could get in the way.

Begin by coming Crow and as you get ready to come into Headstand, allow your back to flatten and feet and legs to come apart a little.  This will bring your head closer to the floor so you won’t bump your head down hard.  Tuck your chin and lower the top of your head onto the floor.  Breathe.  Then begin to draw your low belly in and up as you begin to lift your knees off of your elbows and your buttocks up into the air.  Balance here for a moment before lifting your legs up slowly into Headstand.  You can do this one leg at a time, or both at the same time as you are able.  Just make sure that you don’t hold your breath as this builds too much internal pressure.

These advanced moves take some time to master, so be patient and try to have fun while playing safely.