

This month we will focus on two poses and the transition between them. You need to develop proficiency in each one separately before trying to move from one to the other. Especially since the transition requires that you are able to balance in headstand without the support of the wall.
Sirsasana II
This is also called Tripod Headstand. Because you are on your hands instead of your forearms, this takes more muscular strength in your arms. Some people may prefer this headstand over Sirsasana I, or Forearm Headstand, due to tightness in their shoulders that prevents them from raising their arms overhead. It is nice to be able to do both, they each use different muscles and have different purposes. This helps to make you a well rounded practitioner.
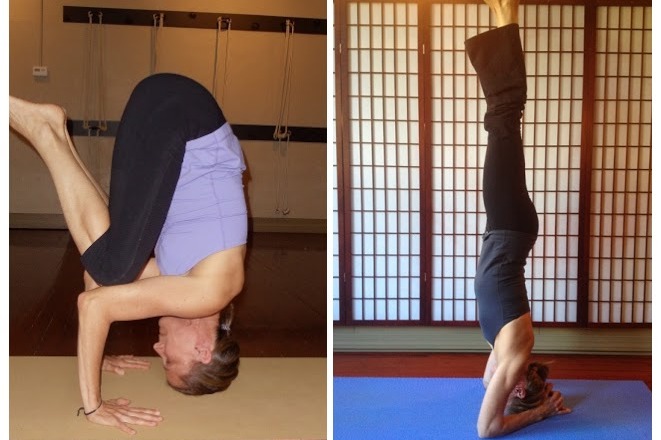
Sirsasana II prep on left, Sirsasana I on right
While I would ordinarily ask students to double their mats for extra padding for Sirsasana I, I would not recommend it for this version. First, we will not be holding Headstand for that long and second, the extra padding makes the foundation less stable which will make the transition from one pose to the other harder.
In order to come into any Headstand, you need to know which part of your head should be on the floor. The perfect spot is on the top of the head, at the very crown. This spot is also known as the bregma, which is a Greek word meaning the top of the head. You could balance a book on your head on this spot and it wouldn’t fall off. Anatomically this is the spot where the frontal bone and parietal bones meet.

How to find which part of your head rests on the floor in Headstand.
Here is a good rule of thumb for finding this spot. Place the heel of your hand at the bridge of your nose and allow the fingers to curl over the top of your head. The spot where your middle finger touches is mostly likely the bregma. However you locate this spot, you need to make sure that your neck rises straight up from this spot when you are in headstand. Remember that Headstand is just an upside down version of Tadasana. You would not want your neck to be bent while it was carrying the weight of your body.

Coming into Tripod Headstand
To come into Sirsasana II, kneel on your mat. Sit back on your heels with your knees together. Place your hands on the floor next to your knees. Make sure the palms are flat and the fingers spread wide and your inner wrists are against your outer knees. Keeping your hands where they are, bend forward and place the top of your head onto the floor. Pause here and make sure you can see your finger tips without having to swivel your head. If you cannot see your finger tips, your hands are too close to your head and your foundation will not be stable. The placement of your hands and head should form the three corners of an equilateral triangle. Check to see that your elbows are as wide as your shoulders and not wider or narrower and that your forearm and upper arms form a right angle. Please do not attempt to go up into Headstand if these alignment marks are not in place; adjust yourself until they are. Once you are certain of the alignment of your foundation, proceed with the next step.
Lift your hips up as if you are coming into Down Dog but keep your head and hands where they are. Keep walking your feet in and your hips up until you cannot walk in any closer. Bend one knee and place that knee on your elbow and when you are ready, do the same with the other knee. Rest here for a few breaths. When you are ready, keep lifting your hips and engaging your core until your knees begin to lift up off of your elbows. Keep lifting until the back is straight and your buttocks are up in the air, but your knees are still bent. When you are ready, slowly take one leg up at a time until you are in Headstand. Take a few breaths here.

Bakasana
To come down, you can either take one straight leg down at a time, or you can try to come down the way you went up; by bending your knees and trying to land your knees on your elbows. Pause here for a moment and when you are ready try to lift your head off the floor. You will most likely land on your feet. This is the beginning of how you come out of Headstand and transition into Crow.
Come into a squat and place your hands on the floor inside of your knees. Rise up high onto the balls of your feet. Bend your elbows and work one elbow under each shin, keeping your heels and your buttocks close together. Begin to tip your weight forward as you move your elbows over your wrists. If you move your head and shoulders far enough forward, you feet should become light. It is a good idea to put a blanket, bolster or a block on the floor in front of you in case you tip over. This can happen, especially in the beginning. Once you get the hang of it you won’t fall again, it is like riding a bicycle in that aspect.
Typically when you come into Crow, you squeeze your inner thighs and the tips of your toes together and look up. This squeezing action helps your legs hug onto your arms by engaging the adductor muscles in your inner thighs and the looking up helps you balance. Once you are balancing, you would begin to push the floor away and try straightening your arms as you draw your belly in and up rounding your back like you do in “cat back”. Make sure you are comfortable in Crow and can balance for a while before you try the transition into Headstand.
Transitions
It is easier to go from Tripod Headstand into Bakasana at first. One way to do this from Headstand is to bring your knees down to your elbows and then try to raise your head off of the floor. You will almost always fall back onto your feet. The trick is to pause halfway in between. One of the ways I do this is to flatten my back a little and allow my feet and knees to come apart slightly. This lowers my center of gravity and makes it easier to get my head off the floor. Once my head is off the floor, I need to look forward, draw my low belly in and squeeze my feet and knees back together. If I look forward and press down into my hands I can hover here for a while, if not I just tip back onto my feet, again. You have to keep trying to slow the motion down until you can stall it.
To go from Crow to Headstand is a little scarier because you are purposefully lowering your head to the floor. You want to do that softly and in control. In the beginning, when it might not be so graceful you might can put some padding there like a blanket, block or bolster. But once you can make the transition smoothly, remove the extra padding under your head as it could get in the way.
Begin by coming Crow and as you get ready to come into Headstand, allow your back to flatten and feet and legs to come apart a little. This will bring your head closer to the floor so you won’t bump your head down hard. Tuck your chin and lower the top of your head onto the floor. Breathe. Then begin to draw your low belly in and up as you begin to lift your knees off of your elbows and your buttocks up into the air. Balance here for a moment before lifting your legs up slowly into Headstand. You can do this one leg at a time, or both at the same time as you are able. Just make sure that you don’t hold your breath as this builds too much internal pressure.
These advanced moves take some time to master, so be patient and try to have fun while playing safely.