Poses

The Single Best Therapeutic Yoga Pose for General Knee Problems

Belting-the-knees-thumbnail.jpg

Last week I talked about some general reasons for why knees can hurt and I gave you some simple exercises that you can do on your own. You can also do these at the beginning of class if you get there a few minutes early. There are certain simple therapeutic exercises that I do every day for my own issues.

Also, I’d like to invite any of you with knee problems who do come to class a few minutes early to let me set you up in a basic supportive posture for your knees. All you have to do is ask!

Moving and Flowing

In last week’s post I commented on the difference between holding poses for a long time and moving and flowing from one pose to the next.  Both are challenging in different ways.  As I observe students move through these flowing sequences this month, I can see where they can hold the poses together and where they can’t and the poses fall apart.   Moving and flowing requires more than strength and coordination, you also need a clear path and a plan to get there.  The path and the plan come from knowledge and repetition; of both the poses and of the sequences.

A clear path comes from knowing the poses: Where are your feet?  Your hands? Which way is the torso facing?  Are the legs bent or straight?  And from knowing what is important in each pose.  Students often mistake what is important in a pose.  In Side Angle students often think it is more important that the hand is on the floor.  The hand should only be placed on the floor if the alignment of the rest of the body can be optimized and maintained.

Let’s take a look at Side Angle Pose, for an example:

Side-angle-with-lines-4-x-6.jpg

In this pose, my front foot is pointing straight ahead and is perpendicular to the arch of my back foot, with my back foot turned in slightly.
My front knee is over its ankle and my back foot is far enough away so that my front thigh is parallel to the floor.  If I could not bend my front thigh to 90 degrees then I would have to move my back foot closer.  But then, my front hand would have to be on a block.    My right forearm is practically hidden from view by my right shin.  They should be lined up, with my right knee pressing against my right arm.

My body is a straight line from the outer edge of my left foot up through my left finger tips.  My left arm is very close to my face, in a straight line. (I call this “handstand arm”.  The arm is in the same position it would be if you were in a handstand.)  My neck is in a straight line with my body and just my gaze is turned up.

My torso is facing the camera, not the floor.  If you have your hand on the floor and your torso is facing downwards, then your hand is too low and you need to raise it on a block. It is more important that the body is turned sideways than it is that the hand is on the floor.

Make the transition in as few moves as possible

Do you remember that show, “Name That Tune”?  It was a game where contestants tried to name a song in as few notes as possible to beat their opponent and win prizes.  Think about making the transition from Side Angle to Half Moon with the fewest steps possible.

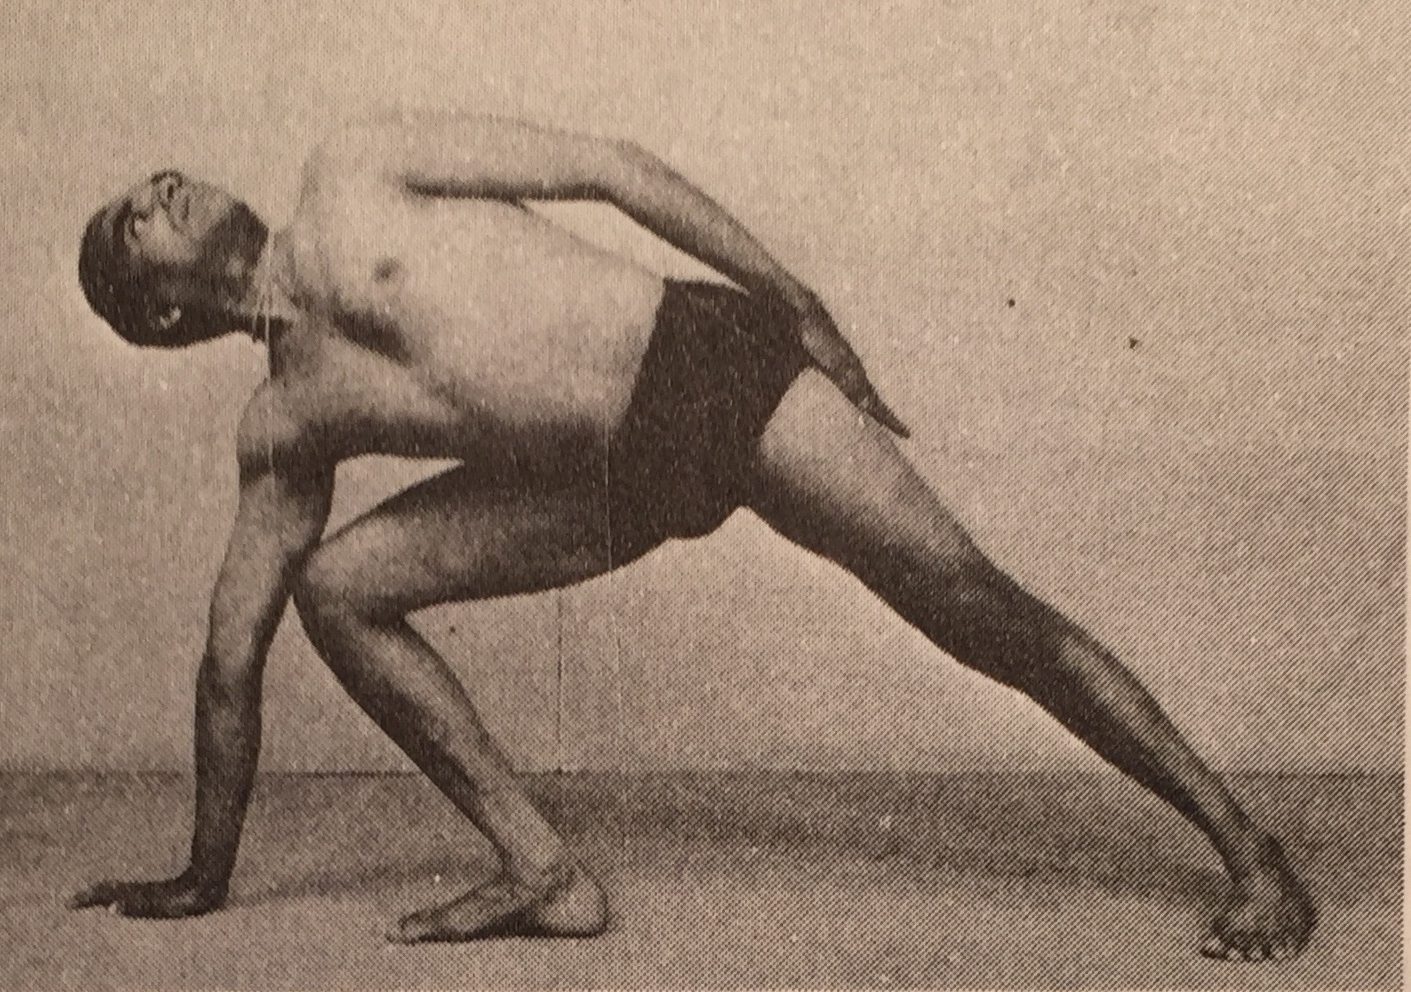
In order to make the transition form Side Angle to Half Moon Pose, it is important that I not turn my torso to face the floor.  It is already facing sideways in Side Angle and it should still be facing sideways in Half Moon.  Learn to keep the torso sideways as you make the transition.  Learn to stay in alignment.  Take a look at this picture of Mr. Iyengar.  In this photo, he is taking the intermediate step from Side Angle as he prepares to move into Half Moon.  Notice his body position.  He lunges deeper into his front knee, reaches his bottom hand forward as he steps his back leg in.  The top arm rests along the side of his body as he prepares to step up.  Notice how he does not turn his torso to the floor!

Side-angle-to-half-moon-interim-pose-e1510428356210.jpg

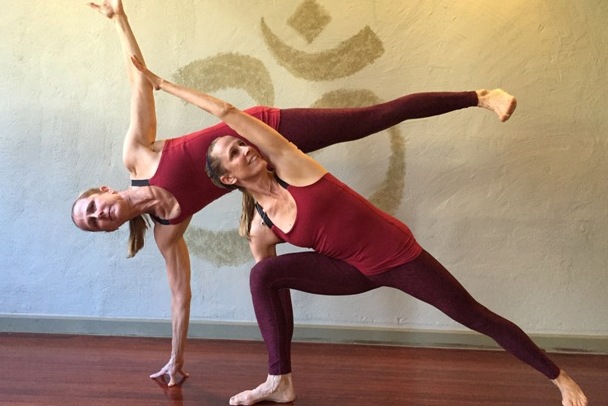
Develop the strength in the front leg to drive down through your standing heel and straighten your standing leg as you come into half moon.  This is all about quadriceps strength.  Notice, in the superimposed picture, that my front foot does not move at all.

Side-Angle-to-Half-Moon-transition-web-large-4-x-6.jpg

Once you come onto your standing leg, expand out through all of your extremities equally.

Half-moon-with-lines-4-x-6.jpg

The alignment of the standing leg is not any different from the shin in Side Angle Pose, it is still vertical.  The straight line of the body shifts as the torso moves more horizontal to the floor.  The arms, well, they are supposed to be vertical and the upper arm is over the lower arm.  As you can see, I need to work on that!  But, that is the idea.

To come out of the pose, you reverse the steps and be as mindful as you were when you came into it.  People often get hurt in transitions when they let go.  Stay engaged until you are back in Tadasana.  Think about it this way, rather than engage, let go and then re-engage, stay engaged as you move from one pose to the next.

This is just one of the transitions that I will be working on in class this month, but this is a big one and a fun one to play with.  See how smoothly you can shift from Side Angle to Half Moon and back again.  Have fun with it.  Notice your improvement and celebrate your accomplishments.  I’ll see you in class!

One of the Best Shoulder Openers – Setu Bandha Sarvangasana

And all you have to do is lie there! This supported pose is a precursor to Shoulderstand.  Setu Bandha Sarvangasana benefits all of the systems of the body so you can recover your health. It reduces fatigue by draining fluids from the legs after long periods of standing. Athletes find it beneficial after a long run to help reduce soreness in the leg and hip muscles. This pose also helps to relieve headaches or mental agitation which are often symptoms of over work.

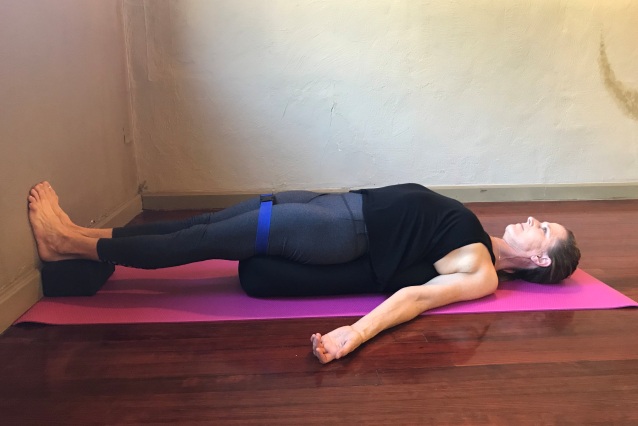
Set up: place your mat with the short edge against the wall. You will need a bolster, two blocks and a belt. Place the blocks at the wall for your heels to rest on. Place the bolster lengthwise on your mat. In this pose you want your heels on the wall, the bolster under your torso and your shoulders on the floor.

Setu-Bandha-Sarvangasana-4-x-6.jpg

Technique: Place your belt around the middle of your thighs. It should be snug. Sit on the edge of the bolster closest to the wall. Have your knees bent and your feet on the wall. Lie back over the bolster and let your head hang over the far end. Keeping your back down on the bolster, push into the wall with your feet and allow the bolster to pull down on the skin of your upper back as you slide off the edge of the bolster. You may have to do this a couple of times to get the exact measurement. You want to have your entire foot pressing into the wall. The bolster should reach up to the bottom tips of your shoulder blades and it lifts your chest, but your head and shoulders should be resting on the floor. Having your thighs belted will keep the legs resting in a parallel position without exerting any effort. Take a good look at the picture to get all of the alignment points correct.

You can rest here for anywhere from 5 to 20 minutes. When you are finished, roll over off of the bolster and rest on your side for a few breaths before coming up. You can practice this pose everyday if you’d like. If you want it to work on helping to open your shoulders, you’d have to practice it at least 3 or 4 times a week.

If you back hurts during or after, the bolster was too thick. Either use a thinner bolster or a folded blanket, or support your head and shoulders with a blanket.

Regarding Shoulders – continued: Developing Yoga Teacher Sight.

Last week I talked about and showed pictures of what it looks like when you are lying on the floor with your shoulders rounded. I used the floor as a reference point so you could see this more clearly.

I want to make sure that you can see and understand this from a teacher's perspective.  These differences can appear to be subtle, but they have a profound effect on the body and mind.

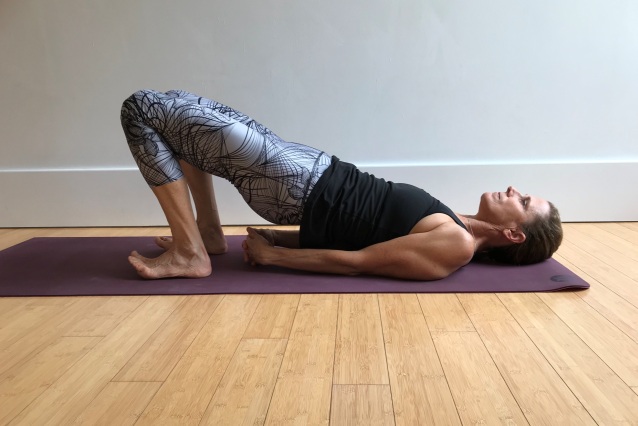
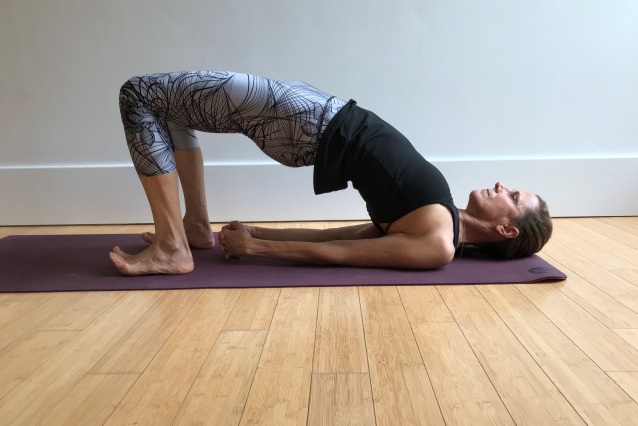
This week let’s look at what this looks like in Bridge Pose. One of the main concepts in many poses from Tadasana and especially into the Backbends is to open the chest.   Daily living seems to make us round our shoulders.  Yoga can help reverse these effects.

Take a look at the following series of photos and pay close attention to the effect that rounded shoulders have on the pose.

Lying on the floor, shoulders rounded, sunken chest

Lying on the floor, shoulders rounded, sunken chest

Bridge prep, shoulders rounded, sunken chest

Bridge prep, shoulders rounded, sunken chest

Bridge pose, shoulders rounded, sunken chest

Bridge pose, shoulders rounded, sunken chest

Compare and contrast the differences in the following three photos:

Lying down, shoulders back, chest lifted

Lying down, shoulders back, chest lifted

Bridge prep, shoulders back, chest lifted

Bridge prep, shoulders back, chest lifted

Bridge pose, shoulders back, chest lifted

Bridge pose, shoulders back, chest lifted

Can you clearly see the difference an open chest has on these simple postures?  But, what happens if you try and your chest doesn't open like that?  Next week I will show some restorative poses to work on to open the chest.

Let me know if this was helpful.  I'll see you in class!

P.S.  I wish someone had told me to put my toes down!  Although lifting the toes is a good remedial action that forms the arches in the feet and helps to keep the knees from splaying out; they shouldn't be lifted that way in the final pose.

Regarding Shoulders

The word yoga means “to come together, to unite.” This refers to tying the mind, body and breath together.  When we do our yoga poses we strive to do them intelligently; to put our mind in our bodies.  For example; to know how rolling the heads of the arm bones back lifts the chest.  The practice of yoga helps our bodies learn to feel these things.  We endeavor to make our whole selves shiny (with an inner radiance), bright and alert.  When our mind is not in our bodies, that part of our body becomes dull and lifeless.  This intelligence is what differentiates yoga from merely stretching.  And it is this inner inquiry that helps us to make progress on the path of yoga.  If we are not aware of what we are or are not doing, we can stay stuck.  Awareness always proceeds change.

There are a lot of things we could be focusing on in any yoga pose, but today I want to shine a light on the shoulders.  I noticed things shifted in my yoga practice when I began to look at my shoulders and realize that I was slumping.  My teachers would say things like "Take the heads of your arm bones back. What does that mean? In my Anusara training the concept used was called “Shoulder Loop”.  The cueing went like this:  “Side body long and the heads of the arm bones back.”

What does that mean to make the side body long?  And why should we do this?

When we do yoga we not only exercise the muscles, which pull on and affect the bones, but the poses also affect our nervous systems and our internal organs.  In everyday life we tend to slump.  Some of that is because we work at keyboards (as I am doing right now) Or, it can be a form of protection of the heart because life is hard and we don’t want to be vulnerable.  Slumping compresses our lungs and heart making it harder to take a full breath and making it harder for the heart to pump blood.  When the chest is caved in, it indirectly puts pressure on the abdominal organs, making it harder for them to function as well.  The decrease in oxygen intake and compression of the organs makes our brain dull and we feel sluggish.

How do you make the side body long?  Lengthen your side waist from your hips to your armpits by lifting the heads of your arm bones up towards your ears.  Then roll the heads of the arm bones backward allowing your scapula, or shoulder blades, to settle on your back close to the spine.  Release the scapula down towards your waist without letting them slide apart again.  This releases your shoulders away from your ears and allows them to settle into a more natural position.  Make sure you don't let the shoulders roll forward again.  The next time you find yourself slumped over your computer keyboard and you are starting to feel sluggish and sleepy, take one minute to sit up straight and try this.  Remain in this upright position and breathe; notice how it feels.  This is how long it takes for your blood to circulate through your body. In just one minute, with full, deep breathing you can 100% oxygenate your blood. Notice the effect this has on your body and your mind.

I wanted to clearly illustrate what it looks like with my shoulder blades rounding forward and with them rolled back so I took the pictures while lying on the floor so you could see the difference more clearly.  Can you see the difference?  What do your shoulders look like?  Now can you do this while standing up?

Shoulders rounding forward

Shoulders rounding forward

Shoulders back and down

Shoulders back and down

This is the beginning of being able to open the upper chest and move the upper thoracic spine into the body.  This starts in Tadasana, but is especially important in back bends.  Next week I will continue this exploration into Bridge Pose.

Yoga Anatomy – How to deepen your Forward Fold

Today in class we were talking about how muscles work.  In the language of anatomy there are different names for what the muscles do.   When you have a muscle that contracts and moves a body part it is called the agonist or prime mover, the antagonist works against the prime mover and the synergists are muscles that work with the prime mover and help it.

Straighten Your Leg

We were talking about Pascimottanasana, or Seated Forward Fold.  In this pose, the quadriceps are the prime mover.  They straighten the leg and this causes the hamstrings, the antagonist to the quads, to stretch.  This is a concept called reciprocal inhibition which means that when one muscles contracts, it signals the brain to tell the antagonistic muscle to relax in order to be stretched.

Pascimottanasana-4-x-6.jpg

But a lot of students miss out on this stretch because they cheat and bend their knees as they fold forward.*   This makes them feel as if they are stretching further because their face is in their shins, but they are not getting the full benefit of the pose.  As best as you can, press the back of the knees into the floor while keeping the heels down.  It is the pressing down of the back of the knees that engages the quads and signals the hamstrings to stretch.  Keeping the heels down prevents hyper-extending the knees.

Use Your Arms

The other aspect of this forward fold are the synergistic muscles, these are the muscles that help you fold deeper.  In the case of Pascimottanasana, contracting the psoas, a deep hip flexor, helps to tip the pelvis forward.  And finally holding the outside of your feet and bending your elbow to engage the biceps helps to pull you forward and deeper into the pose. This is not an aggressive pull, but a gentle pull which helps bring the torso out over the thighs.

Give this a try over a few weeks ad see if it doesn’t help improve your hamstring flexibility.

*(Of course if you have really tight hamstrings you may need to bend your knees as you fold forward to make sure that you are hingeing at the hips and not rounding in the lumbar spine.  This is the sort of thing that is best assessed by your teacher.)

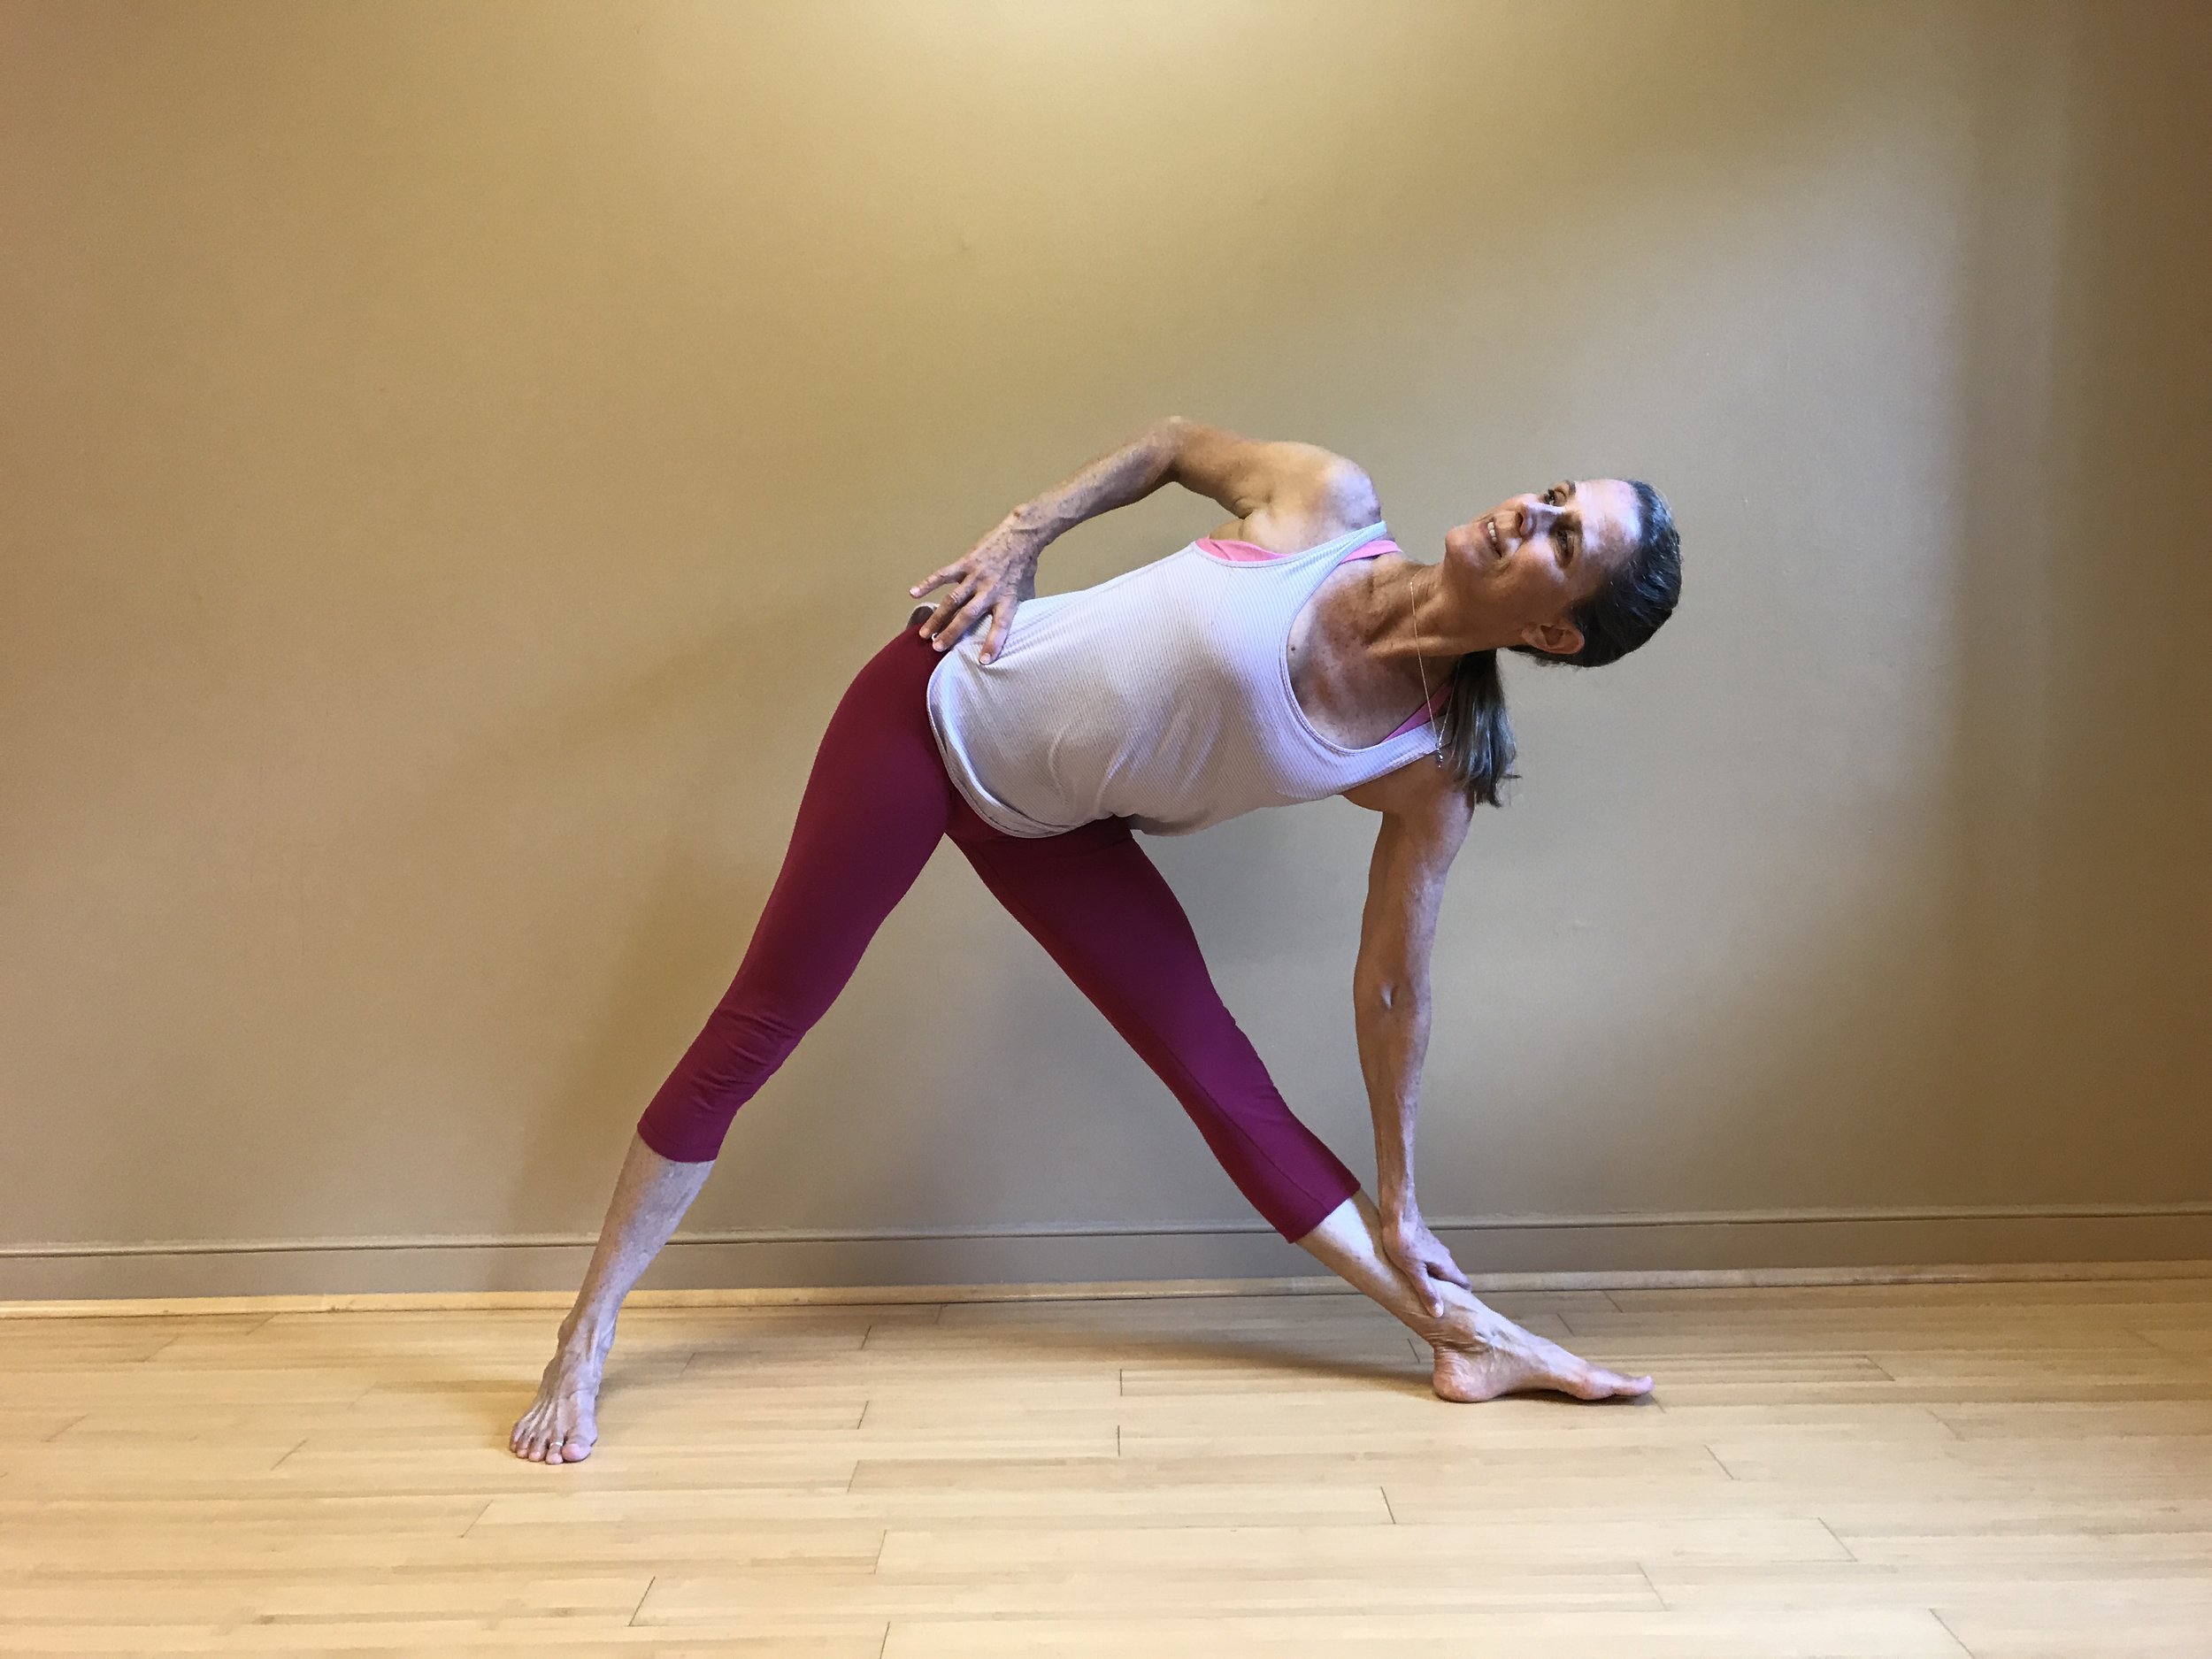
The Straight Leg Question in Triangle

This is a question I get a lot: “Should I straighten my front leg in triangle? My teacher told me I should never straighten my leg, it should always have a micro bend.”

First of all, I have to say that there is no one “right” answer. This is often frustrating because we want to know what the “right” answer is. My stock answer is “it depends”.

Generally, I would say that if the person is healthy, has nothing going on in the way of an injury, is relatively flexible, then yes, the front leg should be straight in Triangle. Tight hamstrings, and I mean tight hamstrings , like I can’t even reach my knees tight hamstrings, would pretty much necessitate bending the knee. Any knee injury would have to be looked at specifically to the individual. There are many types of knee injuries that would be adversely affected by a straight leg.

Anatomy
According to the Yoga Sutra, the asana should have the qualities of steadiness and ease. When the bones are stacked or aligned in a straight line, the effort is transferred along the length of the body part with relative ease and equilibrium. If there is a bend, the force or body weight and the relentless pull of gravity can cause that bend to increase over time. Take the example of holding a straight arm push plank position as opposed to bent arm plank position, or Caturanga. You can hold the straight arm position much longer and with more ease than you can the bent arm position. Why? Because when the bones are stacked or aligned it takes less effort to keep them that way. Muscles work in agonist and antagonistic pairs. If the appendage is straight and the muscles are engaged, both pairs of muscles are working together with the same amount of effort. If there is a bend anywhere, the muscles that are holding the bend are working harder than the opposing muscles and will fatigue faster as the relentless pull of gravity does its thing. There is a time and place for bent arm and straight arm planks. If you can’t hold a bent arm plank with your arms bent at 90 degrees, you might micro bend them to start building strength to work on a full Caturanga.

That was an obvious example, but let’s take a look at the same thing in standing poses: Triangle and Warrior II. In Triangle the front leg is supposed to be straight (see disclaimer above). In Warrior II, the front leg is supposed to be bent. Which pose do you think you could hold longer? It is easier to hold Triangle for longer than Warrior II because the bent front leg fatigues faster than a straight leg.
I am not a fan of hybrid poses. If your front leg is bent in Triangle, what is the difference between Triangle and Warrior II? One of the opposing issues here is also how much do you bend the front knee in Warrior II? I see lots of students whose front knee is not over the standing ankle in Warrior II. Sometimes it is hard to know which pose is being performed because the front knee is not bent deep enough to be Warrior II nor is the front leg straight enough to be considered Triangle Pose. It is not as important how deeply the knee is bent, but, the alignment of the front knee should be over the ankle (barring any injury). Yoga poses work the body in a full range of motion. Our job is to see that we work the body in that full range of motion: legs straight in straight leg poses, knee bent in bent leg poses.

Locked out leg
The difference between a straight leg and a bent leg is pretty obvious. The more subtle difference is between a straight leg and a locked out leg. The instruction to have a micro bend in the front leg comes from seeing a student lock their leg out. If you let your front leg lock out in Triangle Pose, it means that you have basically relaxed all of the muscles in your leg and have allowed your knee joint to move backwards as far as it will go, hyper-extending the joint. The leg will look slightly bowed in this position and the weight in the foot will lift off of the inner edge of the foot and all of the weight will be on the outer edge.

Hyper extended leg. Notice calf bowing toward floor and the lifting of the big toe mound off of the floor.

Hyper extended leg. Notice calf bowing toward floor and the lifting of the big toe mound off of the floor.

Hanging in the ligaments
This can be damaging to the joint over time because you end up hanging in the ligaments. Ligaments connect bone to bone and their purpose is to stabilize the joint; they have very little elasticity. If you continuously hang in your ligaments, these structures can become stretched out over time and will not spring back the way muscles will. Also, every joint has protecting structures and fluids cushioning the bones and protecting the “joint space”. When a joint is hyper-extended, the joint space is compromised and the bones will move closer together on one side of the joint and further away on the opposite side of the joint. This can cause uneven wear and tear on these cushioning surfaces and lead to bone on bone contact which can lead to arthritis, pain and joint dysfunction.
Most yoga teachers will correct this position by telling students to micro bend their front knee. What most students will actually do is bend their front knee.

Straight leg
What I tell my students to do in Triangle is to engage their quadriceps muscle while pressing down in the ball mound of the big toe. In the locked out leg, the quadriceps muscle is not engaged, neither is the calf. If you reached down and felt your quad in this position, the muscle would be squishy and wiggly and you would be able to wiggle your knee cap from side to side. If you engage the quad while pressing down through the mound of the big toe, the knee cap would lift, the calf would also engage and the leg would straighten. If you were to watch someone do this from the side, it would look like they were micro bending their leg from a hyper extended position, but the leg would appear straight. Typically this takes a while to learn how to do. Most students have habitually let their quads relax in Triangle and initiating this change takes a concentration and time. Another instruction I give is to hug all of the muscles in your leg to the bone. This often helps to straighten the leg.

Straight leg. The muscles of the quads are lifted as are the muscles in the calf.

Straight leg. The muscles of the quads are lifted as are the muscles in the calf.

Bent leg
The instruction to lift the knee cap is a much more subtle instruction and could be lost on beginners. Tightness in the hamstrings makes it difficult to straighten the leg, but once the student learns to straighten the leg, they typically begin locking it out. The next instruction seems to be to put a microbend in the leg. There is a subtle but important difference between bending the leg and lifting the knee cap. Bending the leg involves engaging the hamstrings and stretching the quads. Lifting the knee cap involves contracting the quads and stretching the hamstrings.

This is often what I see when a student says they have a micro bend. This is a bent leg.

This is often what I see when a student says they have a micro bend. This is a bent leg.

You can see that these two instructions, bend the knee or lift the knee cap create two very different actions in the leg and two very different looking poses.

Too many cooks spoil the pot.
One of the sources of confusing instructions is that students typically take classes with many different teachers. Some teachers may be newer and have less experience than others. Not all yoga teachers have a lot of anatomy training. Some styles of yoga are different and have different instructions and methodologies.

If you are taking classes with a lot of different teacher, you will hear different and often conflicting instructions based on the style and the teacher’s understanding. And a teacher’s knowledge and understanding can change over time. I want to be careful that I am not saying that my instructions are right and their instructions are wrong. I believe that every teacher teaches from their heart and from what they know to be true at the time. I am only stating what I know to be true from my experience and understanding.

When in Rome.
It is important that you follow the instructions of the teacher during the class that you are taking. It is also important to test theories out for yourself and experience the differences in your body. That is what I have done and what my teachers have encouraged me to do. My experience has taught me that the front leg should be straight in Triangle (Even when I tore my hamstring. I simply did not put my hand down as low until the muscle healed.  I did not work a bent leg.) It has also led me to investigate what the difference is between a straight leg in and a bent leg in Triangle.

If you would like to learn more about this, if you would like to learn more about anatomy in yoga, I have a workshop coming up from 12:00 to 2:00 on October 26th called Hamstrings and Quadriceps: Strength and Flexibility, Two Sides of the Same Coin. This is an anatomy focused workshop; understanding the underlying structures.

The Site of the Pain is often not the Cause of the Pain

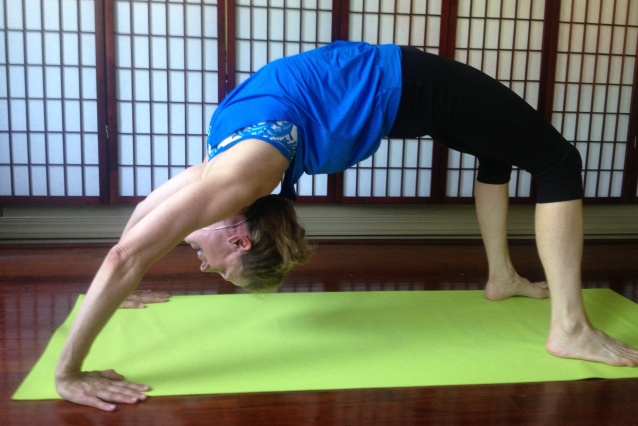
This is my answer to students who ask about wrist pain while doing back bends: "The site of the pain is not the cause of the pain". They often want to know what they can do to stretch their wrists. First I usually ask them to bend their wrists back so that I can see how much range of motion they have in their wrists. If they have normal range of motion and no injuries to the wrist, then the wrist is not the issue. I don’t usually have to see them do the pose to know that their arms will not vertical when they do wheel. When the arms are not vertical in wheel, the wrists will be bent at less than 90 degrees and that is not in the normal range of motion for the wrist and therefore not very comfortable.
However, just to be sure, I always ask them to do their pose for me so I can see if there is anything else going on. But more often than not, their arms are not vertical.

Here is a picture of me doing wheel where my arms are pretty vertical:

This version of Wheel looks more like an upside down letter "U".

This version of Wheel looks more like an upside down letter "U".

Here is a picture of me doing wheel where my arms are not vertical.

This version of Wheel looks more like an arc of a circle.

This version of Wheel looks more like an arc of a circle.

Observe the angle at the wrist. Which one looks like it hurts?  Ouch!  The wrists aren't meant to bend that way!   If the shoulders aren’t open, the lumbar spine doesn’t bend or the quads and/or psoas are tight then other body parts will have to compensate.

In the final form of the pose Wheel should look like an upside down “U”. When it looks more like an arc of a circle, then there is more shoulder or hip opening that needs to be done and the wrists should be supported; either on blocks, the wall, someone’s ankles or even a tightly rolled up blanket placed against the wall can work.

The Difference between Sirsasana I and Sirsasana II

Out of the several different arm/hand positions for Head Stand, there are two that are the most frequently practiced: Sirsasana I – where your forearms form part of the foundation, and Sirsasana II – or Tripod Headstand where your hands are on the floor with your arms bent at 90 degrees.

People often have a preference, one that they like better than the other. Often this has to do with their ability to perform the pose. If your shoulders are tight, Sirsasana I is harder. If your arms are weak, Sirsasana II is harder. While preference is fine, there are reasons to work on both variations. Each headstand requires different competencies and each headstand prepares the body for different further variations.

Sirsasana-I-close-up.jpg

Sirsasana I
Typically the first headstand taught is Sirsasana I. Because it is a closed chain movement, where the hands are brought together and the fingers interlaced, it makes a closed circuit of the forearms, it is the most stable of the two and it strengthens the shoulders for other inversions and arm balances. But, it requires shoulder flexibility, specifically the ability to raise the arms overhead. For some students, this is difficult. We hold a lot of tension in our shoulders and if we have a slightly rounded upper back, this inhibits the range of motion of the upper arm. Sometimes students exhibit what is referred to as deceptive flexibility. An example of that is when a student raises their arm overhead and their back arches. This makes it look and feel as if there is flexibility in the shoulder joint, but there is really compensation in the back. This range of motion is an important aspect of poses where the arms are in the overhead position such as: Down Dog, Warrior I, Chair Pose, Wheel, Handstand, Forearm Balance and Cow Face Arms. If you have shoulder tightness, these poses may present a challenge for you.

Sirsasana-II-close-up.jpg

Sirsasana II
Being an open chain movement, where the elbows can move in and out, this pose is less stable than Sirsasana I. It requires less flexibility because the arms are straight out from the shoulders, rather than overhead, but you need more strength for Tripod Headstand than you do for Sirsasana I. If your shoulders and upper arms are weak, this position will feel wobbly. This upper body strength is relevant to other arm balance poses where the arms are also bent 90 degrees: Low Push Up, Crow, Side Crow, Peacock, Swan, Dragonfly and those crazy arm balances named after sages such as the Koundinyasa variations, the Galavasana variations.
Sequencing

Although the two Head Stands are related, notice there was no overlap in the poses I associated with each headstand. When I am sequencing a class, I think about logical progression of postures. Practicing yoga is about a progression of skills rather than a performance of asana. While you may be proficient in one version of Headstand, it is a good idea to practice both variations to increase your repertoire, strength and range of motion.

A Sequence to Stretch Your Hamstrings

Here is a preview of an audio yoga practice for you to try out.  This is an abbreviated session of a class I have uploaded to Audible Yoga. While I try to be as clear as I can, I imagine this will work best for students who come to my classes and are familiar with my cueing.

The full session is geared towards improving your hamstring flexibility with a little core work thrown in for good measure.  While it is a generic stretching practice, I am introducing it as an entry level sequence for Visvamitrasana.  The challenge pose is the Half-Squat with the optional stretch over the straight leg.   If you are interested in the full class, you can subscribe to my Audible Yoga page here.

Half-squat-web-large.jpg

Don’t be discouraged if you can’t do the Half-Squat right away.  Keep working on this sequence over time and let me know how your flexibility is improving.

There are 4 sections to the full practice.  This version contains only the standing sequence.   I drew stick figures of the poses if you need some visual help.  Make sure you have 2 blocks if you need them for Half-Moon Pose.

When you go back to the start make sure you do the other leg.

When you go back to the start make sure you do the other leg.

Let me know what you think of this mini audio class.  Leave a comment below.