Poses

8 Poses to Astavakrasana

Here are 8 poses to help you get to Astavakrasana, or Eight Crooked Places Pose.

Astavakrasana-SC-web-thumb.jpg

Astavakrasana

This is a sequence you can practice at home, or if you are a teacher, you can try it out on your classes.  You can always add poses to make the sequence fill the time slot you have to teach.

Take a Sun Salute or three, or any other warm up of your choosing and as you come into each pose, stay for at least 5 breaths.

  1. Side Angle Pose - take a vinyasa in-between and end in Down Dog.  From there come into:

  2. Lizard Lunge - back leg straight.  Jump or step switch.  Move back into Down Dog and take a vinyasa if you wish.  Come into:

  3. Revolved Side Angle Pose.  Do both sides and then transition to sitting.

  4. Boat Pose.  Do three times and hold for 5 breaths each time.  Try to lift your self off the floor, balancing on your hands in between.

  5. Revolved Boat.  I also call this seated Astavakrasana.  Right ankle crossed over left, left arm between legs as you twist to the right.  Do other side. Hold 5 breaths.

  6. Baby Cradle.  Take as much time stirring the pot, or rocking your leg back and forth as you need.

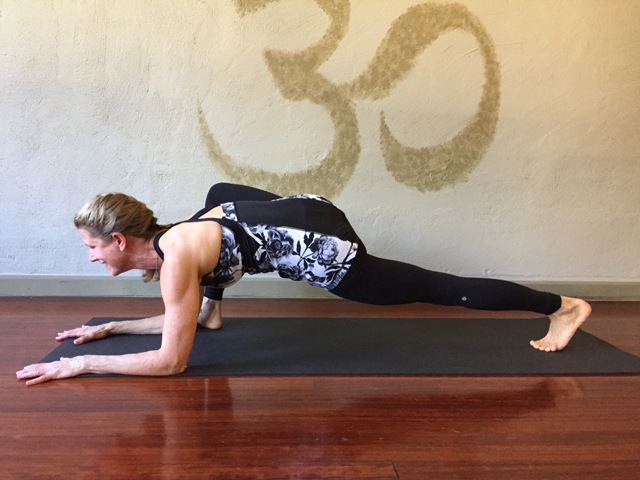
  7. One-Arm Leg Pose.  This is where you lift off with one leg bent over your shoulder and the other leg stretched out straight.

  8. Astavakrasna!

If it doesn't work the first time you try this, be patient and keep practicing!

I'll see you in class!

Karin

Side Angle

Side Angle

Lizard-Lunge-R-web-large.jpg

Lizard Lunge

Revolved Side Angle Pose

Revolved Side Angle Pose

Boat Pose

Boat Pose

Astavakrasana-seated-version-web-large.jpg

Revolved Boat or Seated Astavakrasana

Baby Cradle

Baby Cradle

One Arm Leg Pose

One Arm Leg Pose

Astavakrasana-SC-web-thumb.jpg

Astavakrasana!

What's on your Yoga Bucket List?

You can often tell which poses a yoga studio practices frequently because most of the students can do them.  Sometime before Christmas, I had one of my classes at The Solebury Club doing Crow and everyone in the class was able to do the pose.  It was quite remarkable!  Clearly, it is a pose I add into the sequence often.  But then we got to Hanumanasana, or split…   Not so much!  Hmmm…

A Split is not a pose I can do.  Or rather, it is not a pose I can do and get all the way down to the ground.  So, clearly I am to blame for not teaching it with any regularity.  I have had hamstring injuries in the past and when injured, I would stay away from such a big hamstring stretch. But still, I cannot take all the blame for not teaching this pose.  My other colleagues who teach similar classes at Solebury are as fond of Hanuman as I am; which means they also cannot get all the way down to the ground, so they don’t teach it too often, either.  Therefore, a lot of our students cannot do a split.  Handstands, yes!  Split, no.

Hanumanasana-KEy-web-large.jpg

Not that being able to do a Split is a requirement for anything in life, but still I am intrigued, mystified and challenged by the posture.  I want to be able to do a split before I get too old to do it.  It’s a pose on my yoga bucket list!

At The Solebury Club, Karate Sensei Ed Rumick has created a 100 push-up club on Facebook, which anyone can join.  The goal is to work towards being able to do 100 push-ups by the end of the year.  Here is the link if you are interested.  I decided to join.  I hate push-ups, but I have always wanted to be better at doing them because being able to do 100 push-ups will give me more strength to do other yoga arm balances.  Now that is my idea of fun!   There are some in the club who can already do 100 push-ups.  Personally, I think they need a new challenge and I propose that they learn the routine in this video.  Most people in the club can already do more push-ups than me. But, I don’t care.  I would like to be able to do 3 sets of 10, at least.   I did 26 today.  But I can only do about 7 at a time without losing form.

This made me think about doing a Pose for the Year in yoga.  Hanumanasana is not a pose you can master in one month.  So, I thought it would be a good candidate for a Pose for the Year.  I remember seeing a blog about some gymnastics coach who claimed he could teach an average middle aged man with no flexibility to do a split in 6 months.  I think we need at least that amount of time.

What do you think?  Are you interested?  Are you game?  It would mean that you should expect to see Hanumanasana as a posture at least once a week.  I cannot guarantee I can work it into every sequence, but I want to try to fit it in more frequently.  Also, on the Facebook page there could be sequences, tips and techniques for practicing the pose on your own.  A little stretching everyday can help you get there.

I'll report on my progress and you can let me know how you are doing.

Let me know what you think.  Leave a comment below.

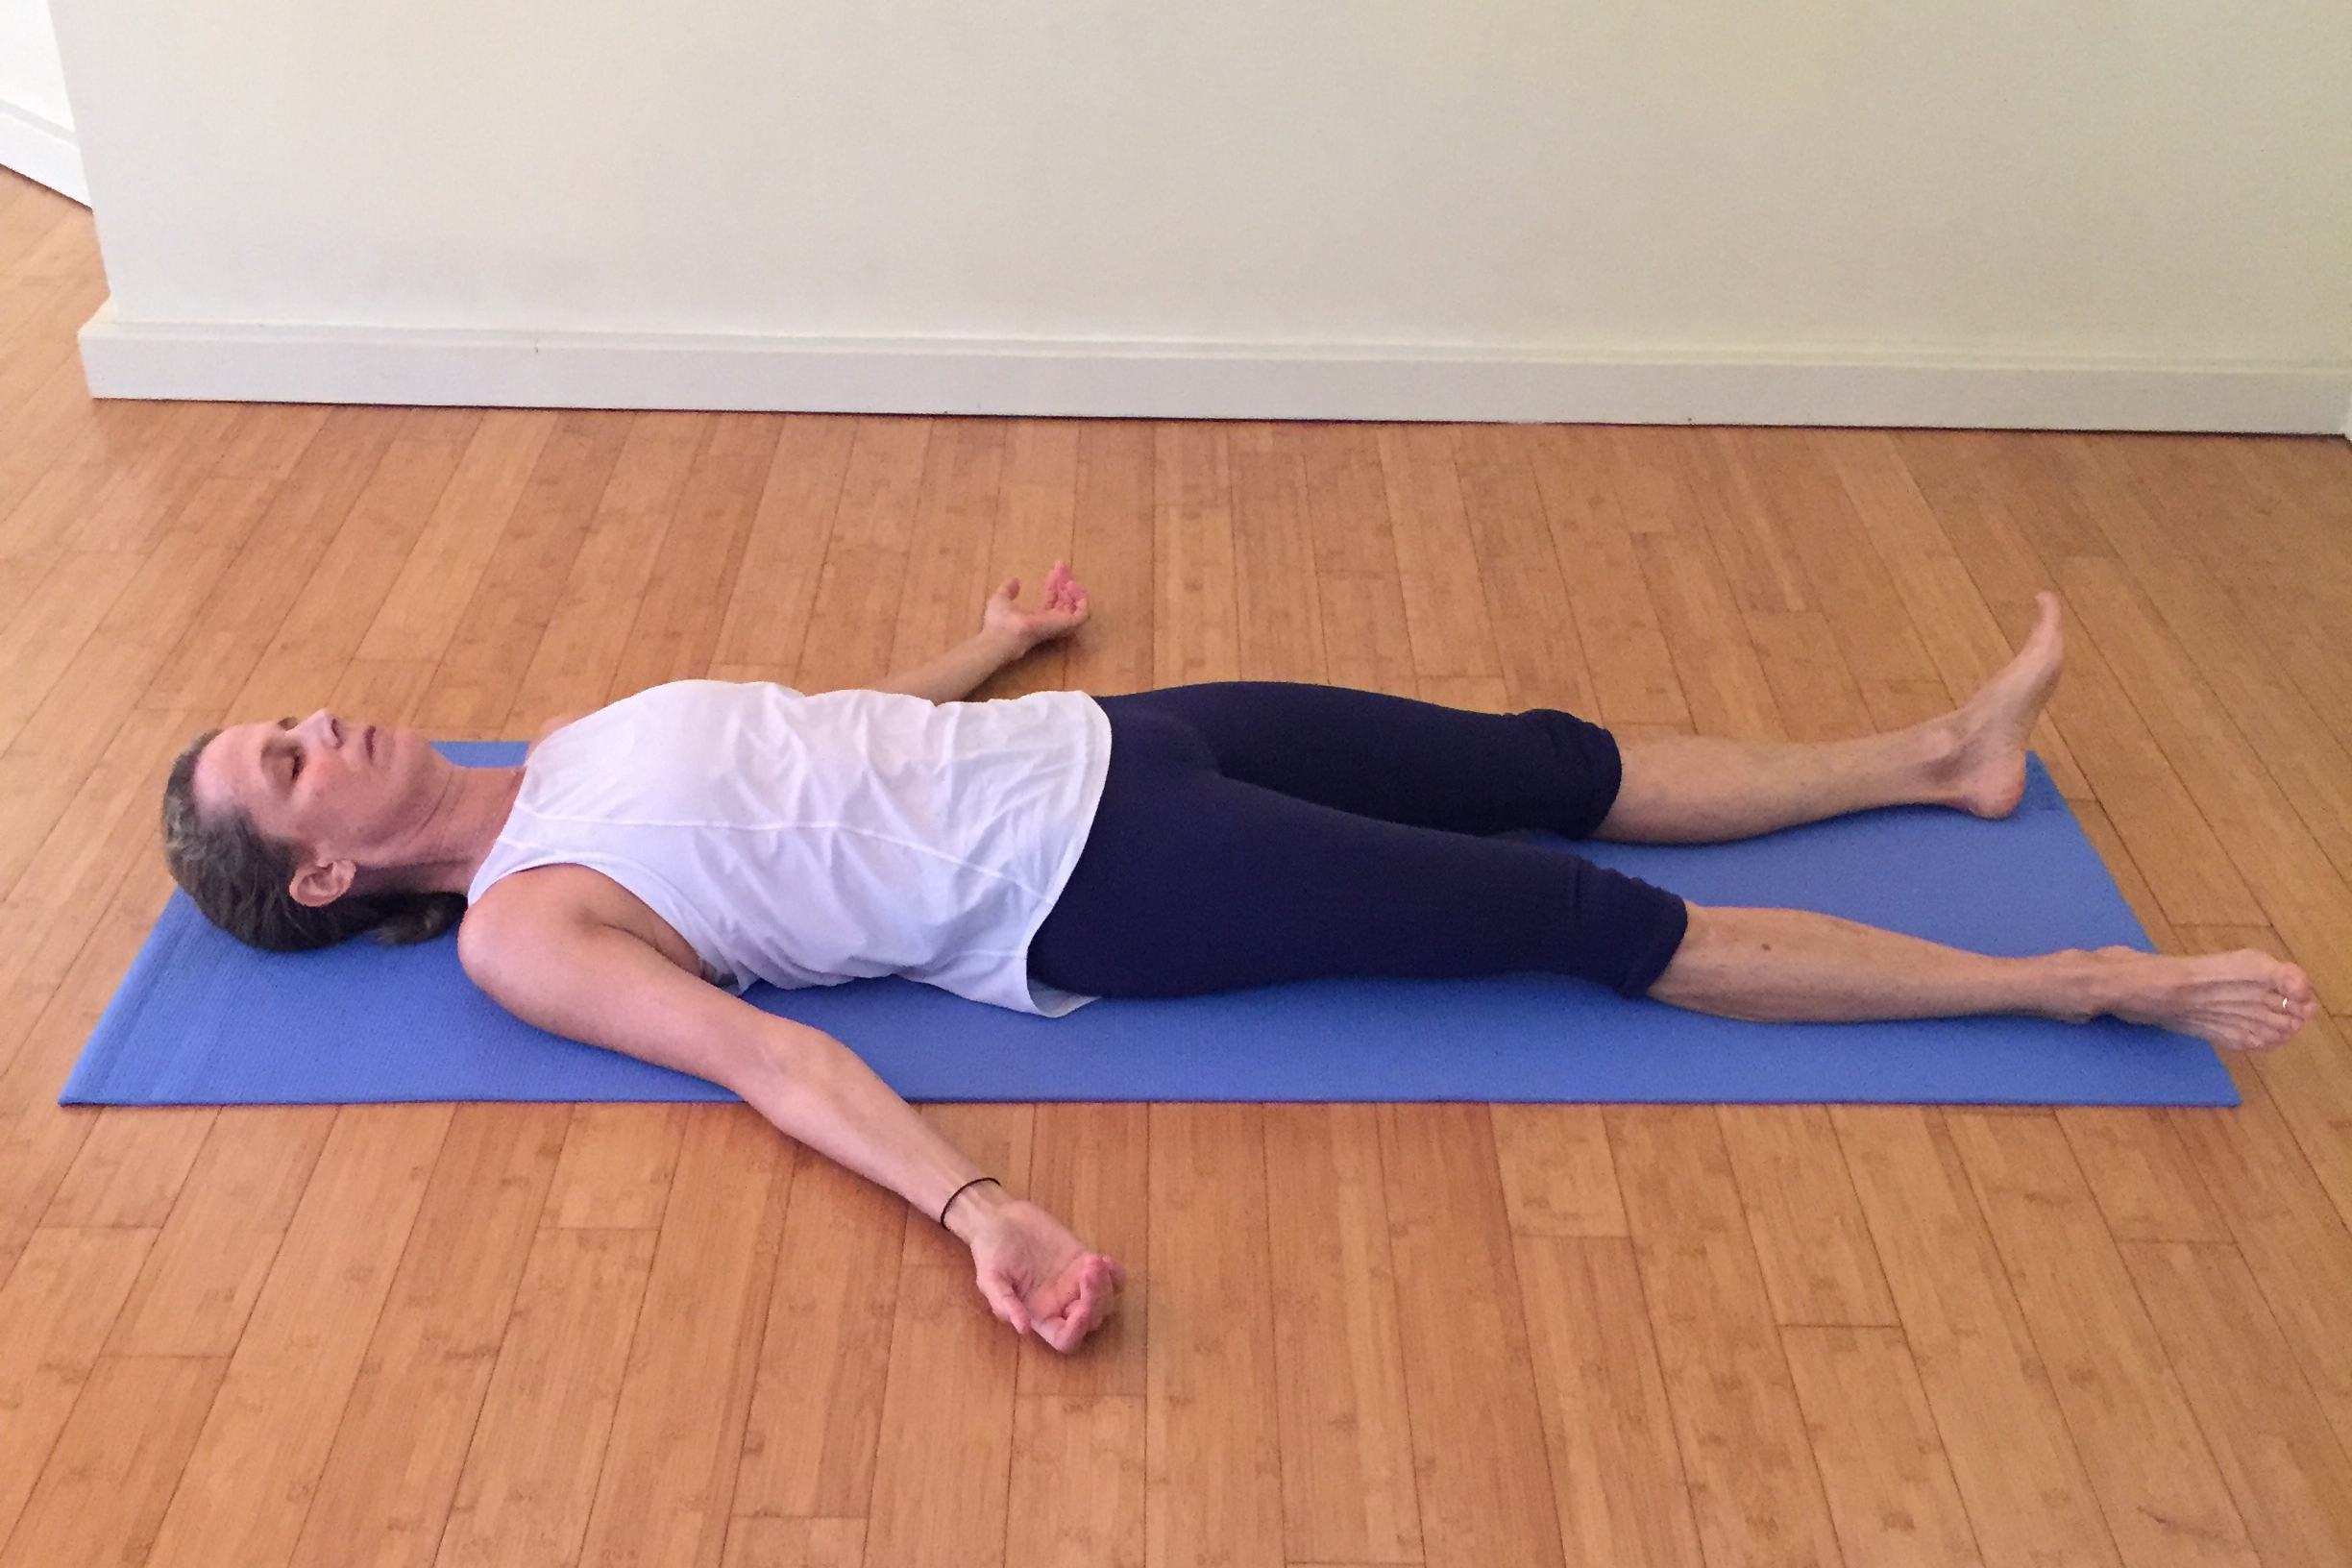
Savasana or Final Relaxation Pose

At the end of every yoga class we come into Savasana or Final Relaxation Pose.  But, did you know that the real translation of Savasana is Corpse Pose?  The ancient yogis meant for us to contemplate our own death.

Savasana-Karin.jpg

I heard this statistic on the radio this morning. Here in the US, as elsewhere in the world, we have 100% mortality rate.

Right?!

We know that, but we try not to think about it. We will all die someday, in the far future. Not today. Not tomorrow either. But who knows when they will die? This particular program was about being financially prepared for death by making a will. We need a will because we cannot take our stuff with us when we die. So what happens to our stuff? And how important is our stuff?

Imagine an angel comes down to tell you “Straighten up your affairs; you will not awake from your sleep tonight. You are coming with me.” How would that change your life? Would you worry about your stuff?  Making a will can give you some peace of mind, at least in terms of taking care of your material possessions. But contemplating your own death can be trickier. Death can be a great teacher. This ties in beautifully with the yogic idea of contemplating death as a way to live your life more fully.

I was talking about death in class last week. Savasana, or what we call Final Relaxation, literally translates to corpse pose. The ancient yogis meant for us to contemplate our deaths, not to fall asleep after our asana class. If you think about it, on a sub-conscious level, maybe that helps explain why a lot of people skip Savasana. It’s too uncomfortable. Just like contemplating death is too uncomfortable. But, we must not be afraid to discuss death. Let’s not get uptight about it. Instead, let this knowledge help you live every moment of your life fully, because every moment matters.

A friend recently recommended a book about mid-life. The book is called: Life Reimagined, The Science, Art and Opportunity of Midlife - by Barbara Bradley Hagerty.  In the book the author describes a conversation she had at lunch with her mother and another woman. She was recounting how her mother taught her integrity and her father taught her delayed gratification. She says, “Sometimes I wonder when it’s time to stop deferring and start gratifying.” Her mother looks at her and says, “It’s now, honey!  This is the time to enjoy your life. Don’t waste another moment!”  Barbara says something clicked inside her, and in that moment she realized how incredibly fortunate she was. She took stock of her life and counted her blessings, saying to herself, “Remember this moment, Barbara, life is very good.”

As a researcher, Barbara Bradley Hagerty found out that if you do this frequently, if you stop and take mental snapshots of meaningful moments in your life, it gives you the sensation that life is slowing down and it takes on more meaning.

From his book The Untethered Soul, author Michael Singer says this, “Learn to live as if you are facing death at all times and you’ll become bolder and more open. If you live fully, you won’t have any last wishes. You will have lived them every moment. Only then will you have fully experienced life and released the part of you that is afraid of living. There is no reason to be afraid of life. And the fear will fade once you understand that the only thing there is to get from life is the growth that comes from experiencing it. Life itself is your career, and your interaction with life is your most meaningful relationship. Everything else you are doing is just focusing on a tiny subset of life in the attempt to give life some meaning. What actually gives life meaning is the willingness to live it.  It isn’t any particular event; it’s the willingness to experience life’s events.”

What would you do differently if you knew you would not wake up tomorrow morning?

Pose of the Month - Dwi Pada Viparita Dandasana

Dwi means two

Pada means foot,

Viparita means reverse or inverted

Danda means staff pose

Dwi-Pada-Viparita-Dandasana-POM2.jpg

This pose is called “Both Feet Inverted Staff Pose” – got it!??  Sometimes the English translation is more obvious, not so with this pose, I think.  This pose is a deeper backbend than wheel, or Urdhva Dhanurasana.  In Dwi Pada, as it is often referred to, the forearms are on the ground, and the legs are straight.  Mr. Iyengar must think this is hard because he rates this pose a 24/60 where as Urdhva Dhanurasana, or Wheel, is a 7/60.

All of the work we have been doing for Scorpion in July will be put to good use as we focus on more back bending in August.  We will continue to open the shoulders, quads and abs and continue to strengthen the legs and core.

Pre-requisites for Dwi Pada are Cobra, Up Dog, Locust and Bow.  Forearm Balance is a great precursor to this posture as well.  Not to worry if you aren’t ready for this asana.   There will always be plenty of modifications.  Instead of doing Dwi Pada, you can be working on Urdhva Dhanurasana (wheel) or Setu Bandha Sarvangasana (bridge).  All of these poses fall under the same category of backbends.  Each one is a variation of a supine backbend and as such they all have similar benefits: they all tone the spine by improving its strength and flexibility and they improve and aid digestion by toning and strengthening the abdominal organs.  These backbends are all invigorating poses, often recommended for relieving depression; and, in India, they are often prescribed for the treatment of cardiovascular ailments*.  There are also supported versions of this pose, to make it more accessible.  Don’t be surprised if you also see a lot of headstands in the coming month.  One way into Dwi Pada is from Wheel, the other way into it is from Headstand.  With all the work we’ve been doing on opening the body in Scorpion we should be ready to play with Dwi Pada.   Keep practicing.  Remember, it’s not about the posture, it’s about the practice!

I’ll see you in class!      Karin

*Please see your doctor about this before self-prescribing.

Finding Balance

We’ve all heard that balance is something we lose as we get older. Losing your balance puts you at risk for falling and getting injured. Working to improve or maintain your balance is important.

Four sensory systems that help us balance:

  1. Proprioceptors: These are sensors in the muscles, joints and skin that sense the position and rates of motion of various body parts with respect to one another. As far as we know, proprioceptive skills are learned by practice.

  2. Sight: The eyes play a key role in determining if the head or body is being held in an upright position. Since more than one third of the neurons in the brain are involved in some way in the visual process, it is no surprise that the eyes are strongly involved in balancing.

  3. The inner ear: The vestibular organs in the inner ears sense both static head positions and movement of the head. Factors that affect the inner ear and can negatively impact balance are: dehydration, excess salt, simple sugars, caffeine, alcohol, nicotine or aspirin.

  4. Pressure sensors: There are large numbers of pressure sensors located in the skin in various locations around the body: soles of the feet, big toe, fingers, thumbs, belly, thigh, calf. These sensors indicate any shift in weight. Unfortunately they become less sensitive as we age.

Another thing that is a factor in balance is strength. And it is something we can lose as we age. But, like proprioception, it is a skill we can work on. Assuming that your sensory systems are all in working order, let’s look at some simple things you can do to improve your balance.

Bird of Paradise

Do more yoga. Any yoga posture more elevated than Savasana (Final Relaxation) works on balance. Not just the obvious, one-legged postures such as: Tree, Eagle, Warrior III, Half Moon and Dancer’s Pose. There are three components to balancing in yoga postures: getting into the posture, holding the posture and coming out of the posture. So, make sure you pay attention to getting into and coming out of the pose as much as you do holding the pose.

Hike. Get out and walk on uneven surfaces. We spend so much time walking on engineered and flat surfaces that our feet and legs get lazy. Walking on uneven surfaces develops the muscles in our feet, calves, legs, hips and even some of our upper body as well. This develops strength and proprioception.

Exercise. Naturally, I like to recommend yoga, but any form of exercise will help build strength, coordination and sharpen your proprioceptive sense. Play golf, tennis, ride a bike, lift weights. Do anything that requires you to move your body, makes you sweat and gets you tired out (in a good way).

Stand while getting dressed. (What?!) In my friend Anna’s class one day, she remarked about how one of her senior students has amazing balance. She even has good balance with her eyes closed! When asked what she attributed her great sense of balance to, the student remarked that she never sits down while getting dressed or undressed!

You might say you don’t have time to do exercise, but everybody has to get dressed and undressed. What do you think? Can you do it? I challenge you to give it a try. For one week, at least, stand every time you get dressed and undressed and see if you notice your balance getting better. And then, let me know how it’s going.

Working on any of these postures will help you improve your balance by increasing your strength and proprioceptive sense.
As one of my yoga teachers says, “Balancing is a significant part of every yoga pose more elevated than Savasana.”

5 Tips for Doing Yoga on the Beach

Do you love going to the beach in the summer? I do. And I love doing yoga on the beach. Some resort towns offer yoga classes on the beach and that can be great, but it is often fun to just do your own practice. I love to go for a long walk, stretch out and do a practice and then go for a swim.

If the idea of practicing yoga on the beach appeals to you, I thought I’d share some of my personal do's and don'ts before you head out:

1. Do your practice on the beach before 10:00 am or after 4:00 pm when the sun is not as strong. I especially prefer the earlier time because I am a morning person. But the real reason I prefer these times is that I do not like to practice yoga on the beach while wearing sunscreen. Sand sticks to the sunscreen and makes me uncomfortable.  Of course you can wear athletic clothing that has an SPF factor if you are concerned about sun exposure, but I like to get a little of direct sun in the off hours for the production of Vitamin D. Also, unless you like attracting a lot of attention, the off hours give you a little more space.

2. Don't take your sticky mat to the beach!  Sticky mats were made to work on hard floors, not sand, dirt or even grass. Sticky mats will attract and hold onto sand.  When teaching yoga at the studio, I have often stepped on a pile of grit on the floor from someone's sandy yoga mat. It is hard to get the sand out of the mat. Even after washing sometimes sand remains. Let your hands and feet feel the earth. It is grounding and good for the soul.

3. Use a towel when necessary. I use a towel mostly to keep my hands clean.  When I do Downward facing Dog, I place my hands on a towel and keep my feet on the sand.  I definitely use my towel for seated and lying down poses.  When the towel gets scrumbled up and sandy, I just shake it out and reposition it on a fresh patch of sand.  Although I have to say that I love doing a split directly on the soft sand.  Your heels will dig a little trench and the warm soft sand will support your whole thigh in a way that allows you to relax into the stretch.  Usually after a split, I might rinse off in the water, do a Seated Forward Bend on my towel and then do Savasana.

4. Change your practice to suit the conditions.  Instead of coming into your standing poses from Down Dog, start them from Tadasana.  This way your hands don't get sandy.  You can do Sun Salutes directly on the sand. That will inspire you to not lower onto your belly, but to hold the Low Push Up and transition into Upward Facing Dog instead of going to your belly for Cobra. If you do need to lower to your belly, either do it on a towel, or skip the sun salutes.

5. Find the most level part of the beach to practice on. Sometimes this is hard as a lot of beaches slope to the water. You can adapt most of your poses to a slight incline, but headstand and a lot of the hand balancing on anything but a truly flat surface is tricky.

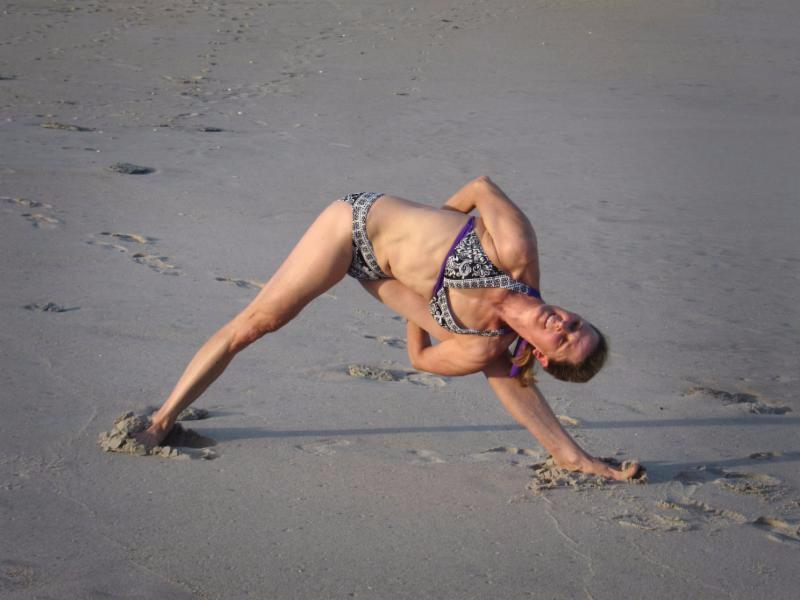
Revolved Triangle on the Beach

Bound Triangle

Bound Triangle

While I specifically mention the beach, you can apply these principles to any outdoor yoga session.  You don't need a yoga mat to do yoga, sometimes it is helpful and sometimes it just gets in the way.  I hope you get out there and enjoy doing yoga outside. Working on different surfaces causes your muscles to work in a different way. It’s a refreshing addition to your practice.

Have fun out there and feel free to post a picture of yourself doing yoga on the beach, or any other place outside.
I’ll see you in class! Karin

Pose of the Month: Vrischikasana (Scorpion Posture)

You can see how this posture got its name; it looks just like a scorpion. There are two versions of Vrischikasana. The first one is done from Forearm Balance, or Pinca Mayurasana. This is an easier version of Scorpion to balance in, but it also requires more stretch in the shoulders. The second version is done from Handstand. It is useful to play with both of them.

Prerequisites: You need strength, shoulder flexibility and a deep back bend to do Scorpion.

  • Strength: There are two separate areas of strength necessary for Vrischikasana: One is core and the other is shoulders. You can build strength in both of these areas at the same time by practicing your ability to hold the various plank positions. There are four versions of Plank Pose on your hands: forward, to the right side, to the left side and Reverse Plank. In the beginning, try holding each one for 20 seconds. Build up to being able to hold each one for a minute. You can also try holding Plank Pose on your forearms.

  • Shoulder flexibility: To do Scorpion and keep your shoulders and your rotator cuff safe, you need to work on stretching your arms overhead. You should be able to stretch your arms overhead and have them be in a straight line with your body without arching your back. If you cannot do this, it is important to work on stretching your shoulders by doing poses like Warrior III with your hands on a ledge, or in Down Dog.

  • Back bends: As you can see in my Scorpion, I cannot get my feet to my head, yet. So, it is not necessary to be able to do so to work on the pose, but you should be pretty strong in your Wheel. Try practicing Wheel against the wall. Start by placing your wrist creases at the corner of the wall and the floor. When you lift up into Wheel, move your chest in the direction of the wall. If your chest can touch the wall, you can begin to work on coming down on your forearms in Wheel. Press your elbows against the wall and begin to move your chest toward the wall. Camel is another great pose that will help with your Scorpion. More than Wheel, Camel will also work to strengthen your abs. From Camel, you can progress to what is often called Pigeon Droppings. This is where you drop back from Camel to your hands.

  • Arm balances: No matter which of the two Scorpion versions you try, you should be pretty comfortable in Forearm Balance and in Handstand. This doesn’t mean that you have to be able to balance in these poses in the middle of the room, but you should be relatively strong in each one of these at the wall.

Remember not to rush the pose. Take your time and enjoy the process. Set small, achievable goals for yourself and celebrate each time you reach one. You don’t want to get stung by forcing yourself into Scorpion!

Sirsasana Q's & A's

What part of your head should be on the floor while doing Headstand?

There is a spot on the top of the head where three plates of the skull meet. This is the fontanel spot in infants. It might be kind of a flat spot. If you are not sure, there is a way to measure using your hand. Place the heel of your hand at the bridge of your nose. Without lifting the heel of your hand up, let your fingers rest on the top of your head. Right where the middle finger rests is the spot the head should be resting on when you are upside down. Once you find the spot, keep your middle finger where it is and lift the rest of your hand. From the roof of your mouth, push up into that spot as if you are balancing a book on your head. This is exactly the spot you should be on during Headstand.

Is there a modification for those who have neck issues and are afraid of putting all of their body weight on their head?

If you have issues with your neck and are leery of Headstand because of that, a nice modification is Six- Block Headstand. This is Headstand with your shoulders resting on the blocks. There is little if any weight on your head, and therefore, there is no pressure on your neck.

Six Block Headstand

Six Block Headstand

My neck feels scrunched when I go upside down in Headstand. That can’t be good, can it?

Your neck should never feel scrunched when you are doing Headstand. If it does, come down immediately! If your neck feels scrunched, it could be because your shoulders are tight and your forearms are below the level of your head. If this is true, you may feel that you prefer to do Tripod Headstand rather than Headstand on your forearms. You can always do Six-Block Headstand. While Tripod Headstand, or Sirsasana II, is a wonderful version of Headstand, there is value in opening up the shoulders for Sirsasana I. A lot of other poses including Wheel and Handstand need this degree of shoulder opening. If you are tight in your shoulders there is a very specific block arrangement that can help you with this. It is rather hard to describe; if you are interested, please check out the photo. A picture is much easier than a thousand words.

It might be hard to see in the image on the left, but the person on the left in the striped sweater has tight shoulders.  Her elbows are winging a bit wider than everyone else's, and her forearms are lower than her head.  We used the 4-block configuration to keep her upper back from rounding as she went up into Sirsasana I.  And with the use of the props, her form is perfect, her neck feels good and she is getting a nice stretch in her arms and upper back.

How long can I stay up in Headstand?

For students just learning Headstand, I would recommend going up and staying for a few breaths and then coming down, maybe 30 seconds at first. And that is it for one day. I would recommend not practicing Headstand every day in the beginning. You can practice every other day until you are sure you are not having any negative side effects from Headstand. Also, remember that Shoulderstand is a counter pose to Headstand. So every time you practice Headstand, you should also practice Shoulderstand for the same amount of time. Once you are comfortable in Headstand, try staying up for 1 minute at a time. You can either time your breaths or use a timer. I like using a timer, but I also know that I can breathe 6 Ujjayi breaths in a minute. Build up gradually over time to 5 minutes (or 30 breaths for me). Once you have reached 5 minutes, keep practicing that same amount of time and stay at that length of time for a couple of weeks, if not months. Then you can start playing with increasing the time even longer. Again, do so gradually. Maybe 1 minute a month. It is not uncommon for people to practice and be able to hold 30-minute Headstands.

A word about Headstand variations: The general rule of thumb I follow is that you should be able to stay in Headstand for 5 minutes before you start doing Headstand variations. You want to make sure your neck is strong enough to support your body weight before you start twisting around on your neck! Also, while it is possible to stay up in Tripod Headstand for 5 minutes, it is usually Sirsasana I, or Forearm Headstand, that is the one most people are in for longer holds. Tripod is the Headstand that works most with transitions like Headstand to Crow, for instance. Happy playing!

I hope these questions and answers are helpful. Let me know if you have any other questions. I’ll see you in class! Karin

Parivrtta Balasana

Parivrtta1.jpg

How long do you usually hold postures in a vinyasa class? Thirty seconds? Five breaths? We do not usually hold poses for very long. Some postures we hold for longer, such as Headstand and Shoulderstand. We might hold those for five minutes. We also hold restorative postures for five minutes or more. Parivrtta Balasana is one of those poses that are better when held for a slightly longer period of time. It is not quite a restorative posture, but it is not quite active either. In Parivrtta Balasana you have to get very still and quiet, let go of doing and come into being. You cannot think or exert your way into this deep twist you have to surrender to it. This is a great example of having to get out of your left brain, which is the analytical thinking brain and come into your right brain, which is the more holistic, pictorial side of your brain. In this state of mind you allow yourself to feel where your body is in space and allow it to relax and let go. You have to get very quiet and retreat inward. Then imagine yourself feeling like pulled taffy and slowly allow yourself to sink into this deep twist. This may take a minute or two. Allow your breath to get very fine and subtle.

Parivrtta2.jpg

One of the benefits of this posture is that it is good for helping to reduce fat around the waist. This posture is best performed on an empty stomach, and it may help you to not overeat during this holiday season.

Parivrtta3.jpg

…or lying down in Supta Virasana. These are two of the few poses that you can do after eating. They stimulate the Stomach meridian and the organ itself, promoting digestion.

Parivrtta4-e1464211942271.jpg

Lastly, if you do eat too much, you might feel like the pose that we usually call Happy Baby, but at this time of the year, I like to call it Stuffed Turkey!

The Single Best Pose for Scoliosis - Vasisthasana

Because I have a little scoliosis, I have a twist in my body.  When I stand, one shoulder is higher than the other shoulder.  Sometimes it bothers me.  As a yoga teacher I feel like I am “supposed to be” more symmetrical.  But I notice the same thing, in varying degrees, in my students, friends and even in pictures of other people.  Most people are not quite symmetrical when they stand.

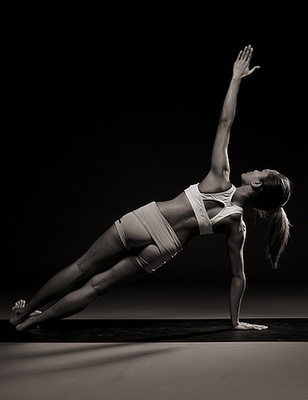
Vasisthasana

Vasisthasana

We don’t do things symmetrically. We have a dominant and non-dominant side.  We hold our children, push a vacuum cleaner, rake, sweep, shovel and do a number of other activities on one side. Try brushing your teeth with your non-dominant hand! This preference of one side over the other sets up a functional asymmetry in the body.  Knowing this can be a good thing.  It can help you be aware of your asymmetry and you can work to correct it.  You can even try, as I sometimes do, to do all of those activities on your non-dominant side.

Years ago, I asked one of my yoga teachers for help with my scoliosis.  She gave me several practices to do.  One of them was to practice Side Plank on my convex side twice as much as I practiced it on my concave side.  (If you don’t know which is your convex side, it is the one that is harder for you to bend towards.)   Just this week, a friend forwarded an article to me that cites the benefits for improving your scoliosis by practicing Side Plank for a minute and a half* daily on your convex side.  The article suggests you do this for two months to notice an improvement. (And then please don’t stop!  It’s just like cleaning your house.  You can’t expect to vacuum once and be done with it. You have to do it regularly.)  Check out the article by clicking here.  Let me know what you think.

*Please start slowly, maybe 10 seconds at first and build up by a few seconds each week to get to a minute and a half.  There are also modifications.  If you need help I would be happy to work with you privately to get you going.  Contact me by clicking here.