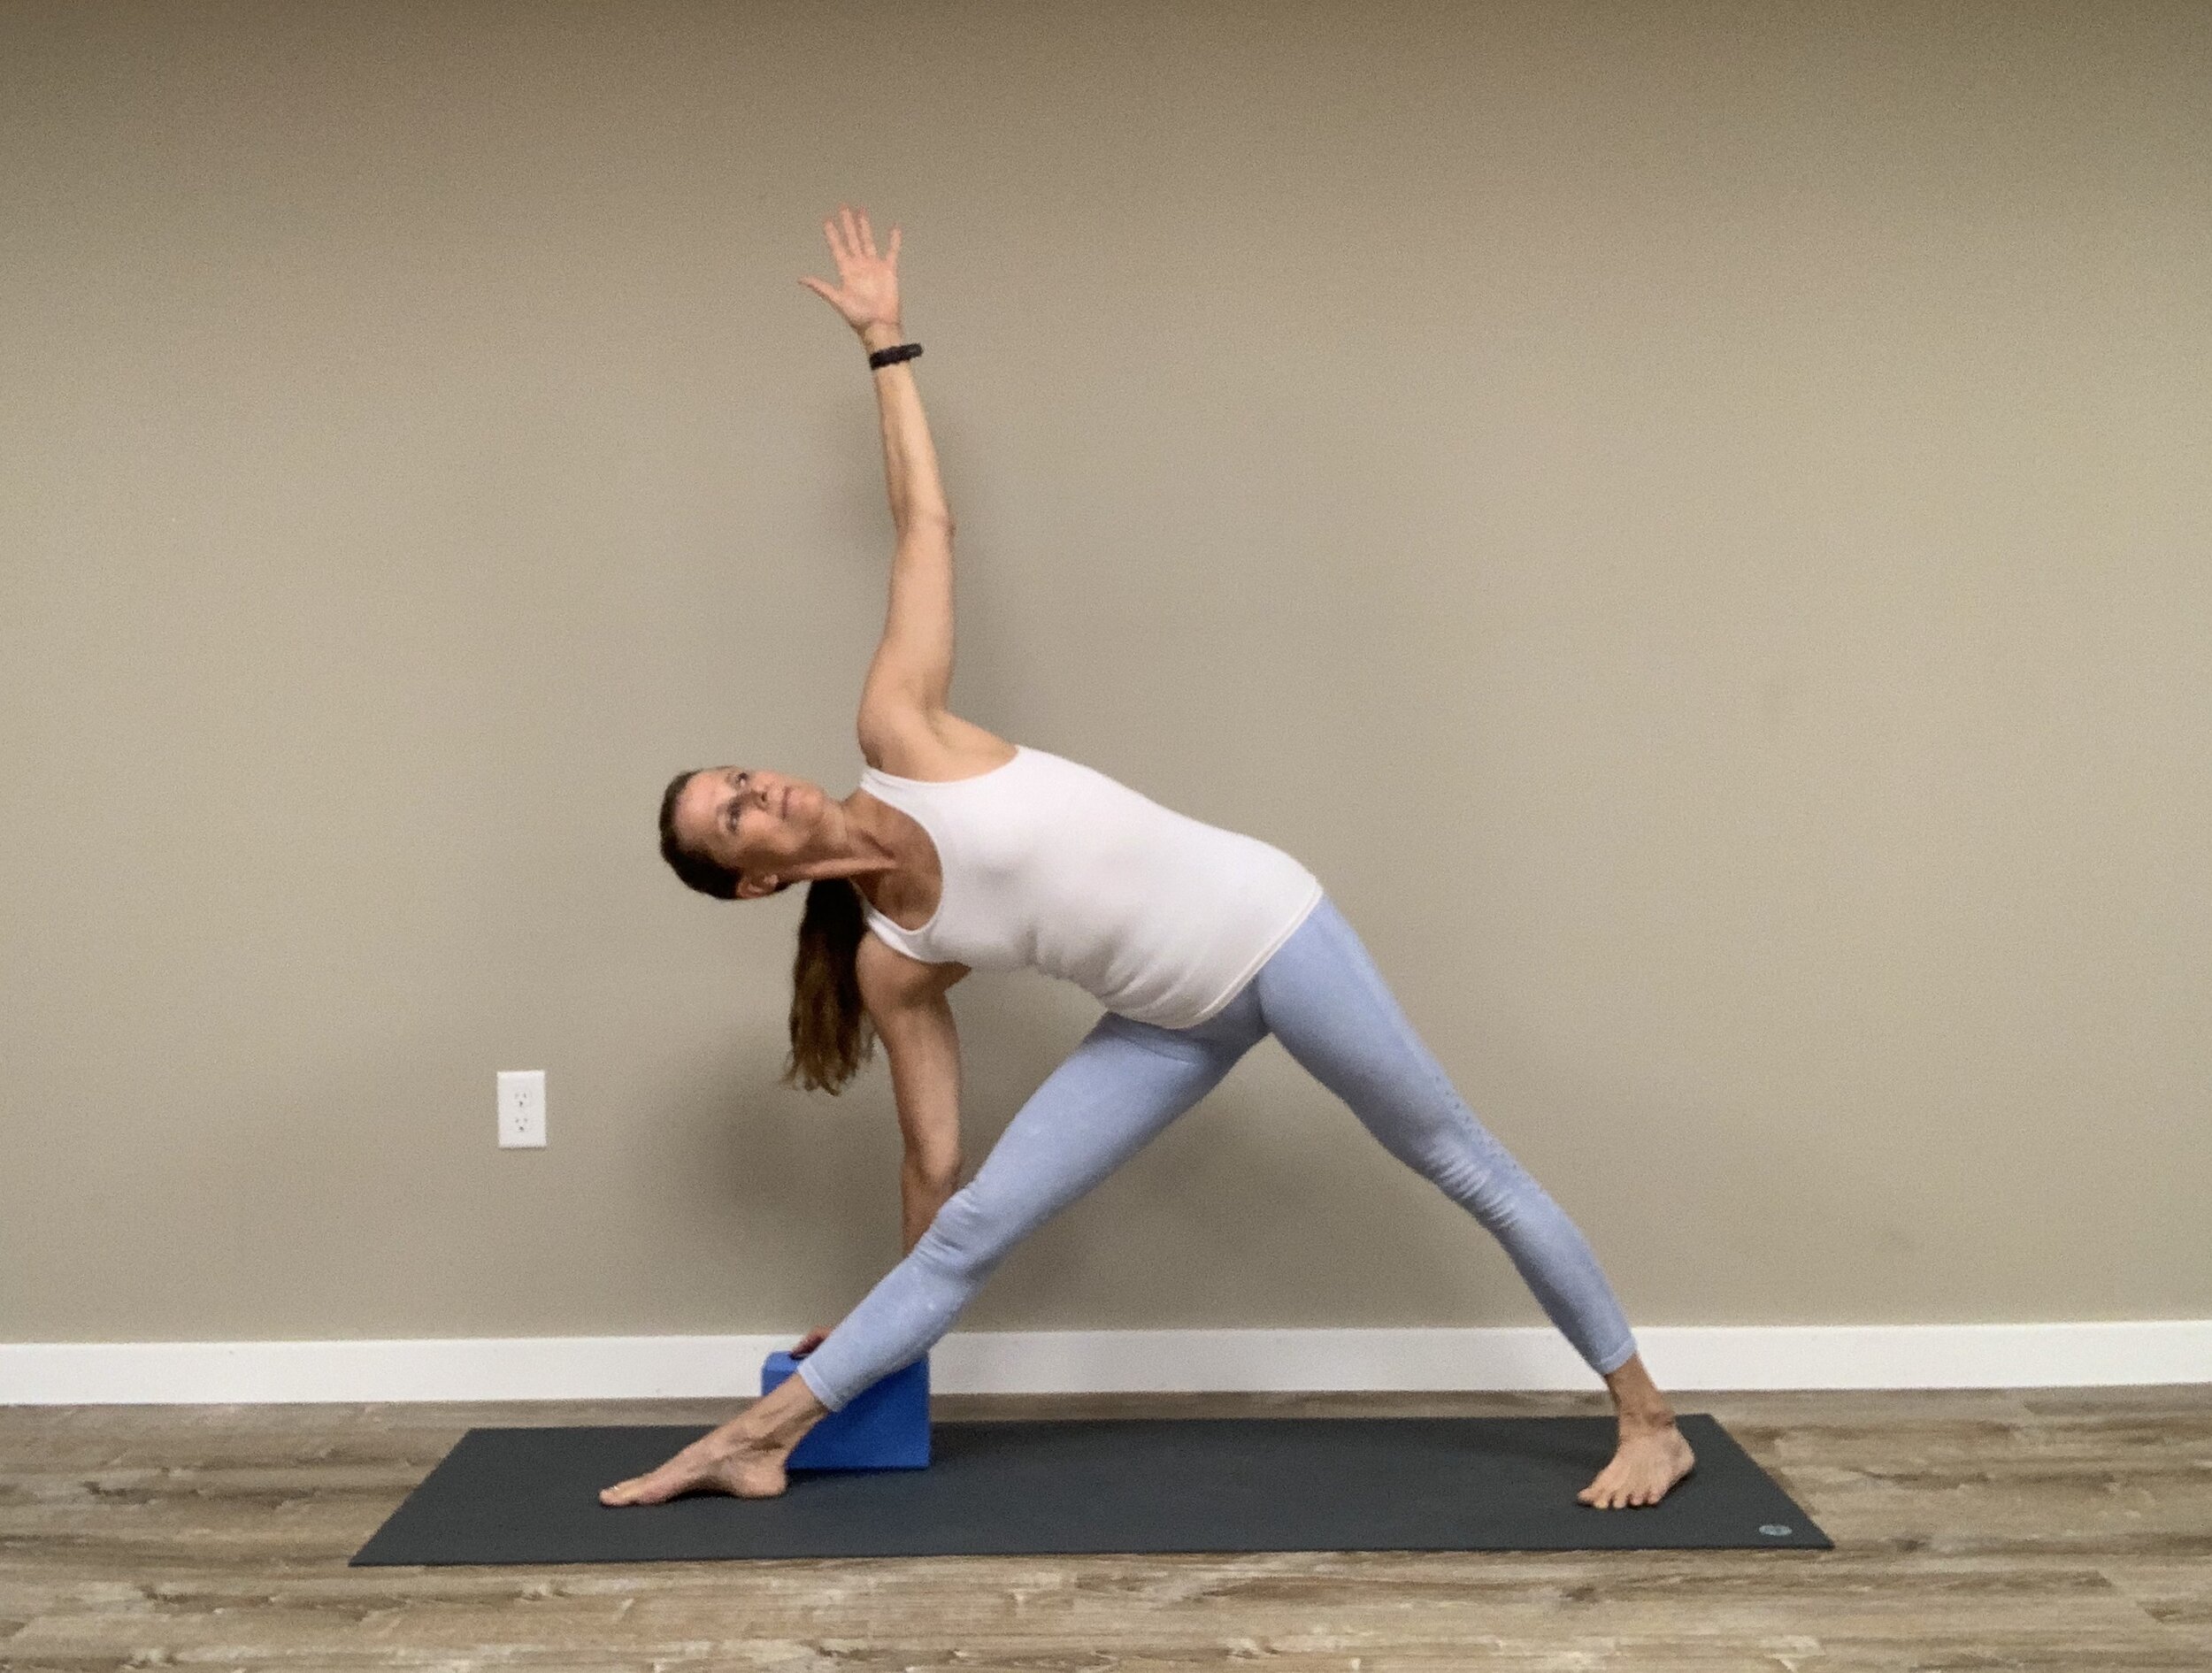
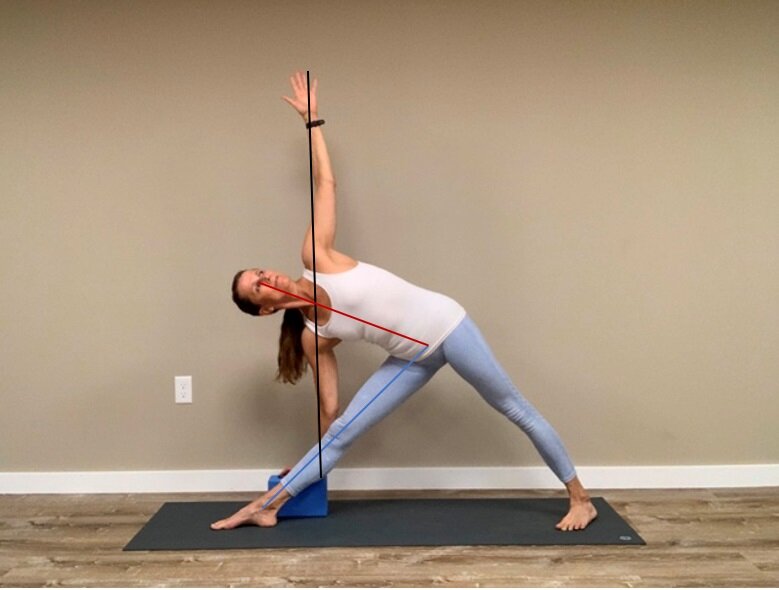
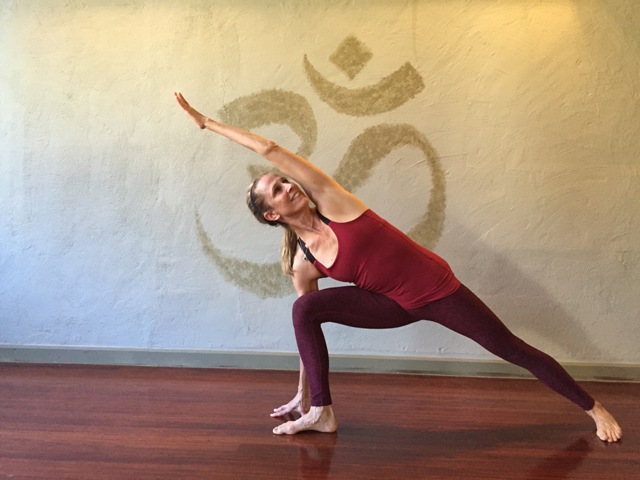
What is more important? Getting your hand to the floor in Parsva Konasana or turning the trunk upwards and establishing the straight line from the pouter edge of the back foot up to the the fingers of the upper arm?
Props and Modifications
Putting Things Off Until Later
Barely the day started and... it's already six in the evening.
Barely arrived on Monday and it's already Friday.
... and the month is already over.
... and the year is almost over.
... and already 40, 50 or 60 years of our lives have passed.
... and we realize that we lost our parents, friends.
and we realize it's too late to go back...So... Let's try, despite everything, to enjoy the remaining time...
Let's keep looking for activities that we like...
Let's put some color in our grey...
Let's smile at the little things in life that put balm in our hearts. And despite everything, we must continue to enjoy with serenity this time we have left.
Let's try to eliminate the afters...
I'm doing it after...
I'll say after...
I'll think about it after...
We leave everything for later like ′′ after ′′ is ours.
Because what we don't understand is that:
Afterwards, the coffee gets cold...
Afterwards, priorities change...
Afterwards, the charm is broken...
Afterwards, health passes...
Afterwards, the kids grow up...
Afterwards parents get old...
Afterwards, promises are forgotten...
Afterwards, the day becomes the night...
Afterwards life ends...
And then it's often too late....So... Let's leave nothing for later...
Because still waiting to see you later, we can lose the best moments,
The best experiences,
Best friends,
The best family...
The day is today... The moment is now...
We are no longer at the age where we can afford to postpone what needs to be done right away.
Urdhva Hastasana or Upward Hands
How to come out of Savasana
Who would have thought that you need instructions to come out of Savasana?! Don’t you just get up off the floor? Do I really need to be told how to do that?
Yoga is a practice of intention, of being aware of what you are doing and how you are doing it, not just while you are in the pose, but before you come into it and after you come out of it. How you come into the pose affects how you are in the pose and how you come out of the pose defines how much of the pose you take with you.
Your asana practice challenges you physically; to stretch and to be strong, and mentally to be present and to be discriminating. Most students tell me that they feel calmer after their yoga practice. That is because the practice works not just on our bodies, but our minds as well. We enter a calmer mental state. Another way to put that is to say that your asana practice can take you out of a mental state of high alert, also known as fight or flight, and put you into a calmer and more relaxed state, also known as rest and digest.
How you come out of Savasana after your yoga practice can either keep you in that calmer state, or jolt you right back into fight or flight. Let’s take a look at what can happen.
Hopefully, you have been able to drop into a deep state of relaxation in Savasana. Your body is still, your mind is quiet and your breathing has slowed down and become very soft and subtle.
The first instruction for coming back from Savasana is to begin to increase your breath. The breath is prana, or energy and as such, it begins to energize the body. I usually guide my students to breathe into their arms and legs and up into their neck and head. When you feel the energy of the breath in these areas of the body you can begin to move and stretch by starting with small movements in the fingers and toes, moving up to the wrists and ankles. At this point you can begin to bend your knees and elbows and turn your chin from side to side.
When you are ready you can roll to your side and pause for a moment, drawing your knees up into your chest in a fetal position and cradling your head on your arm. When you are ready to sit up, roll towards the floor and use your hands to push yourself up, allowing the head to come up last.
If you come up in this manner, you will still be in that sense of calmness and quietude cultivated through the combination of your practice and Savasana. This will help preserve the sense of rest and digest that is equated with a more relaxed mental state.
However, some students may not be able to relax and drop into a restful state in Savasana.
Sometimes students lie still through the instructions for coming back from Savasana and instead of coming up gradually, they sit bolt upright by doing a quick abdominal crunch. Have these students been able to relax? Maybe these students obediently lie back during Savasana but instead of relaxing they are waiting to be “released” from the pose.
Coming up from Savasana in this manner quickly jolts your system out of rest and digest into the state of fight or flight. This is done by a combination of quickly contracting the abdominal muscles and hip flexors which send a message of danger to the brain. This is an action most animals take to protect their visceral organs from being attacked. And although we are not being attacked the reflex action sends off a cascade of nerve signals which triggers the brain into a highly alert state. While most of us will eventually get back to this state on our own, there is no need to rush the process.
So, the next time you are in savasana, try to relax. If you can’t relax, at least lie still and breathe as slowly, deeply and as evenly as you can without creating any stress. And when you come out, do so gradually and notice how you feel.
Yoga means to yoke the body, mind and the spirit. Allow your yoga practice to work on more than just your body by paying attention to how you come out of Savasana.
Triangle Pose
Utthita Trikonasana
Utthita means extended and Trikonasana means Triangle. This is Triangle Pose, one of the most basic standing poses and often one of the first poses taught to beginners. It is the pre-cursor to many other poses including: Virabhadrasana II (Warrior II), Utthita Parsva Konasana (Side Angle), Ardha Chandrasana (Half Moon), Virabhadrasana III (Warrior III) and Virabhadrasana I (Warrior I) and Parivrtta Trikonasana (Revolved Triangle)
The basic instructions are:
Stand in Tadasana in the middle of your mat facing the long edge. Bring your hands up to the center of your chest, in line with your collar bones and on an inhalation step or jump your arms and legs 3-1/2 to 4 feet apart.
Turn your right leg and foot 90 degrees out to the right. Look to see that the right foot is pointing straight out to the right and that the center of the right heel is in line with the arch of the back foot. Lift the kneecaps engaging the quads. Keep the arms extended and the chest lifted. The torso should be centered between the legs.
On an exhalation, reach the right arm out to the right, stretching the right side of your torso out over your right leg, tilting your hips as you go. Keep the left hip rolling up and back on top of the right hip. When you can’t go any further, reach the right hand down to touch your shin, or a block, or the floor on the outside of your leg. Turn your head and look up at your top arm.
Keep weight on the inner edge of your front foot and the outer edge of your back foot. Keep the kneecaps lifted as you breathe normally.
On an inhalation, keeping the kneecaps lifted, press down into the inner edge of the front foot and outer edge of the back foot reach out through your left hand and bring yourself up. Turn your right foot in. Repeat to the other side.
When finished, step or jump your arms and legs back together and return to Tadasansa.
This gives you the basic instructions, but it does not tell you exactly where the body is in space. It is possible to follow these instructions and not end up in a well aligned pose. For this, you need to be able to look at yourself in the pose.
Triangle Pose with alignment points
Notice how far apart my legs are. Often the first thing a student needs to learn is to open the legs wide apart. For this you need the flexibility to spread the legs and the strength to balance in this stance.
See the relationship of my front arm to my front shin. My forearm crosses my shin near my knee. You can’t see this from this angle, but my forearm is also “gating” my front shin; which means that I am pressing my forearm against the shin. This helps to keep the weight on the inner edge of the front foot.
Notice that my arms are in a vertical line with my top hand over my shoulder and ultimately in line with my bottom wrist. There is air and space in my top armpit. My spine and the sides of my waist are in a straight line and not domed.
From the head view, you can see that my torso is in line over my front leg, not inside of it or outside of it. Most students bring the torso to the inside of the front leg in order to get the hand to the floor, mistaking that for the goal of the pose. But all this does is to cause the hips to swing out and the torso to rotate to the floor.
Torso is in line over front leg. See how the wrists and shoulders are in line and they are slightly to the outside of the front leg. This is correct alignment.
Torso is leaning inside of front leg. See how the hands are back and the shoulders are forward. The arms look skewed. This is incorrect alignment.
The other thing to notice from the front view is that I am very two-dimensional. In other words, my body is still in Tadasana even though it is tipped to the side. My buttocks are not moving backwards, my head is not drifting forward and my torso is in a vertical plane. This is the goal of the pose, not getting the hand to the floor.
Another subtle thing to notice is that while my torso is over my front leg, my arms are on the outside of the front leg. In other words, my arms are slightly behind my torso. This is the same as it would be in Tadasana. A lot of shoulder problems come from not being able to roll the shoulders back and lift the base of the throat. Look to see that my arms are vertical in this plane as well.
The gaze should be looking into the top hand, or as close as you can to it. This is easier if the top hand is not drifting behind you. Make sure that your head is in line with your spine and centered between your shoulders. Don’t drop the head backwards to look up at your top hand. The last thing I want to mention is that the head is turned to be looking up at the top hand. I like to give the cue to look at your right hand with your right eye and try to see with your left eye what your right eye can see.
Head in line with the spine.
Head dropped. Bottom ear is closer to the bottom shoulder.
Take a look at yourself in a mirror as you do Triangle Pose and notice where your body is in space.
What Does Your Side Angle Pose Look Like?
Utthita Parsva Konasana or Extended Side Angle Pose
The Bhagavad Gita gives us two definitions of yoga: Yoga is skill in action (B.G. 2-50) and Yoga is equanimity of mind (B.G. 2-48).
One of the best ways to learn more about your yoga poses is by either practicing in front of a mirror, having someone take a picture of you in a pose, or looking at yourself on the screen in a zoom class. This is often very humbling. We are often not as advanced as we think we are! I know I have often been surprised by the fact that what I look like in my mind and how I look on screen are very different. Seeing yourself is a great way to learn and and develop skill. Awareness is always the first step in growth.
Side Angle Pose is a building block towards other advanced poses so it is important to work on and understand Parsva Konasana.
Take a picture of yourself in Side Angle pose from the front and from your head side. Then compare your pose to an example of a well done posture. Be wary of some of the poses you find online on Facebook or Instagram. While you may find some very correctly executed postures, there are many more not so well executed. Like these examples:
Here my front thigh is lower than horizontal and my back leg is collapsing.
Here I have collapsed my neck and shoulder on the lower side and I am not a straight line from my outer back foot up to my top fingers.
For skillfully executed postures, I recommend looking in Light on Yoga by BKS Iyengar. Or, for an online source click here to see a three-dimensional view of Parsva Konasana.
Mr. Iyengar demonstrating the alignment of Parsva Konasana
How does your pose measure up? Can you look at yourself critically but lovingly? Don’t beat yourself up by how bad you might think your pose looks. Instead, look at what you are doing that is good and work to build on that. Look at where you need to move to. Knowing where you are helps you move towards where you want to be. Remember the definitions of yoga refer to skillful action and equanimity of mind, not perfection in asana.
Sometimes students look at a pose and see certain things that they attach importance to, such as the hand on the floor in Side Angle Pose. While the hand on the floor is a goal, you have to first look at the skill of that action.
The full version of Side Angle Pose is with the front knee bent 90 degrees, the knee is over the ankle and the front thigh is parallel to the floor. The upper side of the body should be a straight line from the outer edge of the back foot up to the tips of the fingers of the top hand.
Side view
But, you also have to look at the pose from the front. The body should be very 2 dimensional from the front. That means that the outer buttock of the front leg should be in line with the outer knee, which is in line with the outer heel. The buttocks should not be winging out.
In this view, I have the outer buttock of my front leg in line with the outer knee and my chest is facing sideways. This is skillful action
In this view, you can see that my buttocks are winging out and my chest is facing slightly downward rather than shining out to the side. This usually happens when a student prioritizes getting the hand to the floor over the form of the pose.
If I didn’t have the flexibility to get my hand to the floor, I would be better off placing my hand on a block, or my elbow on my knee if I didn’t have a block, and turning my chest open and then gradually, over time, I would be able to lower my hand to the floor.
A beautiful, modified pose.
One interesting way to do Side Angle Pose is lying down on the floor. The floor will serve as a guide as to align your shoulders, buttocks and hips in the same plane. If you take classes with me you will often hear me say that there are only 12 yoga poses and they are done in different relationships to gravity. When you are doing Side Angle while standing, gravity helps you bend deeply into your front leg. When you do it lying down on the floor, gravity will help turn your chest open. Doing poses lying down on the floor can also show you what you do and don’t know about where to place your body.
Can we learn to be skillful in practice? Can I find equanimity in backing off from grasping for the full pose until I develop the skill to enter the pose gracefully?
A Forward Bend Practice
Yoga for Insomnia
What do you Look Like in a Forward Bend?
Forward Bending
You will often hear me give the cue that the back of the head should be in line with the upper back when folding forward so that you are not rounding your back. Do you know what you look like when you are forward bending? It is important to see yourself when you are folding forward. Often what you feel you are doing and what actually are doing can be two very different things. You can see yourself by looking in a mirror the next time you are practicing. Or, you can enlarge a thumbnail of yourself on the screen in your next zoom class.
When forward bending it is important to move from the hips. Unfortunately, if your hamstrings are tight, you might end up bending from the waist, and/or reaching from the shoulders. These positions are especially important when we hold forward bends for a long time as in the Immune System Sequence
Let’s take a look at what this can look like in Prasarita Padottanasana, or Wide-Legged Forward Bend.
In this first picture, I am hinging from the hips and, being fairly flexible, I can place my head on the floor with my back mostly straight, there is just some slight rounding at the end of the pose.
In this next picture, I am trying to be a student with tight hamstrings and I cannot fold forward very well. You can see that I can hinge at the hips to 90 degrees, but to go any further, I am rounding my back and reaching out of my shoulders to get my hands to the floor. I am using blocks to support my head, but the back of my head is lower than my upper back. which means that my chest is collapsed and I am reaching out of my shoulders to touch the floor. My experience in this pose is that I am pretty uncomfortable.
Here is the same posture using a chair instead. While the chair might be a more appropriate prop for me, how it’s being used is not conducive to folding forward; my back is still rounded with my head lower than my upper back and I am still reaching out of my shoulders.
Check out this last picture. I am still a student with tight hamstrings, but I am using the chair appropriately. My back is straight. I have a straight line from my hips to my elbows. There is no rounding of my back. The back of my head is in line with my upper back and I am not reaching out of the shoulders. In this position I am hinging at the hips. This position looks more like the first picture of myself in the full pose. It also feels very similar as opposed to the other two which don’t feel as good.
Practicing a forward bend, or any pose, in proper alignment will take you deeper into the pose over time. This version of the pose also shows me that the student understands what is meant to be happening in the pose. In other words, it’s not important to get your hands to the floor. It is important to hinge at the hips and to keep as much of Tadasana in your posture as possible.


