Strapasana, or the fine art of threading a yoga belt.

How to Thread a Yoga Belt or Strap

Knowing how to use props correctly can support and inform your practice, or frustrate you if you don't know how to use them correctly.  Blocks are pretty straightforward; you just have to know which height and which orientation.  Blankets are a little harder and a lot like origami.  It is important to fold the blankets correctly to provide a good platform to support your body.  There are a couple of basic folds that we use in yoga, but that is the subject of another blog post.  I always thought belts were pretty simple to thread, go up through the middle and down through the end.  All you have to do is to make sure the buckle is right side up, otherwise the belt will slide.  But I often find that teaching people how to use a belt in class takes up a lot more time than I often think it should.

I created this how to article after a colleague once commented that she used to think that all of the straps in the studio where she taught were broken.  And this was a yoga teacher!  Knowing how to use a prop is as important as knowing where to place your hands and feet in any pose.

In this post, I will go over how to thread the most common types of belts you usually find in a yoga studio.  There are three basic types of belts; a metal buckle, a plastic buckle and a plastic quick release buckle.  The metal buckles are the easiest to use.  They can never be upside down. 

The Metal Buckle

A Metal Buckle

A Metal Buckle

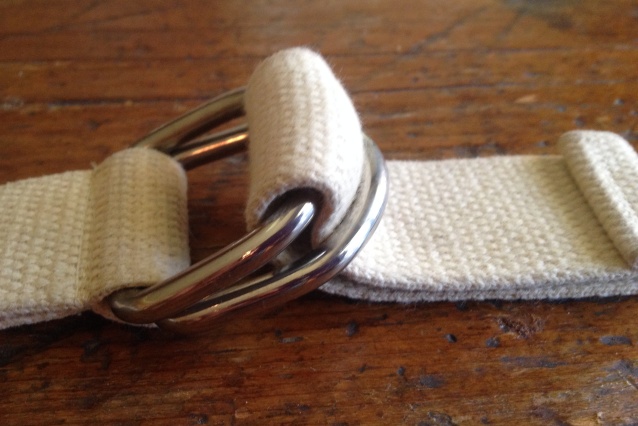
The metal buckle is made up of two metal D-rings.  It threads the same way all belts thread; up through the middle hole and down through the hole on the end.

A metal buckle threaded

A metal buckle threaded

All buckles thread the same way, you go up through the middle and down through the outside.

Plastic Buckles

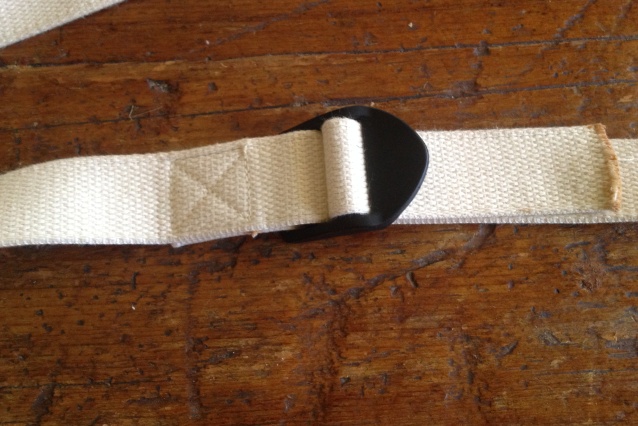
The most important thing you need to know about a plastic buckle is whether it is right side up or upside down.

Here is a picture of a plastic buckle, right side up:

Belt-buckle-right-side-up-4-x-6.jpg

Here is a picture of the same buckle upside down:

belt-buckle-upside-down-4-x-6.jpg

This buckle is threaded the correct way and it will not slide.

belt-buckle-correctly-threaded-4-x-6.jpg

If the buckle is threaded upside down, the belt will slide. This belt buckle is threaded the wrong way:

belt-buckle-incorrectly-threaded-4-x-6.jpg

To thread a buckle, make sure the buckle is right side up and bring the tail end of the belt up through the middle:

belt-buckle-up-through-the-middle-4-x-6.jpg

And then take the belt down through the end.

belt-buckle-down-through-the-end-4-x-6.jpg

The Quick Release Belt

The third kind of belt is the quick release belt.  I like these the best because you don’t ever have to thread them, they usually have a spot where you pinch them to release them and then they snap together.  The only thing you ever have to do to a quick release belt is to adjust the length of the belt.

Here is a picture of a quick release buckle:

belt-buckle-quick-release-4-x-6.jpg

Here is a picture of a quick release buckle taken apart:

belt-buckle-quick-release-apart-4-x-6.jpg

This type of belt snaps together.  To get it apart, you squeeze where the indentations are.

In the picture above left, the left side could be unthreaded but never needs to be.  If you find a belt like this unthreaded, simply rethread it the way you would any other buckle; up through the middle and down through the end.  It is often easier to thread it correctly when the two parts are snapped together.

Quick-release-buckle-threading-up-through-the-middle-4-x-6-4.jpg

To thread:  First make sure the buckle is right side up and then go up through the middle hole…

…and down through the end.

…and down through the end.

This is a quick release belt threaded upside down. The belt won't hold. It will slide when you pull on it. Compare it to the picture of a the quick release belt above.

This is a quick release belt threaded upside down. The belt won't hold. It will slide when you pull on it. Compare it to the picture of a the quick release belt above.

I hope that his article helps you figure out how to thread a belt correctly so that we can spend more class time on asana and less time on props!
The Pose of the Month for April 2019

Bakasana

Baka means Crane, although we typicallly call it Crow Pose.  Some students think that Crow is with the arms bent and Crane is with the arms straight.  I've only known it as Crow.  In the beginning it is hard to straighten your arms.  (As you can see in my photo.)

Crow is often one of the first arm balances you learn after Caturanga and Handstand.  “Arm Balances are the perfect poses to practice persistence in the face of challenge, as well as non-attachment to the fruits of your labors.” ( Julie Gudmestad, YJ, July/August 2002.)

Alignment – Skeletal:
How is the body lined up in space?

  • The hands are place on the floor shoulder width apart, wrist creases pointing straight ahead.

  •  The knees are pressing against the outer arms, high up near the arm pits.

  • The back is rounded and is higher than the buttocks.

  • The inner edges of the feet are touching.

  • The arms will be bent at first and eventually straightened

Actions – Muscular:
What do you do while you are in the pose?

  • Press the inner knees against the arms.

  • Isometrically squeeze the inner arms towards each other.

  • Press the inner edges of the feet together, everting the feet, this will also help with squeezing the knees.

  • The belly button is pulled back into the spine, engaging the abs.

  • Lift the kidneys towards the ceiling.

  • Extend the neck and keep the head as high as possible.

Drishti, (or Focal Point):

  • Straight ahead, eyes on the horizon.


Images:

  • Feel a cat tilt in your back.

  • Inner thighs hold you in pose, this comes from squeezing your inner thighs together and everting the feet.

Modifications:
To lessen for beginners or injuries:

  • Malasana is a good indicator of a student’s ability to find this shape and a good warm up for the flexion of the hips required for this arm balance.

  • Tripod Headstand is a good place to start for an arm balance.

  • Lowering into Caturanga and raising up into High Plank helps build the necessary arm strength for this pose.

  • Lolasana, with or without blocks, strengthens the arms and abs for this pose.

  • Navasana helps strengthens abs.

  • Find the shape of the pose lying on your back. This will enable you to find the foot placement and allow them to feel how the knees squeeze.

  • Use a block under the forehead to be able to be on your arms and feel what the rest of the body is trying to do while you are in the pose.

  • Use a block under the heels to feel how to keep the body compact, heels and buttocks close together.

To intensify:

  • Once you can balance on your arms, begin to try to straighten the arms.

  • Bakasana push-ups strengthen the arms and train the body for transitions.

  • Bakasana to Sirsasana II and back to Bakasana.

Effects:

  • This asana strengthens the arms and abdominal organs since the latter are contracted.

  • Counters osteoporosis because it is a weight bearing exercise.

  • Strengthens the balance reflex and thus helps prevent falls.

Pregnancy:

  • Not recommended – strong abdominal contraction is required.

Contraindications:

  • Pregnancy

  • Wrist issues

Sequencing:
3 poses before – to prepare:

Adho Mukha Svanasana, High Plank, Malasana

3 poses after – to release:

  • Adho Mukha Svanasana, Uttanasana, Urdhva Mukha Virasana

3 poses after – to go further:

  • Sirsasana II, Eka Pada Sirsasana, Eka pada Bakasana

Personal experience:
This pose took me a long time to come to terms with.  First there was the feeling of falling on my face, which I did.  Then I could do the pose but couldn't stay in it.  Then came the period where I could reliably get into it and hold it. Crow is definitely about strength, but it is not just arm strength.  Most of the strength comes from your adductors: your ability to hug your knees into your outer arms.  Then comes the drawing in of the navel to the spine and the engagement of the pelvic floor.  The arm strength is more subtle as you have to find the balance, like a see-saw.  There has to be the same amount of weight in front of the wrists as behind them.  It is this delicate balance that helps you find the pose.  Perfecting Crow gives you a sense of independence and self-confidence.

12 Basic Yoga Poses. Endless Variations.

There are only 12 basic yoga poses with endless variations on the themes.

By that I mean that there are only a handful of basic shapes that make up the majority of yoga poses.  But you can play with that basic shape by recreating it’s form in different relationships to gravity to get hundreds of different yoga poses.

Let’s start with a basic right angle shape.  If you stand in Mountain pose and bend yourself in half, you will come into a pose called Ardha Uttanasana, or Half Forward Bend.  This version of the shape begins to challenge the flexibility of your hamstrings but in such a way that you are working with gravity to help you fold in half.

Half Forward Bend or Ardha Uttanasana

Half Forward Bend or Ardha Uttanasana

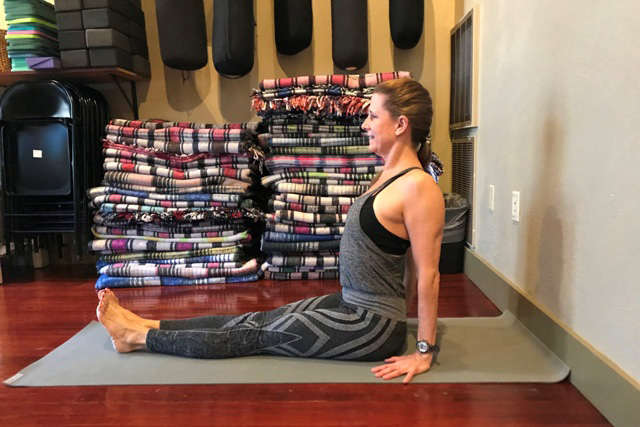
If you take that same shape sitting on the floor with your legs stretched out straight in front of you this is Dandasana, or Staff Pose.  This challenges the flexibility of your hamstrings even more.  But in this orientation to gravity, if your hamstrings are tight, you will feel yourself almost being pulled backward.

Staff Pose or Dandasana

Staff Pose or Dandasana

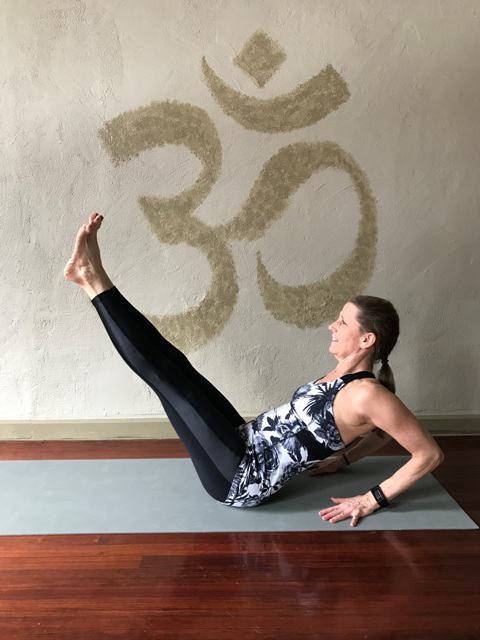
If you lean back about 30 degrees and lift your feet up off the floor this will bring you into boat pose.  In this version of the 90 degree angle your abdominal muscles are being challenged.

Boat Pose or Navasana

Boat Pose or Navasana

If you turn your Boat Upside Down and stretch your arms overhead, you will find yourself in Downward Facing Dog.  While Down Dog challenges your arm strength, it also continues to challenge your hamstring flexibility.

Down Dog or Adho Mukha Svanasana

Down Dog or Adho Mukha Svanasana

If you back your Dog up so that your heels touch the wall and then walk your feet up onto the wall so that your legs are parallel to the floor and your arms and torso are vertical, you have Half Handstand.  This version of the 90 degree posture challenges your arm strength.

Half Handstand or Ardha Adho Mukha Vrksasana

Half Handstand or Ardha Adho Mukha Vrksasana

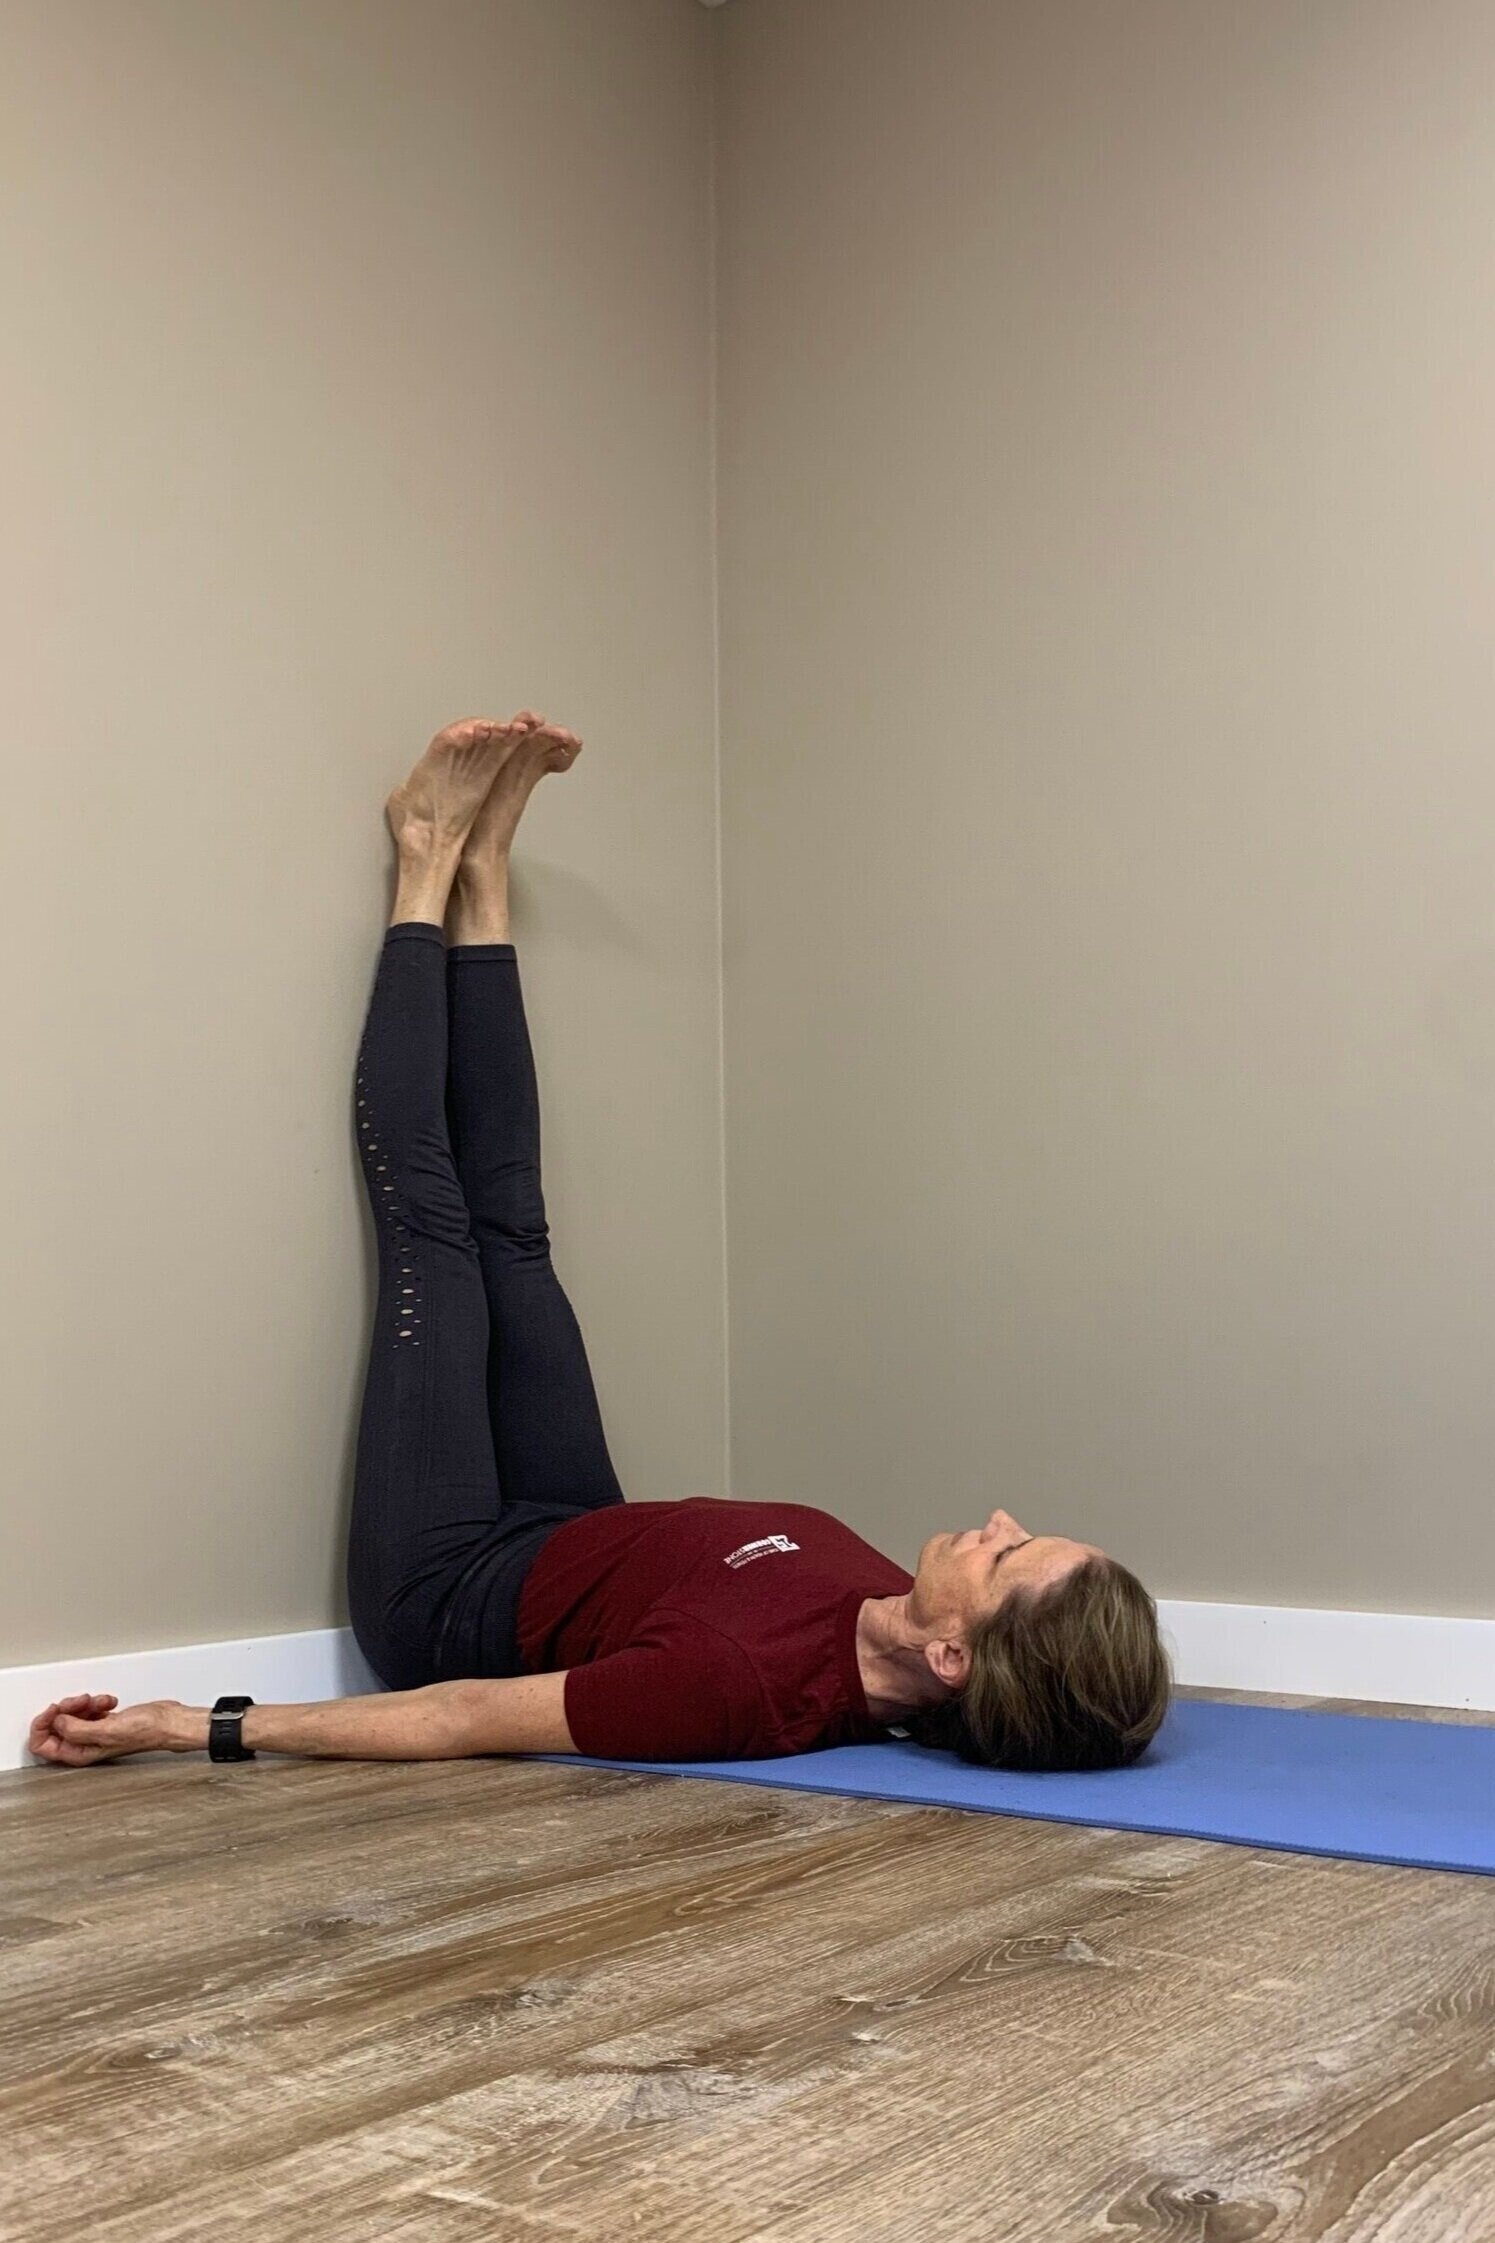
And finally, if you are tired after doing all of these 90 degree shapes, you can take your legs up the wall and rest in a restorative pose.  This version of the basic right angle shape is good for resting and refreshing yourself, especially if you have been standing on your feet all day.

Legs Up The Wall or Viparita Karani

Legs Up The Wall or Viparita Karani

Education and The Spiritual Journey

“Yoga does not just change the way we see things, it transform the person who sees.” B.K.S. Iyengar

I recently listened to (and thought you might enjoy) Terry Gross’ interview with Barbara Brown Taylor on Fresh Air this past week. Ms. Taylor is an ordained Episcopal priest who left her job as rector of a church to become a professor of religion. Barbara Taylor has written several books on religion and spirituality including: An Altar In the World, Learning to Walk in the Dark, Leaving Church and her memoir titled Holy Envy.

As a professor of religion, Taylor said that she “hoped it would be a way to convince {the students} that they could find things they liked about other traditions, and it would not make them disloyal to their own.” She said that it worked most of the time.

Taylor writes about how teaching the different religions changed her student’s understanding of faith, as well as her own. She was asked if she was concerned about shaking the faith of her students. She answered: I think that education does that – whatever the subject matter. So, yes, I did feel as if in the field of religion I was in the business of making misfits, who would never quite fit the same way in their faith communities, their families. Then I started talking to colleagues in other fields and they said, “Yeah, that’s what we do at college, it’s that people grow and change and don’t fit where they used to.’”

Education does that – whatever the subject matter – and yoga is just a different subject.

In Zen Buddhism, this process of education, or moving towards enlightenment is represented by the 10 Bull Pictures.

In psychology, a similar learning curve is depicted by The Four Stages of Competence.

In the beginning we are Consciously Incompetent. This is the ignorance is bliss stage. We don’t know what we don’t know. The second stage is Conscious Incompetence. We know our arms are bent, but we aren’t able to straighten them. This can be a little frustrating. Then there might be a breakthrough and if we really concentrate, we can straighten our arms. This stage is called Conscious Competence. Finally through perfect practice we may enter into the state of Unconscious Competence where we don’t have to think about it, we know our arms are straight.

Another book you might enjoy in this same vein is Educated by Tara Westover. Ms. Westover wasn’t your garden variety college student. When the Holocaust was mentioned in a history class, she didn’t know what it was (no, really). That’s because she didn’t see the inside of a classroom until the age of seventeen. Public education was one of the many things her religious fanatic father was dubious of, believing it a means for the government to brainwash its gullible citizens, and her mother wasn’t diligent on the homeschooling front. If it wasn’t for a brother who managed to extricate himself from their isolated—and often dangerous--world, Westover might still be in rural Idaho, trying to survive her survivalist upbringing. It’s a miraculous story she tells in her memoir Educated. For those of us who took our educations for granted, who occasionally fell asleep in large lecture halls (and inconveniently small ones), it’s hard to grasp the level of grit—not to mention intellect—required to pull off what Westover did. But eventually earning a PhD from Cambridge University may have been the easy part, at least compared to what she had to sacrifice to attain it. The courage it took to make that sacrifice was the truest indicator of how far she’d come, and how much she’d learned. Educated is an inspiring reminder that knowledge is, indeed, power. --Erin Kodicek, Amazon Book

Can't Do Boat Pose?

Modifications for Navasana

In the book How Yoga Works, Miss Friday notices that the Captain skips doing Boat Pose in his practice.  When she asks him about it he says the pose is not for him because it hurts his back.  She lets him know that he needs to do all of the poses that she taught him and that each pose has its benefits.  Leaving out the poses we don’t like simply reinforces our imbalances and the duality that our preferences create.  Often the poses we most want to avoid because we can’t do them or they are uncomfortable are the very ones we need to do.

She quotes from Patanjali's Yoga Sutras to him: And then there will come a time when differences (attachment and aversion) no longer disturb you.  Y.S. II.48

However, we shouldn’t just push through pain to do a pose.  It is possible to find a manageable variation for everybody in any pose.

If you find Navasana to be a challenging pose to do, here are a couple of good variations that you can practice.

Full Boat using the arms for support

Full Boat using the arms for support

Full Boat with bent knees and hands on (or off of) the floor

Full Boat with bent knees and hands on (or off of) the floor

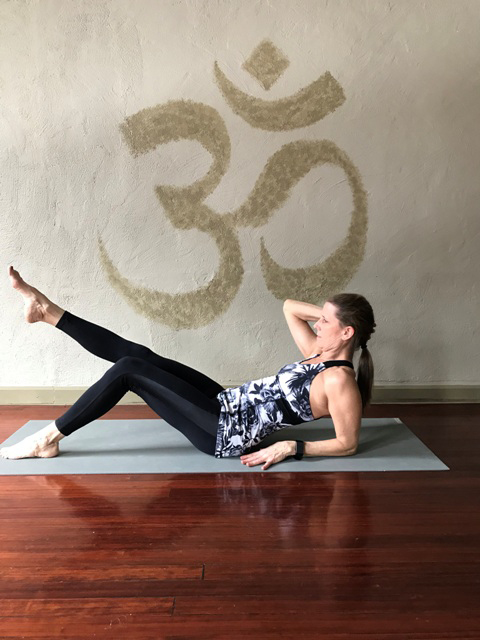
Half Boat, one foot on the floor and using one arm for support

Half Boat, one foot on the floor and using one arm for support

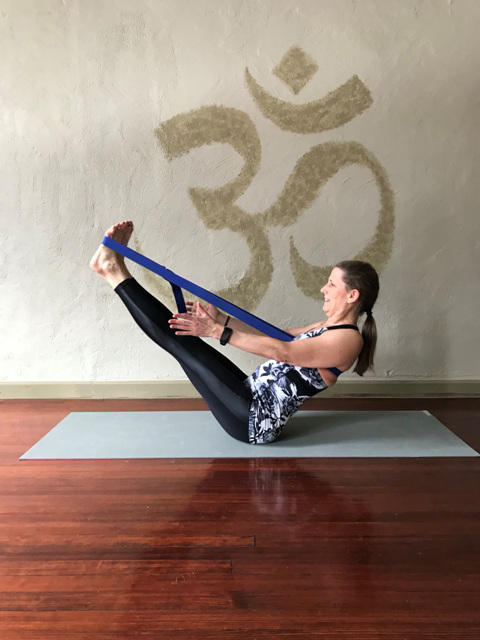
Full Boat using a belt for support

Full Boat using a belt for support

Try any one of these variations, or even combinations of the variations that I haven't pictured, and see if you can make any improvements in your Boat Pose.  Feel free to play and find something you can do!

“So no more faces when you come into a pose that’s hard for you.  The hard ones are usually doing you and your back the most good.  Don’t give in to preferences; don’t create more differences in your life.  It’s the differences that harass us all day long that make our days unhappy.  I like this, I don’t like that.  I like her, I don’t like him.  I don’t want to do this thing I have to do, I’d rather do that thing I want to do.”  (I’m tired of this cold weather and snow already, I’d like it to be 30 degrees warmer!)  Miss Friday to the Captain in How Yoga Works.  (Except the part about the weather,  that’s me!)

Chanting the Sanskrit Alphabet

Chanting the Sanskrit Alphabet

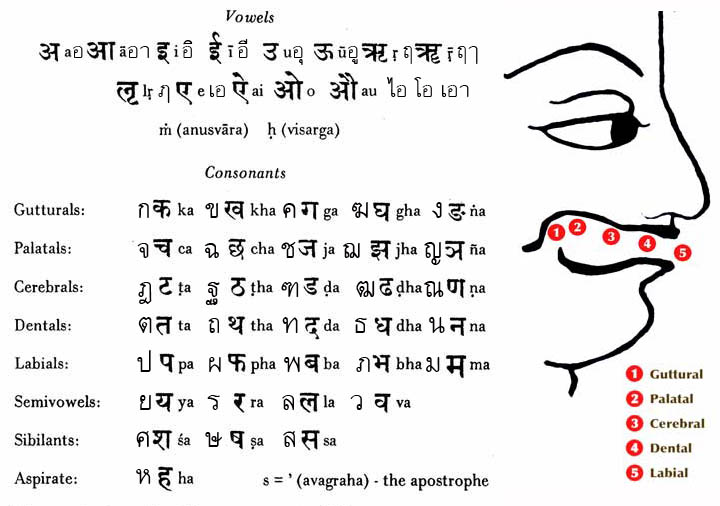
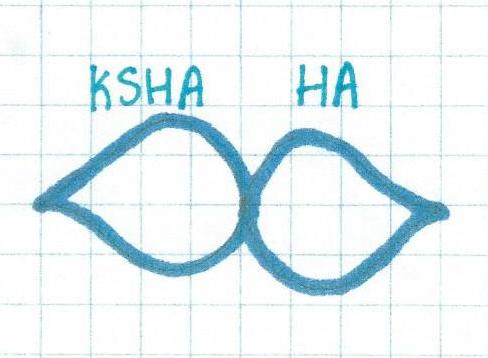
This month we will be learning the Sanskrit alphabet. Chanting the Sanskrit Alphabet is much more than learning the letters and the sounds. Each letter represents a petal in one of our chakras. Chanting the alphabet can open our chakras.

We start by chanting the vowels and then move through the consonants.  The consonants are grouped by how they are pronounced.  The gutturals are created in the back of the throat.  The palatals are created in the upprer palate.  The cerebrals are created by curling the tongue back and touching the tip of it to the roof of the mouth.  The dentals are created with the tongue touching the teeth and the labials are created with the lips.

sanskrit-chart.jpg

Listen to Nicolai Bachman, who wrote The Language of Yoga,  chant the alphabet here:

Each letter stimulates a petal in one of the chakras:

The throat chakra

The throat chakra

The heart chakra

The heart chakra

The solar chakra

The solar chakra

The pelvic chakra

The pelvic chakra

The root chakra

The root chakra

The third eye

The third eye

Which pose helps us to grow old gracefully?

A Pose to Help You Age Gracefully

"We sit and walk as we think.  Watch any man as he walks down the avenue, and you can determine his status in life.  With practice, a finer discernment will have him placed socially and economically, and with a fair idea of his outlook on life.  We judge our fellow man more by the arrangement and movement of his skeletal parts than is evident at once."  – Mabel Todd, The Thinking Body.

The asanas in general help us to grow old gracefully, but Mr. Iyengar says that it is primarily the action of the spine that shows our age.  To help maintain the gracefulness of our spines we need to stretch and strengthen all of the muscles connecting to the spine.  In Light on Yoga, he says that Paripurna Navasana, or Full Boat Pose, and Ardha Navasana, or Half Boat Pose, bring life and vigor to the back and allows us to grow old gracefully and comfortably.

Let’s look at how to come into the pose:

To come into Full Boat Pose: Start in Dandasana, or Staff Pose.  Place the palms on the floor next to the hips and slightly behind them with the fingers pointing forward.  The back is erect and the chest is lifting.

On an exhale, Lean back so as to raise both legs simultaneously from the floor.  Keep the legs together, straight and with the knees tight.  Balance is maintained on the sitting bones without any part of the spine touching the floor.  In the full pose the legs are raised at an angle of about 60 to 65 degrees which should be higher than the head.

Boat Pose

If you can, lift the hands from the floor and bring the arms parallel to the floor, close to the thighs.  The hands are level with the shoulders and the palms face each other.

Stay in the pose for half a minute with normal breathing.  Gradually increase the time to one minute.  However, you will begin to feel the effects of the exercise after only 20 seconds!

To come into Half Boat Pose:  You start, again, in Dandasana.  But this time, you interlace your fingers behind the back of your head, above the neck.

On an exhale, recline the trunk backwards and simultaneously raise the legs from the floor, keeping the knees tight and the toes pointed.  As in Full Boat, the weight of the body rests on the buttocks and no part of the spine should be allowed to touch the floor.  You will feel the muscles in the abdomen and low back engage.

The legs are maintained at a lower angle of about 30 to 35 degrees and are in line with the head, not above it.

Ardha-Navasana-4-x-6-web-large.jpg

This pose can be held for 20 to 30 seconds.  A stay for one minute indicates strong abdominal muscles.

Make sure you do not hold your breath in either of the Boat Pose variations.  If the breath is held, the effects will be only on the stomach muscles. If the breath is too deep, you will lose the engagement of the abdominal muscles.  The technique is to inhale, exhale and hold briefly breathing only into the upper chest.  Breathing in this way not only tones the abdominal muscles, but it will tone the organs as well.

The effects on the organs of Paripurna Navasana and Ardha Navasana differ due to the position of the legs.  In Full Boat the effect is on the intestines, in Half Boat the liver, gall bladder and spleen are affected.

In the beginning, if the back is too weak to bear the strain of the pose, modifciatons can be used to build strength.  These include keeping the hands on the floor, bending the knees, only raising one leg at a time, or using a belt to hold onto the feet.  When the power to stay in the pose comes, it indicates that the back is gaining strength.  A weak back is a handicap in many ways.  These two variations of Boat Pose coupled with twisting poses will help strengthen the back.

In the section on the effects of Boat and Half Boat, Mr. Iyengar concludes with this observation:  “The importance of having a healthy lower back can be realized if we watch old people when they sit down, get up and walk, for consciously or unconsciously they support their back with their hands.  This indicates that the back is weak and cannot withstand the strain.  As long as it is strong, it needs no support, one feels young though advanced in age.  These two asanas bring life and vigour to the back  and enable us to grow old gracefully and comfortably.”

P.S. As I am currently struggling with low back pain, I can testify to feeling old and not so graceful.  This Pose has become too difficult to do.  But rather than skip it, which is the natural tendency, I can work on modifications to help me work towards strengthening my low back and my core.  Often it is the poses we avoid that are the ones that can bring the most balance to our bodies.  The trick is to find a modification that makes it accessible.  Here’s a variation I found that helps with Navasana that can be done sitting in a chair:

Sit on the front edge of a seat with your knees at right angles. Grab onto the sides of the seat with your hands and lean slightly forward. Firm your arms and lift your buttocks slightly off the seat, then raise your heels slightly off the floor (but not the balls of your feet). Let the heads of your thigh bones sink into the pull of gravity and push the top of your sternum forward and up.

Why I don’t consider Legs-Up-the-Wall Pose as a good alternative for Headstand.

Legs-Up-the-Wall: Not an Alternative to Headstand

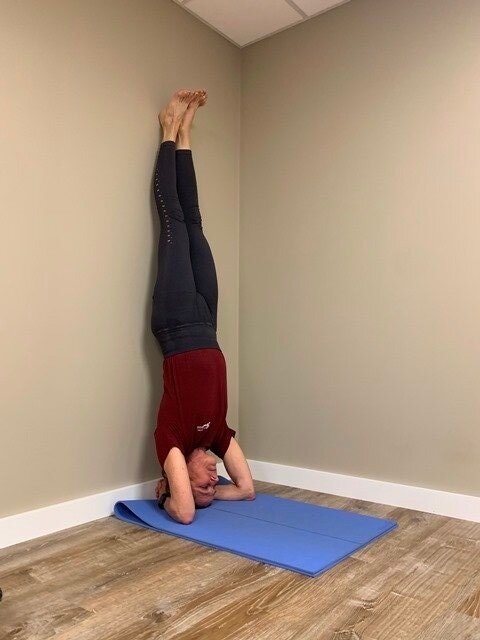
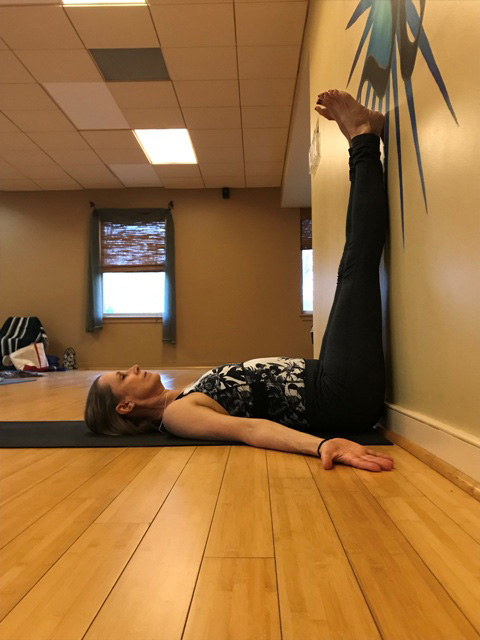
I don’t recommend Legs-Up-the-Wall Pose as an alternative for Headstand or Handstand. The energy of these poses is very different. Every pose has an energy associated with it. You can look up the effects of each pose in Light on Yoga, or even google it online. But, I recommend that the next time you are in a pose, feel the energy of it. This is mandatory if you are a yoga teacher.

Do Head Stand, if that is in your repertoire (please do appropriate warms ups before just popping up into Sirsasana!) and, after a brief rest in Child’s Pose, do Legs-Up-the-Wall Pose. Compare and contrast the two poses. How similar are they? How different?

Sirasasana I at the wall

Sirasasana I at the wall

Legs-up-the-wall-pose

Legs-up-the-wall-pose

Head Stand is a fiery, invigorating pose that requires strength, stamina and focus. Legs-Up-the-Wall Pose is quieting, cooling and nurturing. The only thing they have in common is that the feet are above the head and heart.

I know a lot of teachers will recommend Legs-Up-the-Wall as an alternative for Headstand or even Handstand, but I would not suggest that. Read my blog post here for alternative postures for Headstand.

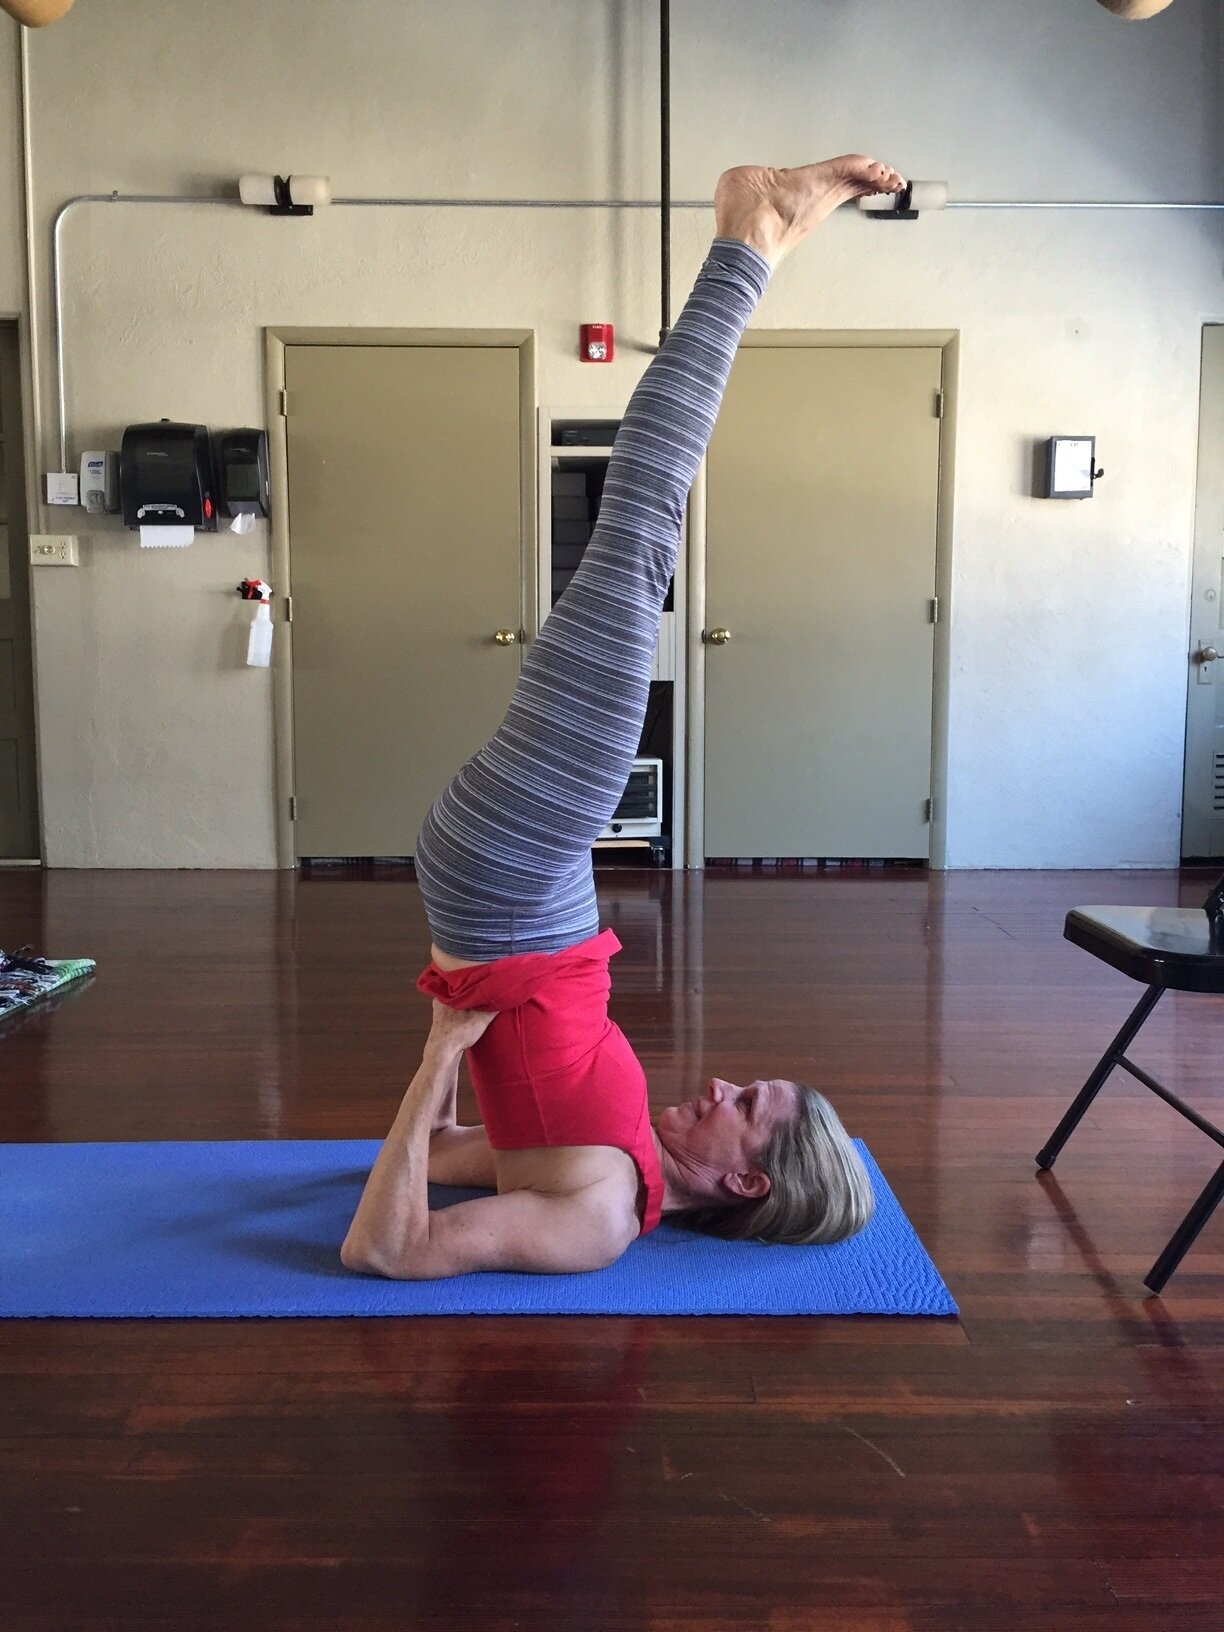
Legs-Up-the-Wall Pose is a better modification for Shoulder Stand Stand because Shoulder Stand is also quieting, cooling and nurturing. After practicing Head Stand you are still in the frame of mind to do poses that are more active. After practicing Legs-Up-the-Wall Pose, you are probably ready for Savasana. Try these two poses: do Shoulder Stand and then come down and rest and then do Legs up the Wall. See how they are energetically more alike?

 
Shoulder Stand is a quieting and nurturing pose

Shoulder Stand is a quieting and nurturing pose

So is Legs Up the Wall Pose

So is Legs Up the Wall Pose

As a teacher, it is important to make sure to guide all students through the same energy levels during a class. Your choreography and sequencing should raise the energy towards an apex at the middle of a class and then gradually decline towards quiet as you move into Savasana. Having the energy yo-yo back and forth can be irritating to the nervous system. As a student, it is important to pay attention to what modifications you are being guided towards so that you are still working at the same energy level as the rest of the class.

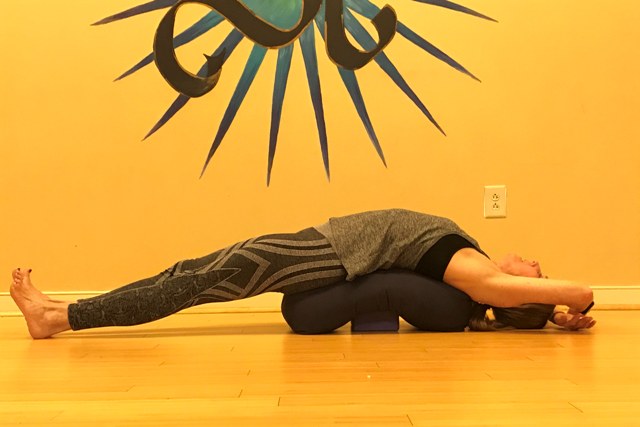
If Legs-Up-the-Wall Pose isn’t a good alternative for Head Stand, then what is? I recommend lying Supine over cross-bolsters (or a bolster with a block crosswise underneath)*. In this pose, the back of the head and the back of the heels are on the floor. Make sure the back of the neck is long and not contracted. The thighs are belted to keep the legs together. The arms are hand-to-elbow overhead with the forearms resting on the floor.

Cross bolsters, or in this case, bolster over a block*. This is a good alternative to Head Stand, especially for people who do not want to invert.

Cross bolsters, or in this case, bolster over a block*. This is a good alternative to Head Stand, especially for people who do not want to invert.

Some of my students immediately question this modification as it is a supine pose. But, again, you have to try it and feel the energy of it. Because it is a back bend, it is more energizing than Legs-Up-the-Wall Pose which falls into the forward bend category because of flexion at the hips. There is also the work of keeping the legs together which is similar to the work you feel keeping the legs together in Sirsasana. And, with the back of the head resting on the floor, it has the same grounding effect as Head Stand. Two students, one doing Sirsasana and one doing this cross-bolster pose will feel more similar afterwards than if one of them was doing Legs-Up-the-Wall Pose. Try it for yourself and see.

Also, please note, if you have your period, you should not be inverting and Cross-Bolsters Pose is a perfect alternative.


(*I sometimes have to be creative with props. If a studio does not have enough bolsters for everyone to have 2, then I will use a block and a bolster. Also, sometimes 2 bolsters are too high for a student. Whenever you are feeling compression in the low back during a back bend, one of the things you can do is to reduce the height of the props. I often use a skinny bolster crossed over a thin folded blanket for those who complain that their back is feeling pinched in this pose.)

Maybe next week, I will address the pose of Legs-Up-the-Wall Pose. There is an important consideration of the orientation of the pelvis in this pose that I often see misunderstood. And, eventhough Shoulder Stand was the pose of the month last month, I can see that I still need to address the modifications for Shoulder Stand: Legs-Up-the-Wall Pose and Supported Setu Bandha (or Supported Bridge Pose).

If you have any questions or comments, please feel free to respond in the comment section below. I use the questions for future blog posts.

Also, if you enjoy learning more stuff like this, consider enrolling in my Teacher Training Program. The next one begins in September 2019. Not everyone who enrolls in the program wants to go on to teach. Some students take it for their own personal development. You can always take just the 4 weekends of Foundations where we learn about the postures, or you can take the 4 weekends of Anatomy. However, I personally feel that the best way to learn something is to learn how to teach it. In that case, The Art & Craft of Teaching portion of the program is a must! See me for more details.
Why so many blankets for Shoulder Stand? 

Why so many blankets for Shoulder Stand? 

My student teachers often ask why Shoulder Stand isn’t taught more frequently.  The answer is probably because it requires a lot of time and effort to do it correctly.  Salamba Sarvangasana is a challenging pose to teach to safely.  The teacher needs to understand the proper body mechanics and range of motion of the neck and then needs to teach the proper folding and use of blankets and belts to do the pose.  There is also a level of studentship, called adikara in Sanskrit, where the student has to take responsibility for following directions and using the props.  Some students don't want to take the time to get all of the props and use them correctly; they just want to do the pose.

However, the normal range of motion for the neck is only 45 degrees.  If you were to do Shoulder Stand without blankets, it would require the neck to bend 90 degrees, double what it can normally do.  This would put a lot of strain on the last cervical vertebrae and the first thoracic to get those extra degrees of flexion.  This is not good for the discs in the  neck.  We use blankets in Shoulder Stand to make up the difference for the degree of available neck flexion and trying to get the body to be vertical in an upside-down version of Tadasana.  That way the neck is supported in its normal range of motion.


Here is a picture of me standing in an upright version of Shoulder Stand.  As you can see, my neck is bent to its maximum range of motion and it is nowhere near 90 degrees to my torso.  Notice my hands are on my back with my elbows as high as my shoulders.

"Upside Down" Shoulder Stand

"Upside Down" Shoulder Stand

If you turned me upside down, as I would be in regular Shoulder Stand, you would have to make up the difference between the tops of my arms and the back of my head.  This is where the blankets come in.  They raise the floor under my arms so that my neck is not over-flexed.

The black line represents the floor. The two arrows represent the difference in height between the floor and my upper arms. The discrepancy between the height of the elbow and the shoulder gets equaled out under the weight of the body.

The black line represents the floor. The two arrows represent the difference in height between the floor and my upper arms. The discrepancy between the height of the elbow and the shoulder gets equaled out under the weight of the body.

The blankets have to be folded precisely so that the height of the blanket is consistent from my shoulders to the tips of my elbows.  This gives me a firm platform to balance on.  The other thing is that my upper arms need to be on the sticky mat with no fabric between my skin and the mat.  Fabric tends to be slippery and the skin slides on it.  This would cause the elbows to wing out and then the pose would collapse onto your upper back.  Also, if you raise the arms up with the blankets, you need to raise the floor so that the buttocks are at least the same height as the blankets.  That makes it easier to go up and come down.

Blanket set up for Shoulder Stand

Blanket set up for Shoulder Stand

Here is what Shoulder Stand would look like if you did not use blankets.  Since you cannot safely bend your neck 90 degrees, your torso would be angled backwards and your legs would be counter balanced forward. This causes your posture to be "piked".

Notice the tension in my neck to get my torso to bend 90 degrees without blankets.

Notice the tension in my neck to get my torso to bend 90 degrees without blankets.

Now, if your shoulders are tight, you also need a belt.  How can you tell if your shoulders are tight?  Stand in front of a mirror and place your hands on your back as if you were in Shoulder Stand.  There are two things to look for:

First, if you place your hands on your back as if you were doing shoulder Stand, can you draw your elbows towards each other in adduction behind your back to make your elbows invisible to yourself looking in the mirror?  If not, you definitely need to belt your elbows in Shoulder Stand to keep them from winging out and to keep your pose from collapsing onto your neck and upper back.

Elbows winging out. This is why you need a belt!

Elbows winging out. This is why you need a belt!

Elbows hugging in. Even though I can get my elbows to hug in, I still use a belt. My body weight makes it harder to keep my elbows hugging in and over time, as I get fatigued holding the pose, my elbows will start to slide apart. A belt helps preven…

Elbows hugging in. Even though I can get my elbows to hug in, I still use a belt. My body weight makes it harder to keep my elbows hugging in and over time, as I get fatigued holding the pose, my elbows will start to slide apart. A belt helps prevent that.

Second, if you look at yourself from the side, with your elbows squeezing in toward the midline, can you get your elbows as high as your shoulders without rounding your shoulders forward or bending forward; stay in Tadasna.  If you cannot, your shoulders are tight in extension.  See the picture titled "Upside Down" Shoulder Stand above.

There are 2 ways to go up into Shoulder Stand and put a belt on your arms:  One is to go over into Plough and put a belt on your biceps at your elbow creases and the other is to go up the wall and lift your hips as if to do Bridge and then put the belt on your arms.  Once the belt is on your arms, then you lift yourself all the way up into Sarvangasana.  When you come down, just reverse the action.  Take the belt off at the same point you put it on.  Please don’t come down and lay on your arms with your elbows belted.

Getting ready to go up into Shoulder Stand. Notice my head is on the lower blanket. My neck can "feel" the edge of the two stacked blankets and my shoulders are on the sticky mat, which is about 3 or so inches back from the edge. This is so that whe…

Getting ready to go up into Shoulder Stand. Notice my head is on the lower blanket. My neck can "feel" the edge of the two stacked blankets and my shoulders are on the sticky mat, which is about 3 or so inches back from the edge. This is so that when I roll up into Shoulder Stand, my shoulders do not roll off of the blanket stack compressing my neck. I have the belt looped (and measured to my shoulder width) over one arm. This way I can find it and put it on the other arm once I am in Plow.

Going into Plow and putting a belt on both arms. Notice that my hips are directly over my shoulders and my back is as straight as it would be in Tadasana.

Going into Plow and putting a belt on both arms. Notice that my hips are directly over my shoulders and my back is as straight as it would be in Tadasana.


Shoulder Stand, full Pose. Notice how vertical my body is. The blankets under my shoulders help me to achieve that. Also, notice how wide the blankets are. Everything from my shoulders to my elbow must be supported at the same height. My neck and he…

Shoulder Stand, full Pose. Notice how vertical my body is. The blankets under my shoulders help me to achieve that. Also, notice how wide the blankets are. Everything from my shoulders to my elbow must be supported at the same height. My neck and head should be on blanket so they can slide and adjust. My elbows should be on mat so that they cannot slide apart. Plus the belt helps me with that, too.


Lastly, when you come down, please do not let your head whiplash forward.  Use your abdominals to control the descent of your hips and keep the back of your head down on the floor.  Make sure you have something under your hips so that they don't drop below the level of the blankets.  That is what causes your head to pop up off the floor.

When you come down, come through Plow and take your belt off.  Then unroll and stay there for a few minutes.  I like to slide back so that my head, shoulders and arms are on the level of the floor and my lower back and hips are on the blanket/mat stack.  You can bring your feet together into Cobbler's Pose.  (I'll update this post with a picture of that, soon!) Stay here for at least 5 minutes, or finish in Savasana if you choose.

Questions?  If any of this is not clear, feel free to leave a comment below.  Also, if I need any other pictures to demonstrate any of these principles better, please let me know.

Mantra of the Month for February - Guru Mantra

Guru Mantra

Guru Brahma Guru Vishnu Guru Devo Maheshwaraha
Guru Saakshaat Para Brahma Tasmai Sri Gurave Namaha

Guru is the Creator (Brahma), Guru is the Preserver(Vishnu), Guru Deva is Destroyer(Maheshwara). Guru is the absolute (singular) Lord himself, Salutations to that Sri Guru

Translation word by word:

  • Guru: Dispeller of Darkness; Gu=Darkness, Ru=Remover

  • Brahma: Creator; Personification of Creating Quality of God

  • Vishnu: Preserver; Personification of Preserving quality of God

  • Deva: God

  • Maheshwara: Destroyer; Personification of Destroying Quality of God

  • Saakshaat: Self/ Himself

  • ParaBrahma: He who is the highest Lord; Consciousness

  • Tasmai: To him/ To such

  • Sri: Holy, splendorous

  • Namaha: Salutations

Here is my favorite rendition of this mantra being chanted by Bhagavan Das.