My Favorite Playlist

Students often tell me that they like my playlists.  I am flattered, thank you.  Last week, the son of one regular student took a couple of my classes before going off to college. When I saw the mom, I told her how much I enjoyed meeting her son. She told me that he enjoyed my class and that he really enjoyed my playlist.  I found this surprising. I am not surprised when students who are closer to me in age tell me that they enjoy my music, but when a young man in his 20s says he likes my playlist?!  This past Saturday several students remarked that the playlist was being particularly good, so I told them that I would share. Enjoy, and please share some of your favorite songs with me. You can leave your recommendations in the comments below this blog post.  Who knows, your suggestions may end up on a future playlist!

All My Days - Alexi Murdoch
I Try - Macy Gray
All the Wild Horses - Ray La Montagne
Wild Horses - The Rolling Stones
After the Gold Rush - Neil Young
Desperado - The Eagles
Ain't No Sunshine - Lenny MacDowell
Redemption Song - Bob Marley
Into the Deep (featuring Macy Gray) - Galactic
Crazy - Gnarls Barkley
Crazy Love - Van Morrison
All the Little Lights - Passenger
Walkin' Away from Caroline - Dave Carter and Tracey Grammer
Angel from Montgomery - Bonnie Raitt and John Prine
For What It's Worth - DJ Drez
Breathe Me - Sia
Veerabhadra (DJ Drez Remix) - Sound Ambassador
Gayatri - Jane Winther

P.S. It is nice to know that you all are focused inward on your breath and what is going on in your body and that you are not distracted by any external distractions! ;)

Sirsasana Q's & A's

What part of your head should be on the floor while doing Headstand?

There is a spot on the top of the head where three plates of the skull meet. This is the fontanel spot in infants. It might be kind of a flat spot. If you are not sure, there is a way to measure using your hand. Place the heel of your hand at the bridge of your nose. Without lifting the heel of your hand up, let your fingers rest on the top of your head. Right where the middle finger rests is the spot the head should be resting on when you are upside down. Once you find the spot, keep your middle finger where it is and lift the rest of your hand. From the roof of your mouth, push up into that spot as if you are balancing a book on your head. This is exactly the spot you should be on during Headstand.

Is there a modification for those who have neck issues and are afraid of putting all of their body weight on their head?

If you have issues with your neck and are leery of Headstand because of that, a nice modification is Six- Block Headstand. This is Headstand with your shoulders resting on the blocks. There is little if any weight on your head, and therefore, there is no pressure on your neck.

Six Block Headstand

Six Block Headstand

My neck feels scrunched when I go upside down in Headstand. That can’t be good, can it?

Your neck should never feel scrunched when you are doing Headstand. If it does, come down immediately! If your neck feels scrunched, it could be because your shoulders are tight and your forearms are below the level of your head. If this is true, you may feel that you prefer to do Tripod Headstand rather than Headstand on your forearms. You can always do Six-Block Headstand. While Tripod Headstand, or Sirsasana II, is a wonderful version of Headstand, there is value in opening up the shoulders for Sirsasana I. A lot of other poses including Wheel and Handstand need this degree of shoulder opening. If you are tight in your shoulders there is a very specific block arrangement that can help you with this. It is rather hard to describe; if you are interested, please check out the photo. A picture is much easier than a thousand words.

It might be hard to see in the image on the left, but the person on the left in the striped sweater has tight shoulders.  Her elbows are winging a bit wider than everyone else's, and her forearms are lower than her head.  We used the 4-block configuration to keep her upper back from rounding as she went up into Sirsasana I.  And with the use of the props, her form is perfect, her neck feels good and she is getting a nice stretch in her arms and upper back.

How long can I stay up in Headstand?

For students just learning Headstand, I would recommend going up and staying for a few breaths and then coming down, maybe 30 seconds at first. And that is it for one day. I would recommend not practicing Headstand every day in the beginning. You can practice every other day until you are sure you are not having any negative side effects from Headstand. Also, remember that Shoulderstand is a counter pose to Headstand. So every time you practice Headstand, you should also practice Shoulderstand for the same amount of time. Once you are comfortable in Headstand, try staying up for 1 minute at a time. You can either time your breaths or use a timer. I like using a timer, but I also know that I can breathe 6 Ujjayi breaths in a minute. Build up gradually over time to 5 minutes (or 30 breaths for me). Once you have reached 5 minutes, keep practicing that same amount of time and stay at that length of time for a couple of weeks, if not months. Then you can start playing with increasing the time even longer. Again, do so gradually. Maybe 1 minute a month. It is not uncommon for people to practice and be able to hold 30-minute Headstands.

A word about Headstand variations: The general rule of thumb I follow is that you should be able to stay in Headstand for 5 minutes before you start doing Headstand variations. You want to make sure your neck is strong enough to support your body weight before you start twisting around on your neck! Also, while it is possible to stay up in Tripod Headstand for 5 minutes, it is usually Sirsasana I, or Forearm Headstand, that is the one most people are in for longer holds. Tripod is the Headstand that works most with transitions like Headstand to Crow, for instance. Happy playing!

I hope these questions and answers are helpful. Let me know if you have any other questions. I’ll see you in class! Karin

The Secret of Yoga

secretofyoga.jpg

"In order to be truly free, you must desire to know the truth more than you want to feel good. Practicing in a way that supports our lifestyle and everything we already know is not a challenge to our basic patterns of conditioning in body, mind and heart, because if feeling good is our goal, then as soon as we feel better, we will lose interest in what is true.” - The Inner Tradition of Yoga by Michael Stone

As a yoga teacher, I find that the following story gets repeated over and over.

I was approached by a student the other day. She wanted to know what she could do to improve her ability to do yoga. She hadn’t been coming to class lately because she had a fall and injured her hand. She did physical therapy for her hand and had gotten better to a certain extent but still found it difficult to do positions where she was weight bearing on her hands. She has been doing pilates and other exercise classes to keep her strength and conditioning up but she has not been able to come back to yoga. I suggested modifying by doing postures on her forearms, which did not seem like a satisfactory answer. I asked her if she still did the exercises her physical therapist told her to do and she said no; she seemed rather bored with that. I suggested that perhaps there were some things we could do to improve the range of motion in her shoulders. Often the site of the pain is not the cause of the pain and students who have pain in their wrists while doing yoga may actually have restricted motion in their shoulders. But she shrugged that off saying that there was not an issue with her shoulders. I suggested other styles of yoga and other teachers. I teach a vinyasa style of yoga where we use our hands for Down Dog and Low Push Up as well as Side Planks and Handstands. Perhaps she needs a style of yoga that didn’t do those things? No, none of that seemed to be satisfactory. I felt somewhat flattered that she wanted to take classes with me. But then I wondered if it was that or was it simply not wanting to let go of what used to be. I get that. Letting go is hard. But, in not letting go we get stuck, bound up in an attachment to something that had previously brought us pleasure. We want that hit of pleasure and we don’t want to be told that we can’t do what we used to be able to do.

Or, maybe we don’t want to be told that we have to do some work to get there. The other side of her dilemma is the idea of doing the work that she needs to do. For her, it might be to continue the exercises for her hand. Maybe she got 80% better and needs to keep going to get 100%. Maybe she will never get 100% better. (I don’t know the extent of her injury. But, as someone who has broken her wrist I do know a thing or two about rehabilitating a hand injury.) There is something entirely monotonous in doing the ground work to rehab an injury or keep ourselves in shape and our bodies functioning optimally. For myself there are certain remedial exercises I need to do to maintain healthy alignment in my hips and back due to my scoliosis and to make sure that my wrist stays feeling good. Those exercises are boring, but they work. I am tempted to skip them because they take up a lot of time. But I know if I do that I will eventually fall into my patterns and habits and be back in pain, again. These exercises are part of my work. They may not be exercises that you should do. Your remedial exercises would be entirely different depending on your body, your issues and what you want to work on.

A common quality we all share is a sense of impatience. We all want to be able to do things now. We don’t want to do the remedial actions, the baby steps, we want the end product, the final result. I once had a yoga student who would get frustrated because she couldn’t do what I could do. She took privates with me, once a week for a couple of years. She never practiced on her own outside of class. I thought she was doing very well for the amount of effort and work she put into her yoga, but that wasn’t good enough for her. She wanted me to tell her what to do to get better. I told her that she needed to do more yoga. I suggested that she take privates with me more than once a week, come to public classes, or practice on her own. But that was not what she wanted to hear. She eventually got frustrated and quit. I felt like she wanted me to tell her the “secret” of yoga, that one thing that would change everything; the one thing that seemed to be hidden from her and did not require any great effort. She wanted to feel good. She wasn’t interested in the truth. Of course, there is no such secret. There is only the work that we each must do.

29 Gifts

29gifts.jpg

I was especially looking forward to reading Cami Walker's book 29 Gifts, the book I chose for January.  One of my students gave it to me for Christmas. Although I wanted to start reading it right away, I made myself wait until January First to pick it up.  I knew that I would devour it and I wanted to have it fresh in my mind for January.  It's quite an easy read.  I read it in the car on our drive up from Florida.

I thought I would do the practice of giving 29 gifts every day during the month of January.  It seems so appropriate after the gift giving frenzy of Christmas, where gifts are expected.  Who is going to expect a gift now? Maybe you'd like to join me?  If one person does it and it has the power to change their life, imagine if several people do it. We could start a movement!  Would you like to join me?  If you do, share something about your experience on my blog

The rules are simple:

  • Give 29 gifts in 29 days. Set a date to begin so that you can begin with full intention.

  • Start Day 1 with a short meditation about your purpose in doing this exercise.  Be clear.  If your intentions are vague, or the energy is half-hearted, your experience will mirror that.

  • Consider beginning everyday of your challenge with a meditation and write out an affirmation statement for your day. Examples include:

  • Today I give with love.

  • Today I give with  gratitude.

  • Today I give with joy.

  • Today I give with abundance.

  • Your gifts can be anything offered to anyone -spare change, cans of soup, your time, kind words or thoughts.  Anything you mindfully give another person "counts". That being said, watch out for gifts that are coming from the following places within yourself because you will likely feel drained when giving from this space:

  • The Bartering Give: If I give, I am good and I will be rewarded.

    1. The Obligated Give: I have to give because it's expected of me.

    2. The Guilty Give: If I don't give I will have bad karma.

    3. The Begrudging Give: He's got new shoes on, he can't need money that badly.

    4. The Resentful Give: I Suppose I better give because it's Day 15, even though I just spent $300 on new brakes for my car.

  • Give at least once a day for 29 consecutive days so that the energy around the ritual gathers momentum.  if you do not give one day, I Suggest starting at Day 1 to release the energy and allow it to build again.  If this is too much for you, just pick up where you left off.  The important thing is to not quit.

Please let me know how this practice is working for you.  Leave your comments below.

Parivrtta Balasana

Parivrtta1.jpg

How long do you usually hold postures in a vinyasa class? Thirty seconds? Five breaths? We do not usually hold poses for very long. Some postures we hold for longer, such as Headstand and Shoulderstand. We might hold those for five minutes. We also hold restorative postures for five minutes or more. Parivrtta Balasana is one of those poses that are better when held for a slightly longer period of time. It is not quite a restorative posture, but it is not quite active either. In Parivrtta Balasana you have to get very still and quiet, let go of doing and come into being. You cannot think or exert your way into this deep twist you have to surrender to it. This is a great example of having to get out of your left brain, which is the analytical thinking brain and come into your right brain, which is the more holistic, pictorial side of your brain. In this state of mind you allow yourself to feel where your body is in space and allow it to relax and let go. You have to get very quiet and retreat inward. Then imagine yourself feeling like pulled taffy and slowly allow yourself to sink into this deep twist. This may take a minute or two. Allow your breath to get very fine and subtle.

Parivrtta2.jpg

One of the benefits of this posture is that it is good for helping to reduce fat around the waist. This posture is best performed on an empty stomach, and it may help you to not overeat during this holiday season.

Parivrtta3.jpg

…or lying down in Supta Virasana. These are two of the few poses that you can do after eating. They stimulate the Stomach meridian and the organ itself, promoting digestion.

Parivrtta4-e1464211942271.jpg

Lastly, if you do eat too much, you might feel like the pose that we usually call Happy Baby, but at this time of the year, I like to call it Stuffed Turkey!

The Single Best Pose for Scoliosis - Vasisthasana

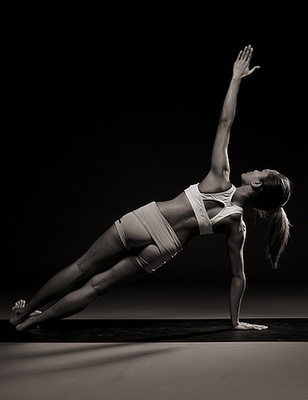
Because I have a little scoliosis, I have a twist in my body.  When I stand, one shoulder is higher than the other shoulder.  Sometimes it bothers me.  As a yoga teacher I feel like I am “supposed to be” more symmetrical.  But I notice the same thing, in varying degrees, in my students, friends and even in pictures of other people.  Most people are not quite symmetrical when they stand.

Vasisthasana

Vasisthasana

We don’t do things symmetrically. We have a dominant and non-dominant side.  We hold our children, push a vacuum cleaner, rake, sweep, shovel and do a number of other activities on one side. Try brushing your teeth with your non-dominant hand! This preference of one side over the other sets up a functional asymmetry in the body.  Knowing this can be a good thing.  It can help you be aware of your asymmetry and you can work to correct it.  You can even try, as I sometimes do, to do all of those activities on your non-dominant side.

Years ago, I asked one of my yoga teachers for help with my scoliosis.  She gave me several practices to do.  One of them was to practice Side Plank on my convex side twice as much as I practiced it on my concave side.  (If you don’t know which is your convex side, it is the one that is harder for you to bend towards.)   Just this week, a friend forwarded an article to me that cites the benefits for improving your scoliosis by practicing Side Plank for a minute and a half* daily on your convex side.  The article suggests you do this for two months to notice an improvement. (And then please don’t stop!  It’s just like cleaning your house.  You can’t expect to vacuum once and be done with it. You have to do it regularly.)  Check out the article by clicking here.  Let me know what you think.

*Please start slowly, maybe 10 seconds at first and build up by a few seconds each week to get to a minute and a half.  There are also modifications.  If you need help I would be happy to work with you privately to get you going.  Contact me by clicking here.

Patience and Breath.

photo by Robyn Graham

photo by Robyn Graham

It took me about eight years to be able to touch the floor in a standing froward bend. I hope you don't get discouraged by that announcement. It might have taken me less time if I wasn't so obsessed with it. I remember when I started doing yoga again in the 90's, after being away from it for several years. I was tight. I would watch other people come into yoga class and they would be as tight as I was, but then I noticed that they began to get more flexible and I didn't seem to be making any progress. I kept wondering what I was doing wrong. My teacher at the time wasn't that particular about alignment. She wasn't particularly helpful, either. One day she asked me when I was going to get over my hamstring thing! I wished I knew. I thought the day that I would finally be able to touch the floor would be a memorable day for me because I wanted it so bad.

I kept working on my hamstring flexibility by trying harder. I tried so hard that my hamstring attachments at my sitting bones would hurt. I kept irritating them by pushing too hard. One day I finally tore my hamstring. Ouch! I kept practicing, afraid to give up my perceived progress. My sitting bones hurt almost all the time. My physical therapist wasn't much help. I had better range of motion with a torn hamstring than most of his patients would ever hope to achieve. I became even more interested in alignment and anatomy. However, it wasn't until I re-injured my hamstring and ended back in my orthopedic surgeon's office that I started to figure things out. My orthopedic surgeon gave me the best advice for healing my hamstring. I had asked him how could I tell if I was rehabilitating my hamstring or re-injuring it, because when you do physical therapy on an injury, it hurts! This is what he told me:

"When you have an injury, it hurts. Assign the pain you have a number from 1 to 10, with 1 being no pain and 10 being the most pain. So, let's say the pain is a 5 today. When you begin to do your yoga practice, try to keep the pain at the same level. If the pain goes up, don't let it go up by more than 1. When you stop exercising, the pain should return to the same level it was before you started. And (here's where the patience comes in) the next day, your pain should not be any worse."

So, you can only tell if you have gone too far by how you feel the next day! After he told me that, I didn't need too many of those next days where the pain would shoot up to a 7 or 8 to figure it out. I learned to back off, feel what was going on in my body and work smarter, not harder. When I stopped pushing myself so hard, my progress in forward bends developed quickly. I paid more attention to my alignment and to my breath. I cannot remember the day when I was finally able to touch the floor in a standing forward bend because the goal became so much less important than the process.

Are we sensation junkies? Do we push ourselves too hard to feel something? In our effort to feel something, are we not feeling what is already there? Perhaps what we need to feel in our bodies is a greater sense of ease. My Iyengar teacher would say that most students cannot differentiate between pain and a stretch. I know she was right in my case. Where are we trying to get to? What's the rush? Are we so focused on getting somewhere that we cannot appreciate where we are right now? Let me know where you are frustrated. Write in a comment below.

Do you have pain in your body when you are practicing yoga? Are your frustrated with your progress or perceived lack of progress? I would be happy to help you explore these questions. If you are interested, you can always schedule a private with me. Contact me by clicking here.

Several people have expressed interest in learning more about what is going on under their skin while they are doing yoga poses, without having to go through a teacher training program. I am in the process of putting together an experiential anatomy workshop for anyone who is interested in learning more about their anatomy while doing yoga. If this is something that you would be interested in, please leave a comment below. What three things would you like to learn about your body in yoga?

Pinca Mayurasana – a preparatory shoulder stretch

Pinca Mayurasana

I have many favorite warm ups for this Forearm Balance Posture. One of them is this stretch over a chair. You have to have a chair with the back removed, otherwise it won’t work. Make sure the chair is on a mat so it won’t slide out from under you. Place a blanket over the chair seat to pad the back of your shoulder blades. Sit in front of the chair, facing away from it. Lean back (if this is too much of a trust exercise for you, you can sit on two blocks or a bolster to make it easier to lean back) and place your head and shoulder blades on the chair. Once you are secure on the chair, lift your hips up in the air so your torso is parallel to the floor. Use one of your hands to feel that the top of your head is lined up with the back edge of the chair seat. This is important; otherwise it won’t be a stretch in the right place! Once you are lined up, thread your arms through the chair back, reach down and grab the back rung of the chair. Take your hands wide on the back rung. The sides of the chair will not let your elbows splay out. Start with your body parallel to the floor. With your breath, gradually allow your seat to begin to drop towards the floor. You should not be able to touch the floor. If your block or bolster is in the way, you might want to remove it. It is nice to have it there when you want to come down, however. Hold the stretch for five breaths and then release down and rest. You can try it again, if you want. I like to do it three times. Each time I try to move my body so that my back is getting leveraged in a slightly different spot over the front edge of the chair seat. That does mean that one time my head is slightly past the back edge of the chair and the third time, my head is in a little form the edge of the chair seat. Be careful, this can be a big stretch. You don’t want it to move towards a painful stretch.

If you are not sure about it, please ask. Ok? I’ll see you in class! Karin

Triangmukaikapada Pascimottanasana

Trianga1-300x225.jpg

If you look at one side of this pose, it looks like Child’s Pose.

Pascimottanasana

If you look at it from the other side, it looks like Seated Forward Bend. That tells you something about perspective, doesn’t it?

While both postures are basically forward-folding, introspective postures, Seated Forward Fold exerts a stronger pull on your hamstrings, and Child’s Pose requires a deep bending at the knee and pointing of the feet. If your body is tight or resistant in those areas, this pose can be quite daunting. Asymmetrical postures are always more challenging in that way. If you find that to be true for our pose of the month, try practicing Child’s Pose and then Seated Forward Bend separately.

I am a big fan of the divide-and-conquer school of practicing yoga poses. If both parts of the posture are hard for you, start with the easier one. Keep trying the harder part, but you don’t need to do both of them together until at least one of them feels more comfortable.Save

A Sequence for Parivrtta Trikonasana

Let’s look at some postures to prepare you for Revolved Triangle.

Lunge Twist

I like to start in an easy Lunge Twist to warm up the spine for rotating.

Side Angle Pose

Next, I would progress to Side Angle Pose.  This is a good pose to get some length in the side waist.

Triangle

Triangle stretches the hamstrings in the front leg and warms them up for a deeper stretch in our pose of the month.

Wide Legged Forward Fold

Next I would begin working the hips square.  Try a Wide Legged Forward Fold and after holding this pose for a few breaths, lift the torso so the spine is parallel to the floor.  Keep one hand on the floor under the chest and lift the other arm up and out to the side twisting to look up at the top hand. Keep the hips level as you twist and keep the spine in a long straight line form tailbone to top of head.

Pyramid Pose

Next, I would do Crescent Lunge, followed by Pyramid Pose.

Easy Revolved Triangle

From Pyramid Pose you can open up into Easy Revolved Triangle, the bottom hand on the inside of the front leg, or full Revolved Triangle,  bottom hand crosses over the forward leg and gates the outside of the shin. Remember to keep your spine long and your breath full.  Be mindful to use the arms for stability and not leverage.

Let me know how this sequence works for you.  I’ll see you in class!   Karin