Pose of the Month

Pose of the month for July - Visvamitrasana

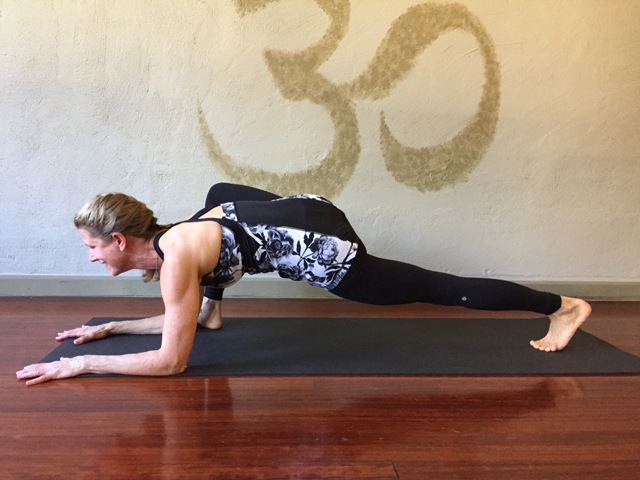
Karin in Visvamitrasana

This pose is named after an ambitious king who became a sage by a lot of hard work. This pose is a variation of Vasisthasana, who was the sage that king Visvamitra was trying to outdo. The yoga pose reflects the story behind it; Visvamitrasana is a much harder posture than Vasisthasana, better known as Side Plank. This posture incorporates the elements of a standing pose (think Hand to Big Toe Pose), an arm balance (Side Plank), a big side stretch (Gate Pose), a big twist (Revolved Seated Tree) and a major hamstring stretch (Split). Don’t look at that list and get intimidated. It just means that we will work on all of those elements, bit by bit, to get to the final pose. There are also many variations, options for props and entry level versions on the way. We will just take it one step at a time and warm up to the final pose. As we work on Visvamitrasana this month, remember: “It’s nice to have and end to journey toward, but it is the journey that matters in the end.” – Ursula LeGuin.

I can’t wait to get started! I’ll see you in class. Karin

Pose of the Month – Natarajasana, or Dancer's Pose

Dancer-web-large.jpg

Nata means dancer
Raja means lord or king.

Natarajasana, is the name of the pose dedicated to Lord Shiva, the Lord of the Dance. In his Himalayan abode on Mount Kailasa and in his southern home, the temple of Chidambaram, Shiva is said to dance. The god created over a hundred dances, some calm and gentle, others fierce and terrible. The tandava is the fierce, violent dance, signifying the destruction of self-limiting awareness; and lasya is the gentle, lyric dance in which Shiva reveals the beautiful, loving, and tender aspects of existence. Shiva, as Lord of the Dance has inspired some of the finest Indian bronzes and sculptures.

As we prepare for Natarajasana this month we will need both fierceness and playfulness.

Natarajasana is quite an advanced pose. Mr Iyengar rates it a 58/60; one of the most advanced poses in Light on Yoga. To prepare for it we need to open the front body: the shoulders, heart, belly and the fronts of the thighs – quads and psoas. We also need to strengthen the back body: the glutes, hamstrings, middle and upper back. We also need to find strength and stability without rigidity combined with a grounded sense of playfulness and open-heartedness.

There are 2 version of Dancer’s Pose that make this asana more accessible to every student. One is what I would call Baby Dancer where you reach back for the bent leg with your arm behind you as in Bow. The gateway pose for this version is Bow Pose. The full version of Dancer’s Pose is where your arms reach over your head for the bent leg foot. The gateway pose for this version is Dwi Pada Viparita Dandasana (Wheel on your forearms with your legs straight).

Notice how both of the poses I mention as gateway poses are symmetrical postures. That is because it is much easier to do symmetrical poses than it is to do asymmetrical poses. Once these poses are mastered you can begin to play with asymmetrical versions of these poses.
Another important pose for this sequence is Virabhadrasana III, or Warrior III. The ability to balance on one leg gives us the strength and steadiness for Natarajasana.

Let’s approach this posture fiercely and playfully. Come to practice ready to work and play. I’ll see you in class! Karin

Growing a Lotus

Karin in Padmasana

“May I learn to live like the lotus flower, content in muddy water.”

Lotus Posture, or Padmasana, is one of the quintessential yoga poses.  You can just picture a yogi sitting with legs crossed, eyes closed and meditating blissfully.  Ironically, Lotus is not a pose that is taught very frequently in yoga classes; at least in Western yoga classes.  Most Westerners have tight hips and cannot do this pose.  Some yoga studios caution against teaching it because people hurt their knees by trying to force themselves into the pose.

With that caution, we will work on Lotus this month. I recommend that you proceed mindfully and pay attention to your knees.  There is a modification for every pose.  (The basic modifications for Lotus are: Easy Pose, Half Lotus and Double Pigeon.)  If you feel any strain in your knees, back off, take a modification and let it go until the next time when you can try again. This is the muddy water referred to in the quote; being okay when things don’t work out as you planned, or when things don’t happen when you want them to. Wait. Patiently. All is coming.

Below is a list of some of the poses we will be working on to help us get into Lotus Pose this month.

Easy Crossed Legs Pose
Warrior II
Side Angle
Triangle
Tree
Standing Half-Lotus Forward Bend
Frog
Gate Pose
Pigeon
Double Pigeon
Cobbler’s Pose
Seated Wide Leg Forward Bend
Revolved Seated Tree
Seated Half Lotus Forward Bend

Pose of the Month - One Arm Handstand

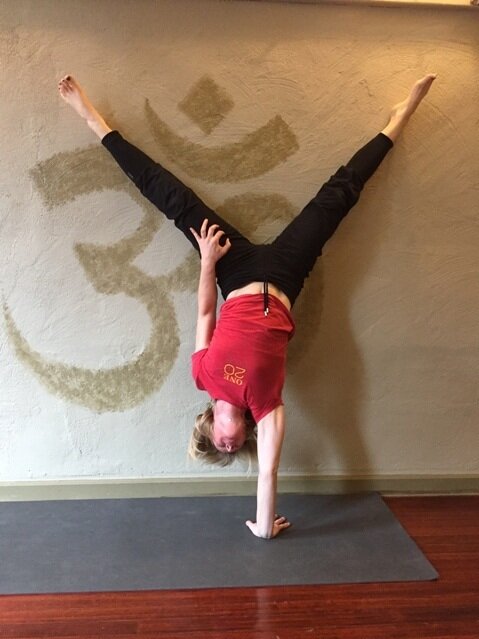
Anna in One Arm Handstand

Anna in One Arm Handstand

Practicing Inversions.
Developing Equanimity.

One of the things that makes yoga different from any other form of exercise is the practice of going upside down. Inversions are not for everyone and there are precautions to follow to be safe.  The body has to be trained by the other poses and the student has to develop the awareness and sensitivity to know where the body is in space and what it is doing.   But, inversions are very internalizing postures and they powerfully focus the mind.

Balancing postures, in general, develop poise.  Hand balancing poses such as handstand build confidence and strength.  Because our upper limbs metaphorically connect us to each other, arm balances can strengthen these connections as well as help us maintain healthy boundaries.  Hand balances can be very empowering postures, but they can also be very intimidating to new students.  It is important to practice patience and proceed with caution.

While there is a certain amount of upper body strength required to move into Handstand.  The posture is not as much about hard work and pushing, as much as it is about moving toward ease.  The first thing to learn is to let go of fear and anxiety and begin to learn to find balance in the center of the skeleton.  Think of stacking your bones like so many building blocks.  In Handstand, you line up your forearms right under your upper arms so that your elbows are articulating in full extension and straightness.  When your upper arms are in line with your torso and your torso is in line with your legs, your skeleton maximizes your ability to support your weight.  This articulation takes some time to reach since your joints need to open up and your muscular body needs to support you.  It is important to master this basic skill before moving into the pose variations.  The flexibility to extend the arms in line with the torso is developed in the various positions of the arms in the standing poses.

While the pose of the month is one arm Handstand, it is important to work up to it progressively.  The action of the arms starts in Child’s Pose, progresses to Downward Facing Dog and moves into two arm Handstand.  As a rule of thumb, it is a good idea to be able to hold regular Handstand for a full minute with your arms completely straight, stacking the bones for stability and ease before you think about trying to balance on one arm.  Other benchmark skills are one minute Side Plank and the ability to do pushups.

Last month when we were working on Astavakrasana, one student finally got into the pose after 15 years of practice.  When I was searching up one arm Handstand online, I read one person’s story about how it took him 14 weeks of practicing four to six hours a day, six days a week.  Results are faster the more you practice, but this is just to remind you not to expect results in one day.  Whether your goal is to get into Handstand or one arm Handstand, patience and perseverance are important.  And, achieving the pose is not important.  As Krishna says to Arjuna in the Bhagavad Gita:

You have the right to your actions,
But never to your action’s fruits.
Act for the action’s sake.
And do not be attached to inaction.

Self possessed, resolute act
Without any thought of results
Open to success or failure.
This equanimity is yoga.
BG 2.47-48
The Benefits of Astavakrasana

Astavakrasana-SC-web-thumb.jpg

Why should we do this pose and what should you do if you can't do it?

If you look in Light on Yoga, Mr. Iyengar says that this pose strengthens the wrists, arms and tones the abdomen.  Surely there are other easier exercises that we can do to get those same results.  But, there is something empowering about the ability to support your body weight on your hands.  You don’t have to do Astavakrasana at all.  Ever.  But, take a look at the poses under each of the individual skills that build up to making this pose and see what you can work on.  Who knows, one day you may surprise yourself!

There are no poses that are absolutely mandatory to do.  But a lot of poses are just progressions of what is possible in strength and flexibility.  Yoga tests our limits, the edges of our comfort zones and where we are stuck.  One of my teachers always says, "In an ever expanding universe, there is always more."  For some that can be overwhelming, but it is not meant to be.  Can you just take a peak around the next bend?  Can you take the next step towards something?  We all know the concept that a business has to grow in order to continue.  How about ourselves?  What happens to us if we don’t continue to grow?  The Bhagavad Gita teaches us to take the actions for the sake of being alive but to let go of the fruits of our actions. There is no pressure to perform, you just show up and do the next thing.

Like any large task that is overwhelming, you can break it down into its smaller components.  Let’s take Astavakrasana  apart and look at each piece.  Work on each component without any thought of the next step until you get there.

Hip flexibility: Getting your leg over your shoulder.

Lizard-Lunge-R-web-large.jpg

If you can do Side Angle Pose, can you do Bound Side Angle Pose?  If you can't do Bound Side Angle Pose, try Lizard Lunge.  After Lizard Lunge, can you now approach Bound Side Angle Pose better?  What would happen if you were to try Lizard Lunge every time you practiced?  In Lizard Lunge we are working the hip flexibility to be able to get the shoulder under the thigh; this is the flexibility you need to bind in Side Angle Pose.  The ability to bind in Side Angle Pose is the same flexibility to get the leg over the shoulder in Astavakrasana.  Notice in this picture that you can see my right knee above my back.

Shoulder Flexibility: The ability to bind the arms.

Uttanasana-with-Yoga-Mudra-web-large.jpg

One of the poses I like to do in almost every class is a forward fold with the hands clasped behind the back.  Because everything is our lives is usually oriented in front of us, we tend to constantly be reaching forward.  This and poor posture causes our shoulders to round forward.  Stretching the arms behind the back stretches the front of the shoulder.   This is the first step in the flexibility to bind.  Practicing Marichyasana I is a good pose to work on your bind.

Marichyasana-I-web-large.jpg

Twisting: the ability to connect your opposite elbow and knee together.

Parsva-Bakasana-head-on-web-large.jpg

A twist is defined as the hips and shoulders rotating 90 degrees from each other.  Usually one part of the body stays still while the other part rotates.  One of the aspects of a lot of twists in yoga is the ability to connect your knee with your opposite elbow.   Think of the ab exercise we call bicycling, where you are lying on your back and your curl your head and shoulders of the ground with your fingers interlaced behind your head and you try to touch your elbow to your opposite knee: your hips stay stationary and your upper body curls and rotates your shoulders.  You will see this same action in Revolved Side Angle Pose, Side Crow and Seated Twists.

Upper body strength: the ability to do a Low Push Up.

Caturanga-KE-web-large.jpg

In Vinyasa classes, this is a pose appears a lot, but very few students do it correctly.  It forms the foundation of most arm balances.  I think most yoga students look for the flexibility in their yoga poses and are not as interested in the strength part.  Strength without flexibility is rigidity.  Flexibility without strength is instability. In yoga, as in life, we need both.  As we work on a Low Push up, we will also work on a High Push up, Side Planks and Reverse Planks.  Reverse Plank works on both shoulder strength and flexibility

Core strength: The ability to lift your lower body of the ground.

Astavakrasana-seated-version-web-large.jpg

As I teach my students in anatomy training: Our arms connect us to each other and our legs connect us to the earth.  Our core integrates the upper body and lower body together.  If  we are lacking a strong core, we risk injuring ourselves.  Boat pose is a great core strengthening posture.  If you add a twist to Boat Pose, you basically have the seated version of Astavakrasana.

The strength of the inner thighs; the ability to squeeze your legs to the midline.

Astavakrasana-arm-detail-web-large.jpg

Drawing into yourself is a challenging thing to do.  Ask most people if they meditate.  While they want to, it is not easy to do.  We are so outwardly directed.  Hugging to the midline is the physical action of drawing inward, of trusting our own instincts.  Being able to draw your legs in towards the midline is the key to balancing your legs on your bent elbow in Astavakrasana.  When things get difficult in a yoga pose, rather than turning inward to their own strength, they let go and move outward away from their core.  This is the same reason why it is difficult to sit in meditation, the lure of the outer world seems more important and better than the inner world.  Being able to hug your legs together  as you tip your head and torso forward in this pose is scary.

Your legs should hug towards the midline in almost every yoga pose that you do.  Try doing Warrior II with your front foot on a sticky mat and your back foot on a blanket.  Start with your feet together, front foot turned out 90 degrees and back foot perpendicular to the front foot.  Let your back foot slide back a few inches and then draw it in.  Don’t go too far at first, or you may strain yourself.  Go progressively further as you get stronger making sure that your back toes don’t turn out.  If your back toes turn out you will use your glutes and in this case you want to use your inner thigh muscles.

As one of my teachers in art school used to quote Mies van der Rohe all the time:  "Develop an infallible technique and put yourself at the mercy of Inspiration."   Keep practicing.  I'll see you in class!

Karin

March Pose of the Month - Astavakrasana

Astavakrasana-SC-web-large.jpg

Astavakra is the name of a sage.  While still in his mother’s womb, he heard his father make several mistakes while reciting the sacred Vedas.  Hearing these, the unborn sage laughed.  The father became enraged and cursed his son to be born deformed, or crooked in eight places – Asta means eight and vakra means a crook, or a kink - literally eight crooks.  Astavakra’s father had been defeated in a philosophical debate by a scholar named Vandi.  When Astavakra became a sage and a great scholar he defeated Vandi avenging his father’s defeat.  Astavakra’s father then blessed him and he lost his deformity.

Astavakrasana was the first arm balance I learned, after Headstand, Handstand, Shoulderstand and Forearm Balance.  Perhaps that is the correct order of poses to learn before trying this arm balance.  I could do Astavakrasana way before I could do Crow.  I found it easy.  I wasn’t afraid of it the way I was of Crow, where I could fall on my face.  If I fell in Astavakrasana it seemed I just crumpled to the floor.  I was more confident in Astavakrasana.  This makes me think of what other qualities you need to bring to your poses besides strength and flexibility.  To do this pose of the month you do need the strength of a good, solid Caturanga, you also need the flexibility to twist – so you will see a lot of that in classes this month.  But, in order to attempt a posture like Astavakrasana you need courage to try.  You need the fearlessness of not being afraid to fall – and of putting a blanket down as a crash pad to help you overcome that fear.  You also need the confidence in yourself.   Those are the yang, or masculine qualities you need for this arm balance.  You also need some yin, or feminine qualities such as enthusiasm, playfulness and yielding.  While you need to bring these qualities to your practice of  Astavakrasana, this arm balance will also bring out these qualities in you.  Are you ready for a month of working playfully?  I’ll see you in class!    Karin

2017 Postures for the Year

The following is a list of the Postures of the Month for 2017.

January - Plank poses and all of their variations:  High Plank, Low Plank, Side Plank, Reverse Plank, Handstand and Headstand.

Karin in Vasisthasana

Karin in Vasisthasana

February - Dwi Pada Viparita Dandasana or Kapotasana - Wheel on your forearms or Full Pigeon

Kapotasana by Cailen Ascher

Cailen in Kapotasana

March - Astavakrasana - Eight crooked places pose

Karin in Astavakrasana

Karin in Astavakrasana

April - Eka Hasta Adho Mukha Vrksasana - One arm Handstand

(Pic Coming Soon)

May - Padmasana - Lotus

Karin in Padmasana

Karin in Padmasana

June - Natarajasana - Dancer's Pose

(Pic Coming Soon)

July - Visvamitrasana or Hanumanasana -  Side Plank, bottom leg lifted or Split

Karin in Visvamitrasana

Karin in Visvamitrasana

August - Prasarita Padottanasana to Sirsasana II -  Wide-Leg Forward Fold to Headstand

Karin in Sirsasana II from Prasarita Padottanasana

Karin in Sirsasana II from Prasarita Padottanasana

September - Salabhasana/Locust

(Pic coming soon)

October - Eka Pada Koundinyasana I

Karin in Eka Pada Koundinyasana I

Karin in Eka Pada Koundinyasana I

November - Dancing Warrior Series

(Pic coming soon)

December - Choice of Restorative Pose

Karin in Supta Virasana

Karin in Supta Virasana

Pose of the Month – Kapotasana

Kapotasana by Cailen Ascher

Kapotasana by Cailen Ascher

In Light on Yoga, Mr. Iyengar rates Kapotasana, or Full Pigeon a  21/60.  He rates One-Legged Pigeon pose as a 28/60.  Yet, you tend to see One-Legged Pigeon pose more frequently than you do the full pose.  Why is that?

There are versions of One-Legged Pigeon pose that are available to most people.  While we might do One-Legged Pigeon with a thigh stretch, most students don’t do the full pose, where you grab your back foot with your arms overhead and rest your head on your foot.  The versions where you don’t hold the back foot are easier.

But there is something to the ordering of the postures.  Full Pigeon is not an easy posture, but since it is symmetrical, it is easier on the body than its asymmetrical relative.  If you can do full pigeon, it is easier and safer to work on that rather than One-Legged Pigeon.  The difficulty with asymmetrical postures such as One-Legged Pigeon is that one leg is in a forward bend, the other leg is in a back bend and the pelvis takes all the stress if the hips cannot be maintained in a square and neutral position.  In order to be able to protect our spines we want to move from the big joints first.  That means that the hips and shoulders need to be open before we move the spine.

As we work on Kapotasana this month, let’s focus less on the end result of a particular pose, but rather we can work on opening the body in preparation for any back bend.

Let me suggest the following progression, not as a sequence but as an order of accomplishment:  Cobra, Locust, Bow, Camel, Wheel, Full Pigeon, One-Legged Pigeon.

Backbends are considered heart opening postures because of the lift in the chest.  Kind of appropriate for February, don’t you think?   I’ll see you in class!   Karin

It’s Ten O’clock.  Do you know where your feet are?  

The original question, “It’s 10:00 pm, do you know where your children are”, somberly intoned just prior to the local news, was eventually parodied by a multitude of stand-up comedians, novelty song artists, and horror movie posters. But the original intent of the line was very serious. The phrase shows up in lots of places.  I have to admit I like to use it in my yoga classes, particularly to draw a student’s attention to a leg that is raised behind them or some other body part they cannot see.  Often the body part is hanging out behind them kid of lifelessly.

In yoga poses, the whole body should be participating.  Yoga means union of mind body and spirit.  We do our yoga poses with our whole bodies.

Often beginners can only pay attention to one body part at a time, but as we progress, and our practice becomes more integrated, we can cast our attention over our whole body.  While this is relevant in all poses, this week I will talk about having your attention on your feet while we are doing planks.

While most planks are felt in the arms or the core, the more the legs and feet work, the easier the postures are to hold.  When the feet and legs are strong, it is easier to keep the core engaged.  One of your core muscles, the psoas, attaches to your lumbar spine and to the upper inner aspect of your thigh bone.  If the legs aren’t activated, this muscle is not activated.  In my Yoga Teacher Training Program, we study the muscles one at a time as if you could activate one muscle and not the one next to it.  But the body doesn’t work that way.  The muscles are often affected by the surrounding muscles.  If you activate the feet and legs in plank, they help to hold the whole body up.  Imagine the difference in picking up a sleeping child as opposed to a child who is actively participating in being picked up.  One is a limp pile succumbing to gravity and the other one helps you.

Here is an example of what I often see student’s feet doing in Side Plank:

Vasisthasana-feet-collapsed-web-large.jpg

Here is what they could be doing:

Vasi-feet-engaged-weblarge.jpg

Here is what I often see from behind when students are in Plank:

Plank-feet-splayed-web-large-e1485133871101.jpg

Here is a picture of feet and legs actively participating in Plank Pose:

plank-feet-engaged-web-large-e1485133938878.jpg

Do you know what your feet are doing in these poses?  Working your feet and keeping your legs engaged will help you in your plank.

Come to class.  I’d be happy to help you.

Vinyasa Pose of the Month for January – Planks

Yoga is a balance of strength and flexibility.  We need to be strong but not rigid.  Being strong gives us a firm foundation and clear boundaries.  Being rigid keeps us stuck, frozen in one place.  In being flexible, we need to be resilient, able to change and go with the flow, but not so flexible that we can be pushed over.  This is as true in our yoga postures as it is in life.

Vasisthasana-KE-web-large.jpg

We will begin this year by developing our strength by working our core in the various forms of Plank Pose.  Our core connects our upper body and lower body together, protecting our spine and integrating our postures. Think of Plank Pose as Tadasana in alternate relationships to gravity using different arm positions.   Tadasana is the first version of Plank.  Use this posture to check your alignment for each of the other versions.  Each version of Plank should still look like Tadasana.

There is Plank pose with the arms held straight out in front of the body.  You can do Plank pose on your hands or on your forearms.  The forearm version is not just for people who have wrist issues.  When practicing Forearm Plank, make sure that you keep your forearms parallel.  In either version of Plank, make sure your hips are in line with your body, not high like a tent and not low like a hammock.  There is also a moving version of Plank called “walking plank”.  This is where you transition back and forth from Plank on your hands to Plank on your forearms, one arm at a time.

Caturanga Dandasana, or Low Plank is a harder version of Plank and relies more on upper body strength than just core.  Make sure that your elbows are stacked over your wrists and your shoulders are kept in line with your elbows as you hold this pose.

The next version of Plank Pose is with the arms straight out from the shoulders in the side plane.  This is Side Plank or Vasisthasana. It works your oblique muscles, or the abdominal muscles that wrap around the side of your body.  Even though the body is tipped over sideways, it should still look like you are holding Tadasana.  Don’t sag or arch!

You may have never thought of Handstand as a version of Plank, but it is Plank with the arms overhead.  Again the body should look the same way it does in Tadasana.  It should not look like a banana.  If the ribs flare out you have lost your core.  Of course, there is a Scorpion version of Handstand that is more difficult.

Reverse Plank is the last version, with the arms in the back plane of the body.  This works the muscles in the back plane of the body including your hamstrings and glutes.  People often think of core as just abs, but the posterior chain muscles are just as important to keeping our spine stabilized, supported and our posture well integrated.

Working our core in these versions of Plank Pose will set us up for a great beginning to a New Year!

I’ll see you in class!

Karin